(fiddled with links to take people to the tabber instead of individual tab pages) |
mNo edit summary |
||
| (12 intermediate revisions by 6 users not shown) | |||
| Line 1: | Line 1: | ||
| − | |||
| − | |||
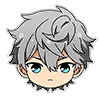
Management is a feature that allows you to level up cards, gain affection points, and collect jewels and Yumecoins. Note that you may only manage students from Yumenosaki Academy—'''this means that cards of the teachers, Eden, or any other collaboration characters cannot be managed.'''<br /><br /> |
Management is a feature that allows you to level up cards, gain affection points, and collect jewels and Yumecoins. Note that you may only manage students from Yumenosaki Academy—'''this means that cards of the teachers, Eden, or any other collaboration characters cannot be managed.'''<br /><br /> |
||
When you first open the Management page, you will only be able to manage one card at a time. Once you have completed 5 management courses, the second character slot will be unlocked, allowing you to manage 2 separate cards at the same time. Note that if you would like to manage 2 cards at once, they must be of different characters. Currently, you can manage up to 2 cards at once, for a maximum time of 8 hours each.<br /><br /> |
When you first open the Management page, you will only be able to manage one card at a time. Once you have completed 5 management courses, the second character slot will be unlocked, allowing you to manage 2 separate cards at the same time. Note that if you would like to manage 2 cards at once, they must be of different characters. Currently, you can manage up to 2 cards at once, for a maximum time of 8 hours each.<br /><br /> |
||
| Line 6: | Line 4: | ||
<br /><br /> |
<br /><br /> |
||
| − | + | ==<font size='5'>Management</font>== |
|
| − | ---- |
||
[[File:Management_Room.png|center|600px]] |
[[File:Management_Room.png|center|600px]] |
||
| Line 18: | Line 15: | ||
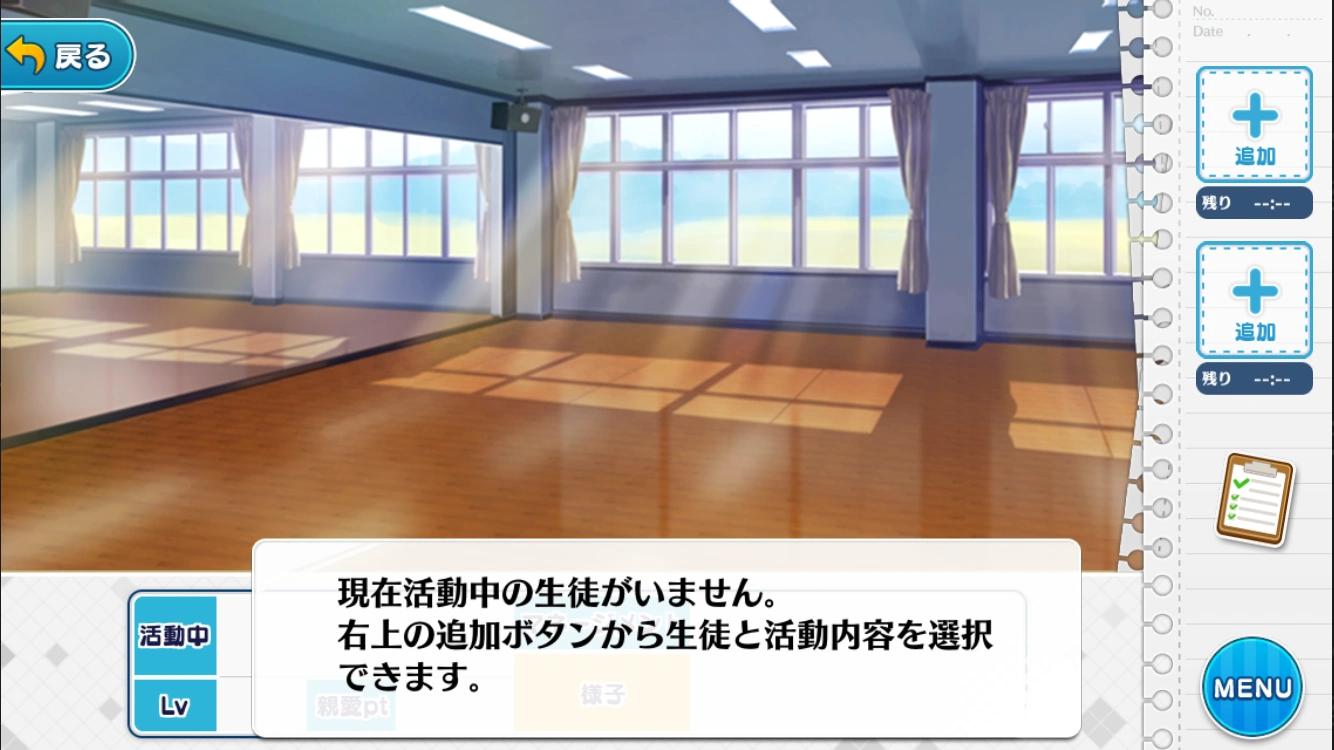
<ol>'''1.''' Click on the blue + sign button to go to the card selection screen |
<ol>'''1.''' Click on the blue + sign button to go to the card selection screen |
||
</ol> |
</ol> |
||
| − | <br /> |
||
[[File:Management_Contents.png|center|600px]] |
[[File:Management_Contents.png|center|600px]] |
||
| − | <br /> |
||
| − | <ol>'''2.''' Click the yellow Change button to select a card. This will bring you to your card list, meaning that cards in the album cannot be chosen. Choose the card that you wish to manage.<br /><br /> '''3.''' ''(Optional)'' You can set a Management Item by clicking on the white button in the left box. Currently, the only Management Item is the Schedule Book, which is used to increase the number of Jewels and Yumecoins earned during Management, as well as raise the chance of a Conversation Event occurring upon the completion of the course. This item is consumed once the course is completed, and cannot be used again.<br /><br /> '''4.''' Select the Management Course you wish to do from the list at the right of the screen. The number in the left of the box indicates how long the course will last. The number on the right shows how many times that course has been completed. The number in gray, at the bottom of each box, shows how much AP each course costs. (You will get 10 times the amount of AP you spend as EXP afterwards, e.g. 400 EXP for a 40 AP course.)<br /><br /> In order to unlock more Management Courses, you must complete each course a certain amount of times. A full [[#List of Activities]] and their unlocking conditions can be found at the bottom of this page.<br /><br /> '''5.''' Once you have selected your desired Management Course, click the yellow button at the bottom right to start the course. This will bring you to your character performing whatever action you have assigned to them.<br /> |
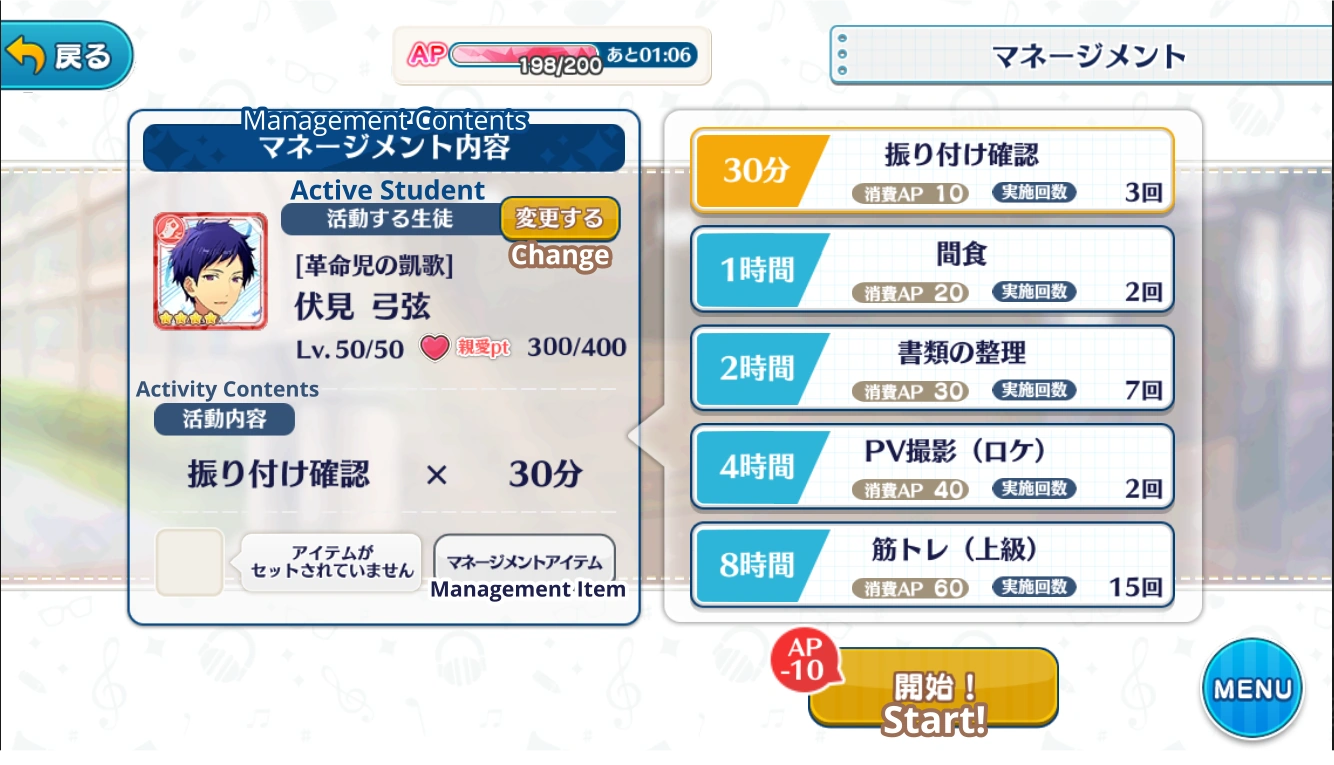
+ | <ol>'''2.''' Click the yellow Change button to select a card. This will bring you to your card list, meaning that cards in the album cannot be chosen. Choose the card that you wish to manage.<br /><br /> '''3.''' ''(Optional)'' You can set a Management Item by clicking on the white button in the left box. Currently, the only Management Item is the Schedule Book, which is used to increase the number of Jewels and Yumecoins earned during Management, as well as raise the chance of a Conversation Event occurring upon the completion of the course. This item is consumed once the course is completed, and cannot be used again.<br /><br /> '''4.''' Select the Management Course you wish to do from the list at the right of the screen. The number in the left of the box indicates how long the course will last. The number on the right shows how many times that course has been completed. The number in gray, at the bottom of each box, shows how much AP each course costs. (You will get 10 times the amount of AP you spend as EXP afterwards, e.g. 400 EXP for a 40 AP course.)<br /><br /> In order to unlock more Management Courses, you must complete each course a certain amount of times. A full [[#List of Activities]] and their unlocking conditions can be found at the bottom of this page.<br /><br /> '''5.''' Once you have selected your desired Management Course, click the yellow button at the bottom right to start the course. This will bring you to your character performing whatever action you have assigned to them.<br />[[File:Management_In_Progress.png|center|600px]] |
<br /> You can check back in on them at any time during the duration of the course by clicking the orange Management button in the Home Menu. Management occurs in the background of the app, so you are free to do whatever you would like while it is running. In fact, time will continue to progress even when the app is closed. |
<br /> You can check back in on them at any time during the duration of the course by clicking the orange Management button in the Home Menu. Management occurs in the background of the app, so you are free to do whatever you would like while it is running. In fact, time will continue to progress even when the app is closed. |
||
<br /><br /> '''Tip:''' Management is a great way to spend AP when you know you will not be playing the game for a few hours. You can set two 8-hour management courses to run in the background while you sleep, for example. This will consume 120 AP, which takes 6 hours to refill, allowing you to not worry about letting your AP sit full for several hours.<br /><br /> '''6.''' The Management Course will complete once its time duration is over. Note that you will receive a phone notification that a course has been completed. You will also see a red exclamation point (!) on the Management button in the Home Menu once a course has been completed. Click on the Management button to see the results of your managing.<br /><br /> There is a chance that you will unlock a Conversation Event upon completing a Management Course. Each character has a few of these events that they can make an appearance in. A full [[#List of Conversation Events]] can be viewed in the Management Details screen.<br /><br /> '''7.''' Once you have completed five (5) Management Courses, the second character slot will unlock. This allows you to manage 2 cards simultaneously. |
<br /><br /> '''Tip:''' Management is a great way to spend AP when you know you will not be playing the game for a few hours. You can set two 8-hour management courses to run in the background while you sleep, for example. This will consume 120 AP, which takes 6 hours to refill, allowing you to not worry about letting your AP sit full for several hours.<br /><br /> '''6.''' The Management Course will complete once its time duration is over. Note that you will receive a phone notification that a course has been completed. You will also see a red exclamation point (!) on the Management button in the Home Menu once a course has been completed. Click on the Management button to see the results of your managing.<br /><br /> There is a chance that you will unlock a Conversation Event upon completing a Management Course. Each character has a few of these events that they can make an appearance in. A full [[#List of Conversation Events]] can be viewed in the Management Details screen.<br /><br /> '''7.''' Once you have completed five (5) Management Courses, the second character slot will unlock. This allows you to manage 2 cards simultaneously. |
||
</ol> |
</ol> |
||
| − | <br /> |
||
| + | |||
| − | ===<font size='5'>Management Details</font>=== |
||
| + | |||
| − | ---- |
||
| + | ==<font size='5'>Management Details</font>== |
||
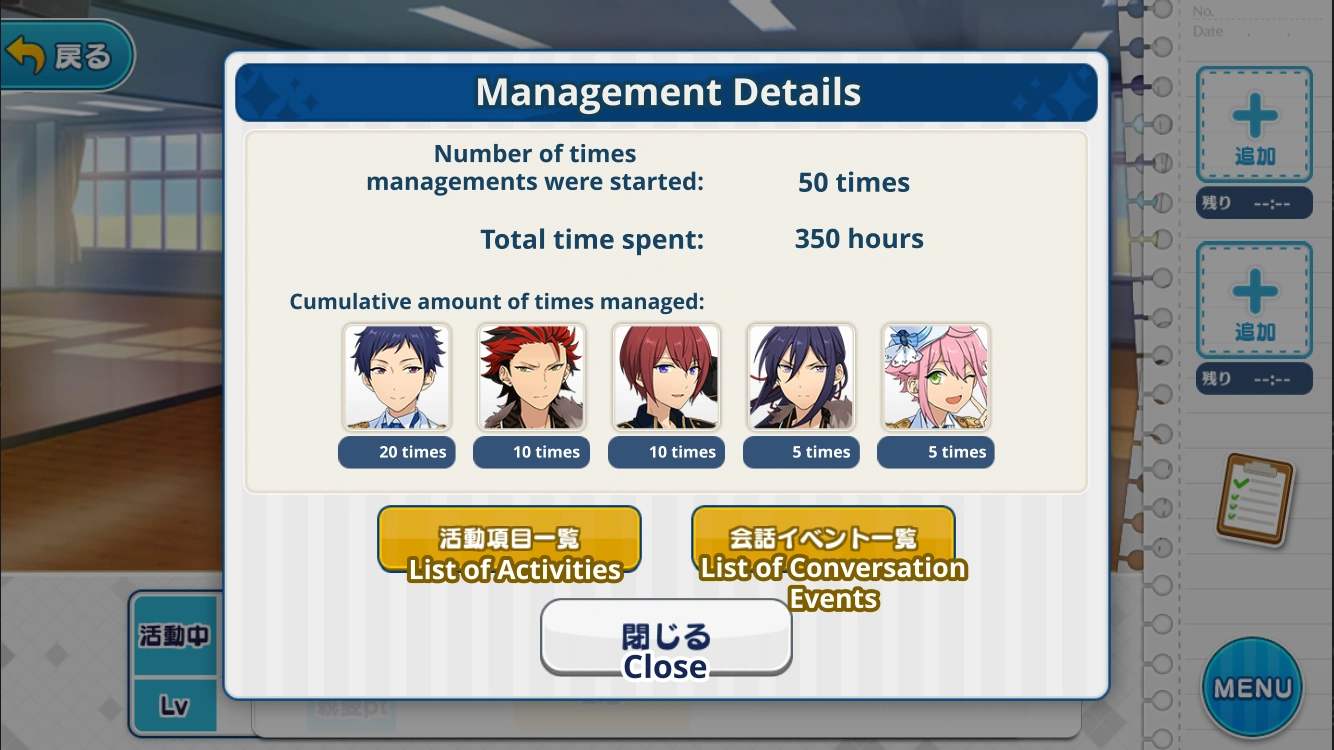
To access this menu, click on the clipboard icon in the main management screen. |
To access this menu, click on the clipboard icon in the main management screen. |
||
[[File:Management_Details.png|center|600px]] |
[[File:Management_Details.png|center|600px]] |
||
| Line 40: | Line 35: | ||
*'''List of Activities:''' Shows you the full List of Management Activities. It will also display which courses you have unlocked, and which courses you have yet to unlock. |
*'''List of Activities:''' Shows you the full List of Management Activities. It will also display which courses you have unlocked, and which courses you have yet to unlock. |
||
*'''List of Conversation Events:''' Shows you the full List of Conversation Events, and allows you to reread the ones you have unlocked through management. |
*'''List of Conversation Events:''' Shows you the full List of Conversation Events, and allows you to reread the ones you have unlocked through management. |
||
| − | <br /> |
||
| − | ===<font size='5'>List of Activities</font>=== |
||
| − | ---- |
||
| + | |||
| − | {| class="mw-collapsible mw-collapsed" align="center" style="border:1px solid #C8B890; border-top:none; border-bottom:none; width:100%; text-align:center;" |
||
| + | |||
| − | ! colspan="6" style="background:#0086b3; color:#fff; font-size:14px; padding:3px 10px;" |'''List of Activities''' |
||
| + | ==<font size='5'>Management Items</font>== |
||
| + | {| class="article-table" border="1" align="center" width="100%" style="text-align:center;line-height:16px; font-size:small;" |
||
| + | ! style="background-color:#0086b3; color:#fff;" align="center"|Item |
||
| + | ! style="background-color:#0086b3; color:#fff;" align="center"|Effect |
||
| + | ! style="background-color:#0086b3; color:#fff;" align="center"|How to obtain |
||
| + | ! style="background-color:#0086b3; color:#fff;" align="center"|Expires |
||
| + | |- |
||
| + | | [[File:Schedule Book.png|50px]]<br />'''Schedule Book''' |
||
| + | | Increases the number of Jewels and Yumecoins earned during Management, raises the chance of a Conversation Event occurring upon the completion of the course. |
||
| + | | Special campaigns |
||
| + | | Never |
||
| + | |} |
||
| + | |||
| + | |||
| + | |||
| + | ==<font size='5'>List of Activities</font>== |
||
| + | {| class="article-table sortable" align="center" border="1" style="width:100%; text-align:center;" |
||
| + | ! colspan="3" style="background:#0086b3; color:#fff; font-size:14px; padding:5px 10px;"|<center>'''Activity Speeds'''</center> |
||
| + | |- class="article-table" style="line-height:20px;" |
||
| + | !Management Duration |
||
| + | !EXP per hour |
||
| + | !Affection Pts per hour |
||
| + | |- |
||
| + | |'''30 mins''' |
||
| + | |200 |
||
| + | |2 |
||
| + | |- |
||
| + | |'''1 hr''' |
||
| + | |200 |
||
| + | |1 |
||
| + | |- |
||
| + | |'''2 hrs''' |
||
| + | |150 |
||
| + | |0.5 |
||
| + | |- |
||
| + | |'''4 hrs''' |
||
| + | |100 |
||
| + | |0.5 |
||
| + | |- |
||
| + | |'''8 hrs''' |
||
| + | |75 |
||
| + | |0.375 |
||
| + | |} |
||
| + | {| class="article-table mw-collapsible mw-collapsed" align="center" border="1" style="width:100%; text-align:center;" |
||
| + | ! colspan="6" style="background:#0086b3; color:#fff; font-size:14px; padding:3px 10px;" |<center>'''List of Activities'''</center> |
||
|- class="article-table" style="line-height:20px;" |
|- class="article-table" style="line-height:20px;" |
||
| − | !Management Activity (JP) |
+ | ! style="text-align:center;"| Management Activity (JP) |
| − | !Management Activity (EN) |
+ | ! style="text-align:center;"|Management Activity (EN) |
| − | !Duration |
+ | ! style="text-align:center;"|Duration |
| − | !Affection Points Gained |
+ | ! style="text-align:center;"|Affection Points Gained |
| − | !Activity Required to Unlock |
+ | ! style="text-align:center;"|Activity Required to Unlock |
| − | ! # of Completions Needed to Unlock |
+ | ! style="text-align:center;"|# of Completions Needed to Unlock |
|- class="article-table" style="line-height:15px;" |
|- class="article-table" style="line-height:15px;" |
||
|振り付け確認 |
|振り付け確認 |
||
| Line 66: | Line 103: | ||
|1 Point |
|1 Point |
||
|n/a |
|n/a |
||
| + | |n/a |
||
| + | |- class="article-table" style="line-height:15px;" |
||
| + | |勉強 |
||
| + | |Studying |
||
| + | |30 min. |
||
| + | |1 Point |
||
| + | |Added 9/11/18 |
||
|n/a |
|n/a |
||
|- class="article-table" style="line-height:15px;" |
|- class="article-table" style="line-height:15px;" |
||
| Line 87: | Line 131: | ||
|1 Point |
|1 Point |
||
|n/a |
|n/a |
||
| + | |n/a |
||
| + | |- class="article-table" style="line-height:15px;" |
||
| + | |バスケの授業 |
||
| + | |Basketball Lesson |
||
| + | |30 min. |
||
| + | |1 Point |
||
| + | |Added 11/26/18 |
||
| + | |n/a |
||
| + | |- class="article-table" style="line-height:15px;" |
||
| + | |演技練習 |
||
| + | |Acting Practice |
||
| + | |30 min. |
||
| + | |1 Point |
||
| + | |Added 5/13/19 |
||
| + | |n/a |
||
| + | |- class="article-table" style="line-height:15px;" |
||
| + | |餌の用意 |
||
| + | |Preparing Animal Feed |
||
| + | |30 min. |
||
| + | |1 Point |
||
| + | |Added 10/26/19 |
||
|n/a |
|n/a |
||
|- class="article-table" style="line-height:15px;" |
|- class="article-table" style="line-height:15px;" |
||
| Line 116: | Line 181: | ||
|Warm-Up Exercises |
|Warm-Up Exercises |
||
|1 time |
|1 time |
||
| + | |- class="article-table" style="line-height:15px;" |
||
| + | |縄跳び(初級) |
||
| + | |Jump Rope (Basic) |
||
| + | |1 hour |
||
| + | |1 Point |
||
| + | |Added 9/11/18 |
||
| + | |n/a |
||
| + | |- class="article-table" style="line-height:15px;" |
||
| + | |商店街でビラ配り |
||
| + | |Handing out Fliers (Downtown) |
||
| + | |1 hour |
||
| + | |1 Point |
||
| + | |Added 9/11/18 |
||
| + | |n/a |
||
| + | |- class="article-table" style="line-height:15px;" |
||
| + | |サッカーの授業 |
||
| + | |Soccer Lesson |
||
| + | |1 hour |
||
| + | |1 Point |
||
| + | |Added 5/13/19 |
||
| + | |n/a |
||
| + | |- class="article-table" style="line-height:15px;" |
||
| + | |ティータイム |
||
| + | |Teatime |
||
| + | |1 hour |
||
| + | |1 Point |
||
| + | |Added 11/26/18 |
||
| + | |n/a |
||
| + | |- class="article-table" style="line-height:15px;" |
||
| + | |お花の水やり |
||
| + | |Watering the Flowers |
||
| + | |1 hour |
||
| + | |1 Point |
||
| + | |Added 10/26/19 |
||
| + | |n/a |
||
|- class="article-table" style="line-height:15px;" |
|- class="article-table" style="line-height:15px;" |
||
|軽食 |
|軽食 |
||
| Line 123: | Line 223: | ||
|Snack |
|Snack |
||
|5 times |
|5 times |
||
| + | |- class="article-table" style="line-height:15px;" |
||
| + | |休憩 |
||
| + | |Break |
||
| + | |2 hours |
||
| + | |1 Point |
||
| + | |? |
||
| + | |? |
||
| + | |- class="article-table" style="line-height:15px;" |
||
| + | |宿題 |
||
| + | |Homework |
||
| + | |2 hours |
||
| + | |1 Point |
||
| + | |Studying |
||
| + | |1 time |
||
|- class="article-table" style="line-height:15px;" |
|- class="article-table" style="line-height:15px;" |
||
|PV撮影 |
|PV撮影 |
||
| Line 137: | Line 251: | ||
|Cleaning the Hallway |
|Cleaning the Hallway |
||
|1 time |
|1 time |
||
| + | |- class="article-table" style="line-height:15px;" |
||
| + | |テニスの授業 |
||
| + | |Tennis Lesson |
||
| + | |2 hours |
||
| + | |1 Point |
||
| + | |Basketball Lesson |
||
| + | |5 times |
||
| + | |- class="article-table" style="line-height:15px;" |
||
| + | |ステージ設営手伝い |
||
| + | |Helping with Stage Construction |
||
| + | |2 hours |
||
| + | |1 Points |
||
| + | |Added 5/13/19 |
||
| + | |n/a |
||
| + | |- class="article-table" style="line-height:15px;" |
||
| + | |動物の世話 |
||
| + | |Looking after Animals |
||
| + | |2 hours |
||
| + | |1 Points |
||
| + | |Preparing Animal Feed |
||
| + | |5 times |
||
|- class="article-table" style="line-height:15px;" |
|- class="article-table" style="line-height:15px;" |
||
|歌唱練習 |
|歌唱練習 |
||
| Line 151: | Line 286: | ||
|Walking |
|Walking |
||
|5 times |
|5 times |
||
| + | |- class="article-table" style="line-height:15px;" |
||
| + | |仮眠 |
||
| + | |Nap |
||
| + | |4 hours |
||
| + | |2 Points |
||
| + | |? |
||
| + | |? |
||
|- class="article-table" style="line-height:15px;" |
|- class="article-table" style="line-height:15px;" |
||
|PV撮影(ロケ) |
|PV撮影(ロケ) |
||
| Line 157: | Line 299: | ||
|2 Points |
|2 Points |
||
|PV Shooting |
|PV Shooting |
||
| + | |5 times |
||
| + | |- class="article-table" style="line-height:15px;" |
||
| + | |縄跳び(上級) |
||
| + | |Jump Rope (Advanced) |
||
| + | |4 hours |
||
| + | |2 Points |
||
| + | |Jump Rope (Basic) |
||
|5 times |
|5 times |
||
|- class="article-table" style="line-height:15px;" |
|- class="article-table" style="line-height:15px;" |
||
| Line 164: | Line 313: | ||
|2 Points |
|2 Points |
||
|Cleaning the Hallway |
|Cleaning the Hallway |
||
| + | |5 times |
||
| + | |- class="article-table" style="line-height:15px;" |
||
| + | |ライブ音源確認 |
||
| + | |Live Sound Test |
||
| + | |4 hours |
||
| + | |2 Points |
||
| + | |Added 11/26/18 |
||
| + | |n/a |
||
| + | |- class="article-table" style="line-height:15px;" |
||
| + | |ライブ映像確認 |
||
| + | |Checking Live Show Footage |
||
| + | |4 hours |
||
| + | |2 Points |
||
| + | |Acting Practice |
||
|5 times |
|5 times |
||
|- class="article-table" style="line-height:15px;" |
|- class="article-table" style="line-height:15px;" |
||
| Line 179: | Line 342: | ||
|Singing Practice |
|Singing Practice |
||
|5 times |
|5 times |
||
| + | |- class="article-table" style="line-height:15px;" |
||
| + | |テスト勉強 |
||
| + | |Studying for a Test |
||
| + | |8 hours |
||
| + | |3 Points |
||
| + | |? |
||
| + | |? |
||
|- class="article-table" style="line-height:15px;" |
|- class="article-table" style="line-height:15px;" |
||
|筋トレ(上級) |
|筋トレ(上級) |
||
| Line 192: | Line 362: | ||
|3 Points |
|3 Points |
||
|Sorting Documents |
|Sorting Documents |
||
| + | |5 times |
||
| + | |- class="article-table" style="line-height:15px;" |
||
| + | |繁華街でビラ配り |
||
| + | |Handing out Fliers (Business District) |
||
| + | |8 hours |
||
| + | |3 Points |
||
| + | |Handing out Fliers (Downtown) |
||
| + | |5 times |
||
| + | |- class="article-table" style="line-height:15px;" |
||
| + | |音響設営手伝い |
||
| + | |Helping with Sound System Setup |
||
| + | |8 hours |
||
| + | |3 Points |
||
| + | |Helping with Stage Construction |
||
| + | |5 times |
||
| + | |- class="article-table" style="line-height:15px;" |
||
| + | |アフタヌーンティー |
||
| + | |Afternoon Tea |
||
| + | |8 hours |
||
| + | |3 Points |
||
| + | |Teatime |
||
|5 times |
|5 times |
||
|} |
|} |
||
| − | <br /> |
||
| − | ===<font size= '5'>List of Conversation Events</font>=== |
||
| + | |||
| − | ---- |
||
| + | ==<font size='5'>List of Conversation Events</font>== |
||
| − | {| class="article-table" cellspacing="1/6" cellpadding="2" border="1" align="center" width="100%" style="line-height:15px" |
||
| + | {| class="mw-collapsible article-table" align="center" border="1" style="width:100%; text-align:center;" |
||
| − | |colspan="4" style="background:#0086b3;color:#fff;border-bottom:1px solid #C8B890;padding:5px;" |<center>'''Management Stories'''</center> |
||
| + | ! colspan="3" style="background:#0086b3; color:#fff; font-size:14px; padding:3px 10px;" |<center>'''Management Stories'''</center> |
||
| − | |} |
||
| − | {| class="article-table" cellspacing="1/6" cellpadding="2" border="1" align="center" width="100%" style="line-height:15px" style="text-align:center;" |
||
|- |
|- |
||
!<center>Story Title</center> |
!<center>Story Title</center> |
||
| Line 212: | Line 400: | ||
|[[Tetora Nagumo/Management Story|Tetora – 2]] |
|[[Tetora Nagumo/Management Story|Tetora – 2]] |
||
|[[File:Tetora Head.png|50x50px]] [[File:Shinobu Head.png|50x50px]] |
|[[File:Tetora Head.png|50x50px]] [[File:Shinobu Head.png|50x50px]] |
||
| + | |- |
||
| + | |[[Tetora Nagumo/Management Story|Tetora – 3]] |
||
| + | |[[File:Tetora Head.png|50x50px]] [[File:Kanata Head.png|50x50px]] |
||
| + | |- |
||
| + | |[[Tetora Nagumo/Management Story|Tetora – 4]] |
||
| + | |[[File:Tetora Head.png|50x50px]] [[File:Kuro Head.png|50x50px]] |
||
| + | |- |
||
| + | |[[Tetora Nagumo/Management Story|Tetora – 5]] |
||
| + | |[[File:Tetora Head.png|50x50px]] [[File:Tomoya Head.png|50x50px]] |
||
| + | |- |
||
| + | |[[Tetora Nagumo/Management Story|Tetora – 6]] |
||
| + | |[[File:Tetora Head.png|50x50px]] [[File:Hinata Head.png|50x50px]] |
||
|- |
|- |
||
|[[Hajime Shino/Management Story|Hajime – 1]] |
|[[Hajime Shino/Management Story|Hajime – 1]] |
||
| Line 218: | Line 418: | ||
|[[Hajime Shino/Management Story|Hajime – 2]] |
|[[Hajime Shino/Management Story|Hajime – 2]] |
||
|[[File:Hajime Head.png|50x50px]] [[File:Subaru Head.png|50x50px]] |
|[[File:Hajime Head.png|50x50px]] [[File:Subaru Head.png|50x50px]] |
||
| + | |- |
||
| + | |[[Hajime Shino/Management Story|Hajime – 3]] |
||
| + | |[[File:Hajime Head.png|50x50px]] [[File:Nazuna Head.png|50x50px]] |
||
| + | |- |
||
| + | |[[Hajime Shino/Management Story|Hajime – 4]] |
||
| + | |[[File:Hajime Head.png|50x50px]] [[File:Eichi Head.png|50x50px]] |
||
| + | |- |
||
| + | |[[Hajime Shino/Management Story|Hajime – 5]] |
||
| + | |[[File:Hajime Head.png|50x50px]] [[File:Tetora Head.png|50x50px]] |
||
| + | |- |
||
| + | |[[Hajime Shino/Management Story|Hajime – 6]] |
||
| + | |[[File:Hajime Head.png|50x50px]] [[File:Mika Head.png|50x50px]] |
||
|- |
|- |
||
|[[Tomoya Mashiro/Management Story|Tomoya – 1]] |
|[[Tomoya Mashiro/Management Story|Tomoya – 1]] |
||
| Line 224: | Line 436: | ||
|[[Tomoya Mashiro/Management Story|Tomoya – 2]] |
|[[Tomoya Mashiro/Management Story|Tomoya – 2]] |
||
|[[File:Tomoya Head.png|50x50px]] [[File:Wataru Head.png|50x50px]] |
|[[File:Tomoya Head.png|50x50px]] [[File:Wataru Head.png|50x50px]] |
||
| + | |- |
||
| + | |[[Tomoya Mashiro/Management Story|Tomoya – 3]] |
||
| + | |[[File:Tomoya Head.png|50x50px]] [[File:Tetora Head.png|50x50px]] |
||
| + | |- |
||
| + | |[[Tomoya Mashiro/Management Story|Tomoya – 4]] |
||
| + | |[[File:Tomoya Head.png|50x50px]] [[File:Wataru Head.png|50x50px]] |
||
| + | |- |
||
| + | |[[Tomoya Mashiro/Management Story|Tomoya – 5]] |
||
| + | |[[File:Tomoya Head.png|50x50px]] [[File:Hinata Head.png|50x50px]] |
||
| + | |- |
||
| + | |[[Tomoya Mashiro/Management Story|Tomoya – 6]] |
||
| + | |[[File:Tomoya Head.png|50x50px]] [[File:Hajime Head.png|50x50px]] |
||
|- |
|- |
||
|[[Hinata Aoi/Management Story|Hinata – 1]] |
|[[Hinata Aoi/Management Story|Hinata – 1]] |
||
| Line 230: | Line 454: | ||
|[[Hinata Aoi/Management Story|Hinata – 2]] |
|[[Hinata Aoi/Management Story|Hinata – 2]] |
||
|[[File:Hinata Head.png|50x50px]] [[File:Yuta Head.png|50x50px]] |
|[[File:Hinata Head.png|50x50px]] [[File:Yuta Head.png|50x50px]] |
||
| + | |- |
||
| + | |[[Hinata Aoi/Management Story|Hinata – 3]] |
||
| + | |[[File:Hinata Head.png|50x50px]] [[File:Kuro Head.png|50x50px]] |
||
| + | |- |
||
| + | |[[Hinata Aoi/Management Story|Hinata – 4]] |
||
| + | |[[File:Hinata Head.png|50x50px]] [[File:Chiaki Head.png|50x50px]] |
||
| + | |- |
||
| + | |[[Hinata Aoi/Management Story|Hinata – 5]] |
||
| + | |[[File:Hinata Head.png|50x50px]] [[File:Koga Head.png|50x50px]] |
||
| + | |- |
||
| + | |[[Hinata Aoi/Management Story|Hinata – 6]] |
||
| + | |[[File:Hinata Head.png|50x50px]] [[File:Midori Head.png|50x50px]] |
||
|- |
|- |
||
|[[Midori Takamine/Management Story|Midori – 1]] |
|[[Midori Takamine/Management Story|Midori – 1]] |
||
| Line 236: | Line 472: | ||
|[[Midori Takamine/Management Story|Midori – 2]] |
|[[Midori Takamine/Management Story|Midori – 2]] |
||
|[[File:Midori Head.png|50x50px]] [[File:Kanata Head.png|50x50px]] |
|[[File:Midori Head.png|50x50px]] [[File:Kanata Head.png|50x50px]] |
||
| + | |- |
||
| + | |[[Midori Takamine/Management Story|Midori – 3]] |
||
| + | |[[File:Midori Head.png|50x50px]] [[File:Hajime Head.png|50x50px]] |
||
| + | |- |
||
| + | |[[Midori Takamine/Management Story|Midori – 4]] |
||
| + | |[[File:Midori Head.png|50x50px]] [[File:Tetora Head.png|50x50px]] |
||
| + | |- |
||
| + | |[[Midori Takamine/Management Story|Midori – 5]] |
||
| + | |[[File:Midori Head.png|50x50px]] [[File:Shinobu Head.png|50x50px]] |
||
| + | |- |
||
| + | |[[Midori Takamine/Management Story|Midori – 6]] |
||
| + | |[[File:Midori Head.png|50x50px]] [[File:Yuta Head.png|50x50px]] |
||
|- |
|- |
||
|[[Tori Himemiya/Management Story|Tori – 1]] |
|[[Tori Himemiya/Management Story|Tori – 1]] |
||
| Line 242: | Line 490: | ||
|[[Tori Himemiya/Management Story|Tori – 2]] |
|[[Tori Himemiya/Management Story|Tori – 2]] |
||
|[[File:Tori Head.png|50x50px]] [[File:Izumi Head.png|50x50px]] |
|[[File:Tori Head.png|50x50px]] [[File:Izumi Head.png|50x50px]] |
||
| + | |- |
||
| + | |[[Tori Himemiya/Management Story|Tori – 3]] |
||
| + | |[[File:Tori Head.png|50x50px]] [[File:Hinata Head.png|50x50px]] |
||
| + | |- |
||
| + | |[[Tori Himemiya/Management Story|Tori – 4]] |
||
| + | |[[File:Tori Head.png|50x50px]] [[File:Makoto Head.png|50x50px]] |
||
| + | |- |
||
| + | |[[Tori Himemiya/Management Story|Tori – 5]] |
||
| + | |[[File:Tori Head.png|50x50px]] [[File:Sora Head.png|50x50px]] |
||
| + | |- |
||
| + | |[[Tori Himemiya/Management Story|Tori – 6]] |
||
| + | |[[File:Tori Head.png|50x50px]] [[File:Eichi Head.png|50x50px]] |
||
|- |
|- |
||
|[[Shinobu Sengoku/Management Story|Shinobu – 1]] |
|[[Shinobu Sengoku/Management Story|Shinobu – 1]] |
||
| Line 248: | Line 508: | ||
|[[Shinobu Sengoku/Management Story|Shinobu – 2]] |
|[[Shinobu Sengoku/Management Story|Shinobu – 2]] |
||
|[[File:Shinobu Head.png|50x50px]] [[File:Mao Head.png|50x50px]] |
|[[File:Shinobu Head.png|50x50px]] [[File:Mao Head.png|50x50px]] |
||
| + | |- |
||
| + | |[[Shinobu Sengoku/Management Story|Shinobu – 3]] |
||
| + | |[[File:Shinobu Head.png|50x50px]] [[File:Midori Head.png|50x50px]] |
||
| + | |- |
||
| + | |[[Shinobu Sengoku/Management Story|Shinobu – 4]] |
||
| + | |[[File:Shinobu Head.png|50x50px]] [[File:Nazuna Head.png|50x50px]] |
||
| + | |- |
||
| + | |[[Shinobu Sengoku/Management Story|Shinobu – 5]] |
||
| + | |[[File:Shinobu Head.png|50x50px]] [[File:Yuta Head.png|50x50px]] |
||
| + | |- |
||
| + | |[[Shinobu Sengoku/Management Story|Shinobu – 6]] |
||
| + | |[[File:Shinobu Head.png|50x50px]] [[File:Souma Head.png|50x50px]] |
||
|- |
|- |
||
|[[Yuta Aoi/Management Story|Yuta – 1]] |
|[[Yuta Aoi/Management Story|Yuta – 1]] |
||
| Line 254: | Line 526: | ||
|[[Yuta Aoi/Management Story|Yuta – 2]] |
|[[Yuta Aoi/Management Story|Yuta – 2]] |
||
|[[File:Yuta Head.png|50x50px]] [[File:Souma Head.png|50x50px]] |
|[[File:Yuta Head.png|50x50px]] [[File:Souma Head.png|50x50px]] |
||
| + | |- |
||
| + | |[[Yuta Aoi/Management Story|Yuta – 3]] |
||
| + | |[[File:Yuta Head.png|50x50px]] [[File:Koga Head.png|50x50px]] |
||
| + | |- |
||
| + | |[[Yuta Aoi/Management Story|Yuta – 4]] |
||
| + | |[[File:Yuta Head.png|50x50px]] [[File:Rei Head.png|50x50px]] |
||
| + | |- |
||
| + | |[[Yuta Aoi/Management Story|Yuta – 5]] |
||
| + | |[[File:Yuta Head.png|50x50px]] [[File:Izumi Head.png|50x50px]] |
||
| + | |- |
||
| + | |[[Yuta Aoi/Management Story|Yuta – 6]] |
||
| + | |[[File:Yuta Head.png|50x50px]] [[File:Tsukasa Head.png|50x50px]] |
||
|- |
|- |
||
|[[Mitsuru Tenma/Management Story|Mitsuru – 1]] |
|[[Mitsuru Tenma/Management Story|Mitsuru – 1]] |
||
| Line 260: | Line 544: | ||
|[[Mitsuru Tenma/Management Story|Mitsuru – 2]] |
|[[Mitsuru Tenma/Management Story|Mitsuru – 2]] |
||
|[[File:Mitsuru Head.png|50x50px]] [[File:Adonis Head.png|50x50px]] |
|[[File:Mitsuru Head.png|50x50px]] [[File:Adonis Head.png|50x50px]] |
||
| + | |- |
||
| + | |[[Mitsuru Tenma/Management Story|Mitsuru – 3]] |
||
| + | |[[File:Mitsuru Head.png|50x50px]] [[File:Sora Head.png|50x50px]] |
||
| + | |- |
||
| + | |[[Mitsuru Tenma/Management Story|Mitsuru – 4]] |
||
| + | |[[File:Mitsuru Head.png|50x50px]] [[File:Arashi Head.png|50x50px]] |
||
| + | |- |
||
| + | |[[Mitsuru Tenma/Management Story|Mitsuru – 5]] |
||
| + | |[[File:Mitsuru Head.png|50x50px]] [[File:Tori Head.png|50x50px]] |
||
| + | |- |
||
| + | |[[Mitsuru Tenma/Management Story|Mitsuru – 6]] |
||
| + | |[[File:Mitsuru Head.png|50x50px]] [[File:Shinobu Head.png|50x50px]] |
||
|- |
|- |
||
|[[Tsukasa Suou/Management Story|Tsukasa – 1]] |
|[[Tsukasa Suou/Management Story|Tsukasa – 1]] |
||
| Line 266: | Line 562: | ||
|[[Tsukasa Suou/Management Story|Tsukasa – 2]] |
|[[Tsukasa Suou/Management Story|Tsukasa – 2]] |
||
|[[File:Tsukasa Head.png|50x50px]] [[File:Yuzuru Head.png|50x50px]] |
|[[File:Tsukasa Head.png|50x50px]] [[File:Yuzuru Head.png|50x50px]] |
||
| + | |- |
||
| + | |[[Tsukasa Suou/Management Story|Tsukasa – 3]] |
||
| + | |[[File:Tsukasa Head.png|50x50px]] [[File:Tori Head.png|50x50px]] |
||
| + | |- |
||
| + | |[[Tsukasa Suou/Management Story|Tsukasa – 4]] |
||
| + | |[[File:Tsukasa Head.png|50x50px]] [[File:Leo Head.png|50x50px]] |
||
| + | |- |
||
| + | |[[Tsukasa Suou/Management Story|Tsukasa – 5]] |
||
| + | |[[File:Tsukasa Head.png|50x50px]] [[File:Eichi Head.png|50x50px]] |
||
| + | |- |
||
| + | |[[Tsukasa Suou/Management Story|Tsukasa – 6]] |
||
| + | |[[File:Tsukasa Head.png|50x50px]] [[File:Tomoya Head.png|50x50px]] |
||
|- |
|- |
||
|[[Sora Harukawa/Management Story|Sora – 1]] |
|[[Sora Harukawa/Management Story|Sora – 1]] |
||
| Line 272: | Line 580: | ||
|[[Sora Harukawa/Management Story|Sora – 2]] |
|[[Sora Harukawa/Management Story|Sora – 2]] |
||
|[[File:Sora Head.png|50x50px]] [[File:Natsume Head.png|50x50px]] |
|[[File:Sora Head.png|50x50px]] [[File:Natsume Head.png|50x50px]] |
||
| + | |- |
||
| + | |[[Sora Harukawa/Management Story|Sora – 3]] |
||
| + | |[[File:Sora Head.png|50x50px]] [[File:Yuta Head.png|50x50px]] |
||
| + | |- |
||
| + | |[[Sora Harukawa/Management Story|Sora – 4]] |
||
| + | |[[File:Sora Head.png|50x50px]] [[File:Shinobu Head.png|50x50px]] |
||
| + | |- |
||
| + | |[[Sora Harukawa/Management Story|Sora – 5]] |
||
| + | |[[File:Sora Head.png|50x50px]] [[File:Mitsuru Head.png|50x50px]] |
||
| + | |- |
||
| + | |[[Sora Harukawa/Management Story|Sora – 6]] |
||
| + | |[[File:Sora Head.png|50x50px]] [[File:Makoto Head.png|50x50px]] |
||
|- |
|- |
||
|[[Subaru Akehoshi/Management Story|Subaru – 1]] |
|[[Subaru Akehoshi/Management Story|Subaru – 1]] |
||
| Line 278: | Line 598: | ||
|[[Subaru Akehoshi/Management Story|Subaru – 2]] |
|[[Subaru Akehoshi/Management Story|Subaru – 2]] |
||
|[[File:Subaru Head.png|50x50px]] [[File:Chiaki Head.png|50x50px]] |
|[[File:Subaru Head.png|50x50px]] [[File:Chiaki Head.png|50x50px]] |
||
| + | |- |
||
| + | |[[Subaru Akehoshi/Management Story|Subaru – 3]] |
||
| + | |[[File:Subaru Head.png|50x50px]] [[File:Mitsuru Head.png|50x50px]] |
||
| + | |- |
||
| + | |[[Subaru Akehoshi/Management Story|Subaru – 4]] |
||
| + | |[[File:Subaru Head.png|50x50px]] [[File:Mao Head.png|50x50px]] |
||
| + | |- |
||
| + | |[[Subaru Akehoshi/Management Story|Subaru – 5]] |
||
| + | |[[File:Subaru Head.png|50x50px]] [[File:Midori Head.png|50x50px]] |
||
| + | |- |
||
| + | |[[Subaru Akehoshi/Management Story|Subaru – 6]] |
||
| + | |[[File:Subaru Head.png|50x50px]] [[File:Natsume Head.png|50x50px]] |
||
|- |
|- |
||
|[[Hokuto Hidaka/Management Story|Hokuto – 1]] |
|[[Hokuto Hidaka/Management Story|Hokuto – 1]] |
||
| Line 284: | Line 616: | ||
|[[Hokuto Hidaka/Management Story|Hokuto – 2]] |
|[[Hokuto Hidaka/Management Story|Hokuto – 2]] |
||
|[[File:Hokuto Head.png|50x50px]] [[File:Tomoya Head.png|50x50px]] |
|[[File:Hokuto Head.png|50x50px]] [[File:Tomoya Head.png|50x50px]] |
||
| + | |- |
||
| + | |[[Hokuto Hidaka/Management Story|Hokuto – 3]] |
||
| + | |[[File:Hokuto Head.png|50x50px]] [[File:Subaru Head.png|50x50px]] |
||
| + | |- |
||
| + | |[[Hokuto Hidaka/Management Story|Hokuto – 4]] |
||
| + | |[[File:Hokuto Head.png|50x50px]] [[File:Hinata Head.png|50x50px]] |
||
| + | |- |
||
| + | |[[Hokuto Hidaka/Management Story|Hokuto – 5]] |
||
| + | |[[File:Hokuto Head.png|50x50px]] [[File:Souma Head.png|50x50px]] |
||
| + | |- |
||
| + | |[[Hokuto Hidaka/Management Story|Hokuto – 6]] |
||
| + | |[[File:Hokuto Head.png|50x50px]] [[File:Mao Head.png|50x50px]] |
||
|- |
|- |
||
|[[Makoto Yuuki/Management Story|Makoto – 1]] |
|[[Makoto Yuuki/Management Story|Makoto – 1]] |
||
| Line 290: | Line 634: | ||
|[[Makoto Yuuki/Management Story|Makoto – 2]] |
|[[Makoto Yuuki/Management Story|Makoto – 2]] |
||
|[[File:Makoto Head.png|50x50px]] [[File:Nazuna Head.png|50x50px]] |
|[[File:Makoto Head.png|50x50px]] [[File:Nazuna Head.png|50x50px]] |
||
| + | |- |
||
| + | |[[Makoto Yuuki/Management Story|Makoto – 3]] |
||
| + | |[[File:Makoto Head.png|50x50px]] [[File:Hokuto Head.png|50x50px]] |
||
| + | |- |
||
| + | |[[Makoto Yuuki/Management Story|Makoto – 4]] |
||
| + | |[[File:Makoto Head.png|50x50px]] [[File:Subaru Head.png|50x50px]] |
||
| + | |- |
||
| + | |[[Makoto Yuuki/Management Story|Makoto – 5]] |
||
| + | |[[File:Makoto Head.png|50x50px]] [[File:Adonis Head.png|50x50px]] |
||
| + | |- |
||
| + | |[[Makoto Yuuki/Management Story|Makoto – 6]] |
||
| + | |[[File:Makoto Head.png|50x50px]] [[File:Ritsu Head.png|50x50px]] |
||
|- |
|- |
||
|[[Souma Kanzaki/Management Story|Souma – 1]] |
|[[Souma Kanzaki/Management Story|Souma – 1]] |
||
| Line 296: | Line 652: | ||
|[[Souma Kanzaki/Management Story|Souma – 2]] |
|[[Souma Kanzaki/Management Story|Souma – 2]] |
||
|[[File:Souma Head.png|50x50px]] [[File:Keito Head.png|50x50px]] |
|[[File:Souma Head.png|50x50px]] [[File:Keito Head.png|50x50px]] |
||
| + | |- |
||
| + | |[[Souma Kanzaki/Management Story|Souma – 3]] |
||
| + | |[[File:Souma Head.png|50x50px]] [[File:Eichi Head.png|50x50px]] |
||
| + | |- |
||
| + | |[[Souma Kanzaki/Management Story|Souma – 4]] |
||
| + | |[[File:Souma Head.png|50x50px]] [[File:Kanata Head.png|50x50px]] |
||
| + | |- |
||
| + | |[[Souma Kanzaki/Management Story|Souma – 5]] |
||
| + | |[[File:Souma Head.png|50x50px]] [[File:Makoto Head.png|50x50px]] |
||
| + | |- |
||
| + | |[[Souma Kanzaki/Management Story|Souma – 6]] |
||
| + | |[[File:Souma Head.png|50x50px]] [[File:Mitsuru Head.png|50x50px]] |
||
|- |
|- |
||
|[[Adonis Otogari/Management Story|Adonis – 1]] |
|[[Adonis Otogari/Management Story|Adonis – 1]] |
||
| Line 302: | Line 670: | ||
|[[Adonis Otogari/Management Story|Adonis – 2]] |
|[[Adonis Otogari/Management Story|Adonis – 2]] |
||
|[[File:Adonis Head.png|50x50px]] [[File:Kaoru Head.png|50x50px]] |
|[[File:Adonis Head.png|50x50px]] [[File:Kaoru Head.png|50x50px]] |
||
| + | |- |
||
| + | |[[Adonis Otogari/Management Story|Adonis – 3]] |
||
| + | |[[File:Adonis Head.png|50x50px]] [[File:Madara Head.png|50x50px]] |
||
| + | |- |
||
| + | |[[Adonis Otogari/Management Story|Adonis – 4]] |
||
| + | |[[File:Adonis Head.png|50x50px]] [[File:Mitsuru Head.png|50x50px]] |
||
| + | |- |
||
| + | |[[Adonis Otogari/Management Story|Adonis – 5]] |
||
| + | |[[File:Adonis Head.png|50x50px]] [[File:Subaru Head.png|50x50px]] |
||
| + | |- |
||
| + | |[[Adonis Otogari/Management Story|Adonis – 6]] |
||
| + | |[[File:Adonis Head.png|50x50px]] [[File:Arashi Head.png|50x50px]] |
||
|- |
|- |
||
|[[Natsume Sakasaki/Management Story|Natsume – 1]] |
|[[Natsume Sakasaki/Management Story|Natsume – 1]] |
||
| Line 308: | Line 688: | ||
|[[Natsume Sakasaki/Management Story|Natsume – 2]] |
|[[Natsume Sakasaki/Management Story|Natsume – 2]] |
||
|[[File:Natsume Head.png|50x50px]] [[File:Tsumugi Head.png|50x50px]] |
|[[File:Natsume Head.png|50x50px]] [[File:Tsumugi Head.png|50x50px]] |
||
| + | |- |
||
| + | |[[Natsume Sakasaki/Management Story|Natsume – 3]] |
||
| + | |[[File:Natsume Head.png|50x50px]] [[File:Wataru Head.png|50x50px]] |
||
| + | |- |
||
| + | |[[Natsume Sakasaki/Management Story|Natsume – 4]] |
||
| + | |[[File:Natsume Head.png|50x50px]] [[File:Sora Head.png|50x50px]] |
||
| + | |- |
||
| + | |[[Natsume Sakasaki/Management Story|Natsume – 5]] |
||
| + | |[[File:Natsume Head.png|50x50px]] [[File:Hokuto Head.png|50x50px]] |
||
| + | |- |
||
| + | |[[Natsume Sakasaki/Management Story|Natsume – 6]] |
||
| + | |[[File:Natsume Head.png|50x50px]] [[File:Rei Head.png|50x50px]] |
||
|- |
|- |
||
|[[Koga Oogami/Management Story|Koga – 1]] |
|[[Koga Oogami/Management Story|Koga – 1]] |
||
| Line 314: | Line 706: | ||
|[[Koga Oogami/Management Story|Koga – 2]] |
|[[Koga Oogami/Management Story|Koga – 2]] |
||
|[[File:Koga Head.png|50x50px]] [[File:Hinata Head.png|50x50px]] |
|[[File:Koga Head.png|50x50px]] [[File:Hinata Head.png|50x50px]] |
||
| + | |- |
||
| + | |[[Koga Oogami/Management Story|Koga – 3]] |
||
| + | |[[File:Koga Head.png|50x50px]] [[File:Makoto Head.png|50x50px]] |
||
| + | |- |
||
| + | |[[Koga Oogami/Management Story|Koga – 4]] |
||
| + | |[[File:Koga Head.png|50x50px]] [[File:Yuta Head.png|50x50px]] |
||
| + | |- |
||
| + | |[[Koga Oogami/Management Story|Koga – 5]] |
||
| + | |[[File:Koga Head.png|50x50px]] [[File:Arashi Head.png|50x50px]] |
||
| + | |- |
||
| + | |[[Koga Oogami/Management Story|Koga – 6]] |
||
| + | |[[File:Koga Head.png|50x50px]] [[File:Subaru Head.png|50x50px]] |
||
|- |
|- |
||
|[[Ritsu Sakuma/Management Story|Ritsu – 1]] |
|[[Ritsu Sakuma/Management Story|Ritsu – 1]] |
||
| Line 320: | Line 724: | ||
|[[Ritsu Sakuma/Management Story|Ritsu – 2]] |
|[[Ritsu Sakuma/Management Story|Ritsu – 2]] |
||
|[[File:Ritsu Head.png|50x50px]] [[File:Leo Head.png|50x50px]] |
|[[File:Ritsu Head.png|50x50px]] [[File:Leo Head.png|50x50px]] |
||
| + | |- |
||
| + | |[[Ritsu Sakuma/Management Story|Ritsu – 3]] |
||
| + | |[[File:Ritsu Head.png|50x50px]] [[File:Tsumugi Head.png|50x50px]] |
||
| + | |- |
||
| + | |[[Ritsu Sakuma/Management Story|Ritsu – 4]] |
||
| + | |[[File:Ritsu Head.png|50x50px]] [[File:Mika Head.png|50x50px]] |
||
| + | |- |
||
| + | |[[Ritsu Sakuma/Management Story|Ritsu – 5]] |
||
| + | |[[File:Ritsu Head.png|50x50px]] [[File:Tsukasa Head.png|50x50px]] |
||
| + | |- |
||
| + | |[[Ritsu Sakuma/Management Story|Ritsu – 6]] |
||
| + | |[[File:Ritsu Head.png|50x50px]] [[File:Yuzuru Head.png|50x50px]] |
||
|- |
|- |
||
|[[Mao Isara/Management Story|Mao – 1]] |
|[[Mao Isara/Management Story|Mao – 1]] |
||
| Line 326: | Line 742: | ||
|[[Mao Isara/Management Story|Mao – 2]] |
|[[Mao Isara/Management Story|Mao – 2]] |
||
|[[File:Mao Head.png|50x50px]] [[File:Midori Head.png|50x50px]] |
|[[File:Mao Head.png|50x50px]] [[File:Midori Head.png|50x50px]] |
||
| + | |- |
||
| + | |[[Mao Isara/Management Story|Mao – 3]] |
||
| + | |[[File:Mao Head.png|50x50px]] [[File:Shinobu Head.png|50x50px]] |
||
| + | |- |
||
| + | |[[Mao Isara/Management Story|Mao – 4]] |
||
| + | |[[File:Mao Head.png|50x50px]] [[File:Izumi Head.png|50x50px]] |
||
| + | |- |
||
| + | |[[Mao Isara/Management Story|Mao – 5]] |
||
| + | |[[File:Mao Head.png|50x50px]] [[File:Yuzuru Head.png|50x50px]] |
||
| + | |- |
||
| + | |[[Mao Isara/Management Story|Mao – 6]] |
||
| + | |[[File:Mao Head.png|50x50px]] [[File:Koga Head.png|50x50px]] |
||
|- |
|- |
||
|[[Yuzuru Fushimi/Management Story|Yuzuru – 1]] |
|[[Yuzuru Fushimi/Management Story|Yuzuru – 1]] |
||
| Line 332: | Line 760: | ||
|[[Yuzuru Fushimi/Management Story|Yuzuru – 2]] |
|[[Yuzuru Fushimi/Management Story|Yuzuru – 2]] |
||
|[[File:Yuzuru Head.png|50x50px]] [[File:Eichi Head.png|50x50px]] |
|[[File:Yuzuru Head.png|50x50px]] [[File:Eichi Head.png|50x50px]] |
||
| + | |- |
||
| + | |[[Yuzuru Fushimi/Management Story|Yuzuru – 3]] |
||
| + | |[[File:Yuzuru Head.png|50x50px]] [[File:Leo Head.png|50x50px]] |
||
| + | |- |
||
| + | |[[Yuzuru Fushimi/Management Story|Yuzuru – 4]] |
||
| + | |[[File:Yuzuru Head.png|50x50px]] [[File:Tsukasa Head.png|50x50px]] |
||
| + | |- |
||
| + | |[[Yuzuru Fushimi/Management Story|Yuzuru – 5]] |
||
| + | |[[File:Yuzuru Head.png|50x50px]] [[File:Mika Head.png|50x50px]] |
||
| + | |- |
||
| + | |[[Yuzuru Fushimi/Management Story|Yuzuru – 6]] |
||
| + | |[[File:Yuzuru Head.png|50x50px]] [[File:Hokuto Head.png|50x50px]] |
||
|- |
|- |
||
|[[Arashi Narukami/Management Story|Arashi – 1]] |
|[[Arashi Narukami/Management Story|Arashi – 1]] |
||
| Line 338: | Line 778: | ||
|[[Arashi Narukami/Management Story|Arashi – 2]] |
|[[Arashi Narukami/Management Story|Arashi – 2]] |
||
|[[File:Arashi Head.png|50x50px]] [[File:Mika Head.png|50x50px]] |
|[[File:Arashi Head.png|50x50px]] [[File:Mika Head.png|50x50px]] |
||
| + | |- |
||
| + | |[[Arashi Narukami/Management Story|Arashi – 3]] |
||
| + | |[[File:Arashi Head.png|50x50px]] [[File:Adonis Head.png|50x50px]] |
||
| + | |- |
||
| + | |[[Arashi Narukami/Management Story|Arashi – 4]] |
||
| + | |[[File:Arashi Head.png|50x50px]] [[File:Madara Head.png|50x50px]] |
||
| + | |- |
||
| + | |[[Arashi Narukami/Management Story|Arashi – 5]] |
||
| + | |[[File:Arashi Head.png|50x50px]] [[File:Ritsu Head.png|50x50px]] |
||
| + | |- |
||
| + | |[[Arashi Narukami/Management Story|Arashi – 6]] |
||
| + | |[[File:Arashi Head.png|50x50px]] [[File:Nazuna Head.png|50x50px]] |
||
|- |
|- |
||
|[[Mika Kagehira/Management Story|Mika – 1]] |
|[[Mika Kagehira/Management Story|Mika – 1]] |
||
| − | |[[File:Mika Head.png|50x50px]] [[File: |
+ | |[[File:Mika Head.png|50x50px]] [[File:Shu Head.png|50x50px]] |
|- |
|- |
||
|[[Mika Kagehira/Management Story|Mika – 2]] |
|[[Mika Kagehira/Management Story|Mika – 2]] |
||
| + | |[[File:Mika Head.png|50x50px]] [[File:Arashi Head.png|50x50px]] |
||
| + | |- |
||
| + | |[[Mika Kagehira/Management Story|Mika – 3]] |
||
| + | |[[File:Mika Head.png|50x50px]] [[File:Yuzuru Head.png|50x50px]] |
||
| + | |- |
||
| + | |[[Mika Kagehira/Management Story|Mika – 4]] |
||
|[[File:Mika Head.png|50x50px]] [[File:Shu Head.png|50x50px]] |
|[[File:Mika Head.png|50x50px]] [[File:Shu Head.png|50x50px]] |
||
| + | |- |
||
| + | |[[Mika Kagehira/Management Story|Mika – 5]] |
||
| + | |[[File:Mika Head.png|50x50px]] [[File:Tsumugi Head.png|50x50px]] |
||
| + | |- |
||
| + | |[[Mika Kagehira/Management Story|Mika – 6]] |
||
| + | |[[File:Mika Head.png|50x50px]] [[File:Kuro Head.png|50x50px]] |
||
|- |
|- |
||
|[[Keito Hasumi/Management Story|Keito – 1]] |
|[[Keito Hasumi/Management Story|Keito – 1]] |
||
| Line 350: | Line 814: | ||
|[[Keito Hasumi/Management Story|Keito – 2]] |
|[[Keito Hasumi/Management Story|Keito – 2]] |
||
|[[File:Keito Head.png|50x50px]] [[File:Souma Head.png|50x50px]] |
|[[File:Keito Head.png|50x50px]] [[File:Souma Head.png|50x50px]] |
||
| + | |- |
||
| + | |[[Keito Hasumi/Management Story|Keito – 3]] |
||
| + | |[[File:Keito Head.png|50x50px]] [[File:Mao Head.png|50x50px]] |
||
| + | |- |
||
| + | |[[Keito Hasumi/Management Story|Keito – 4]] |
||
| + | |[[File:Keito Head.png|50x50px]] [[File:Yuzuru Head.png|50x50px]] |
||
| + | |- |
||
| + | |[[Keito Hasumi/Management Story|Keito – 5]] |
||
| + | |[[File:Keito Head.png|50x50px]] [[File:Kaoru Head.png|50x50px]] |
||
| + | |- |
||
| + | |[[Keito Hasumi/Management Story|Keito – 6]] |
||
| + | |[[File:Keito Head.png|50x50px]] [[File:Madara Head.png|50x50px]] |
||
|- |
|- |
||
|[[Eichi Tenshouin/Management Story|Eichi – 1]] |
|[[Eichi Tenshouin/Management Story|Eichi – 1]] |
||
| Line 356: | Line 832: | ||
|[[Eichi Tenshouin/Management Story|Eichi – 2]] |
|[[Eichi Tenshouin/Management Story|Eichi – 2]] |
||
|[[File:Eichi Head.png|50x50px]] [[File:Hajime Head.png|50x50px]] |
|[[File:Eichi Head.png|50x50px]] [[File:Hajime Head.png|50x50px]] |
||
| + | |- |
||
| + | |[[Eichi Tenshouin/Management Story|Eichi – 3]] |
||
| + | |[[File:Eichi Head.png|50x50px]] [[File:Tsukasa Head.png|50x50px]] |
||
| + | |- |
||
| + | |[[Eichi Tenshouin/Management Story|Eichi – 4]] |
||
| + | |[[File:Eichi Head.png|50x50px]] [[File:Ritsu Head.png|50x50px]] |
||
| + | |- |
||
| + | |[[Eichi Tenshouin/Management Story|Eichi – 5]] |
||
| + | |[[File:Eichi Head.png|50x50px]] [[File:Mao Head.png|50x50px]] |
||
| + | |- |
||
| + | |[[Eichi Tenshouin/Management Story|Eichi – 6]] |
||
| + | |[[File:Eichi Head.png|50x50px]] [[File:Izumi Head.png|50x50px]] |
||
|- |
|- |
||
|[[Kaoru Hakaze/Management Story|Kaoru – 1]] |
|[[Kaoru Hakaze/Management Story|Kaoru – 1]] |
||
| Line 362: | Line 850: | ||
|[[Kaoru Hakaze/Management Story|Kaoru – 2]] |
|[[Kaoru Hakaze/Management Story|Kaoru – 2]] |
||
|[[File:Kaoru Head.png|50x50px]] [[File:Rei Head.png|50x50px]] |
|[[File:Kaoru Head.png|50x50px]] [[File:Rei Head.png|50x50px]] |
||
| + | |- |
||
| + | |[[Kaoru Hakaze/Management Story|Kaoru – 3]] |
||
| + | |[[File:Kaoru Head.png|50x50px]] [[File:Souma Head.png|50x50px]] |
||
| + | |- |
||
| + | |[[Kaoru Hakaze/Management Story|Kaoru – 4]] |
||
| + | |[[File:Kaoru Head.png|50x50px]] [[File:Koga Head.png|50x50px]] |
||
| + | |- |
||
| + | |[[Kaoru Hakaze/Management Story|Kaoru – 5]] |
||
| + | |[[File:Kaoru Head.png|50x50px]] [[File:Keito Head.png|50x50px]] |
||
| + | |- |
||
| + | |[[Kaoru Hakaze/Management Story|Kaoru – 6]] |
||
| + | |[[File:Kaoru Head.png|50x50px]] [[File:Adonis Head.png|50x50px]] |
||
|- |
|- |
||
|[[Izumi Sena/Management Story|Izumi – 1]] |
|[[Izumi Sena/Management Story|Izumi – 1]] |
||
| Line 368: | Line 868: | ||
|[[Izumi Sena/Management Story|Izumi – 2]] |
|[[Izumi Sena/Management Story|Izumi – 2]] |
||
|[[File:Izumi Head.png|50x50px]] [[File:Makoto Head.png|50x50px]] |
|[[File:Izumi Head.png|50x50px]] [[File:Makoto Head.png|50x50px]] |
||
| + | |- |
||
| + | |[[Izumi Sena/Management Story|Izumi – 3]] |
||
| + | |[[File:Izumi Head.png|50x50px]] [[File:Kaoru Head.png|50x50px]] |
||
| + | |- |
||
| + | |[[Izumi Sena/Management Story|Izumi – 4]] |
||
| + | |[[File:Izumi Head.png|50x50px]] [[File:Tori Head.png|50x50px]] |
||
| + | |- |
||
| + | |[[Izumi Sena/Management Story|Izumi – 5]] |
||
| + | |[[File:Izumi Head.png|50x50px]] [[File:Shu Head.png|50x50px]] |
||
| + | |- |
||
| + | |[[Izumi Sena/Management Story|Izumi – 6]] |
||
| + | |[[File:Izumi Head.png|50x50px]] [[File:Chiaki Head.png|50x50px]] |
||
|- |
|- |
||
|[[Chiaki Morisawa/Management Story|Chiaki – 1]] |
|[[Chiaki Morisawa/Management Story|Chiaki – 1]] |
||
| Line 374: | Line 886: | ||
|[[Chiaki Morisawa/Management Story|Chiaki – 2]] |
|[[Chiaki Morisawa/Management Story|Chiaki – 2]] |
||
|[[File:Chiaki Head.png|50x50px]] [[File:Tetora Head.png|50x50px]] |
|[[File:Chiaki Head.png|50x50px]] [[File:Tetora Head.png|50x50px]] |
||
| + | |- |
||
| + | |[[Chiaki Morisawa/Management Story|Chiaki – 3]] |
||
| + | |[[File:Chiaki Head.png|50x50px]] [[File:Shu Head.png|50x50px]] |
||
| + | |- |
||
| + | |[[Chiaki Morisawa/Management Story|Chiaki – 4]] |
||
| + | |[[File:Chiaki Head.png|50x50px]] [[File:Midori Head.png|50x50px]] |
||
| + | |- |
||
| + | |[[Chiaki Morisawa/Management Story|Chiaki – 5]] |
||
| + | |[[File:Chiaki Head.png|50x50px]] [[File:Kanata Head.png|50x50px]] |
||
| + | |- |
||
| + | |[[Chiaki Morisawa/Management Story|Chiaki – 6]] |
||
| + | |[[File:Chiaki Head.png|50x50px]] [[File:Keito Head.png|50x50px]] |
||
|- |
|- |
||
|[[Shu Itsuki/Management Story|Shu – 1]] |
|[[Shu Itsuki/Management Story|Shu – 1]] |
||
| Line 380: | Line 904: | ||
|[[Shu Itsuki/Management Story|Shu – 2]] |
|[[Shu Itsuki/Management Story|Shu – 2]] |
||
|[[File:Shu Head.png|50x50px]] [[File:Kuro Head.png|50x50px]] |
|[[File:Shu Head.png|50x50px]] [[File:Kuro Head.png|50x50px]] |
||
| + | |- |
||
| + | |[[Shu Itsuki/Management Story|Shu – 3]] |
||
| + | |[[File:Shu Head.png|50x50px]] [[File:Natsume Head.png|50x50px]] |
||
| + | |- |
||
| + | |[[Shu Itsuki/Management Story|Shu – 4]] |
||
| + | |[[File:Shu Head.png|50x50px]] [[File:Tsumugi Head.png|50x50px]] |
||
| + | |- |
||
| + | |[[Shu Itsuki/Management Story|Shu – 5]] |
||
| + | |[[File:Shu Head.png|50x50px]] [[File:Hajime Head.png|50x50px]] |
||
| + | |- |
||
| + | |[[Shu Itsuki/Management Story|Shu – 6]] |
||
| + | |[[File:Shu Head.png|50x50px]] [[File:Kanata Head.png|50x50px]] |
||
|- |
|- |
||
|[[Madara Mikejima/Management Story|Madara – 1]] |
|[[Madara Mikejima/Management Story|Madara – 1]] |
||
| Line 386: | Line 922: | ||
|[[Madara Mikejima/Management Story|Madara – 2]] |
|[[Madara Mikejima/Management Story|Madara – 2]] |
||
|[[File:Madara Head.png|50x50px]] [[File:Mitsuru Head.png|50x50px]] |
|[[File:Madara Head.png|50x50px]] [[File:Mitsuru Head.png|50x50px]] |
||
| + | |- |
||
| + | |[[Madara Mikejima/Management Story|Madara – 3]] |
||
| + | |[[File:Madara Head.png|50x50px]] [[File:Arashi Head.png|50x50px]] |
||
| + | |- |
||
| + | |[[Madara Mikejima/Management Story|Madara – 4]] |
||
| + | |[[File:Madara Head.png|50x50px]] [[File:Adonis Head.png|50x50px]] |
||
| + | |- |
||
| + | |[[Madara Mikejima/Management Story|Madara – 5]] |
||
| + | |[[File:Madara Head.png|50x50px]] [[File:Chiaki Head.png|50x50px]] |
||
| + | |- |
||
| + | |[[Madara Mikejima/Management Story|Madara – 6]] |
||
| + | |[[File:Madara Head.png|50x50px]] [[File:Shu Head.png|50x50px]] |
||
|- |
|- |
||
|[[Kuro Kiryu/Management Story|Kuro – 1]] |
|[[Kuro Kiryu/Management Story|Kuro – 1]] |
||
| Line 392: | Line 940: | ||
|[[Kuro Kiryu/Management Story|Kuro – 2]] |
|[[Kuro Kiryu/Management Story|Kuro – 2]] |
||
|[[File:Kuro Head.png|50x50px]] [[File:Shu Head.png|50x50px]] |
|[[File:Kuro Head.png|50x50px]] [[File:Shu Head.png|50x50px]] |
||
| + | |- |
||
| + | |[[Kuro Kiryu/Management Story|Kuro – 3]] |
||
| + | |[[File:Kuro Head.png|50x50px]] [[File:Chiaki Head.png|50x50px]] |
||
| + | |- |
||
| + | |[[Kuro Kiryu/Management Story|Kuro – 4]] |
||
| + | |[[File:Kuro Head.png|50x50px]] [[File:Souma Head.png|50x50px]] |
||
| + | |- |
||
| + | |[[Kuro Kiryu/Management Story|Kuro – 5]] |
||
| + | |[[File:Kuro Head.png|50x50px]] [[File:Leo Head.png|50x50px]] |
||
| + | |- |
||
| + | |[[Kuro Kiryu/Management Story|Kuro – 6]] |
||
| + | |[[File:Kuro Head.png|50x50px]] [[File:Tsumugi Head.png|50x50px]] |
||
|- |
|- |
||
|[[Wataru Hibiki/Management Story|Wataru – 1]] |
|[[Wataru Hibiki/Management Story|Wataru – 1]] |
||
| Line 398: | Line 958: | ||
|[[Wataru Hibiki/Management Story|Wataru – 2]] |
|[[Wataru Hibiki/Management Story|Wataru – 2]] |
||
|[[File:Wataru Head.png|50x50px]] [[File:Hokuto Head.png|50x50px]] |
|[[File:Wataru Head.png|50x50px]] [[File:Hokuto Head.png|50x50px]] |
||
| + | |- |
||
| + | |[[Wataru Hibiki/Management Story|Wataru – 3]] |
||
| + | |[[File:Wataru Head.png|50x50px]] [[File:Keito Head.png|50x50px]] |
||
| + | |- |
||
| + | |[[Wataru Hibiki/Management Story|Wataru – 4]] |
||
| + | |[[File:Wataru Head.png|50x50px]] [[File:Tomoya Head.png|50x50px]] |
||
| + | |- |
||
| + | |[[Wataru Hibiki/Management Story|Wataru – 5]] |
||
| + | |[[File:Wataru Head.png|50x50px]] [[File:Natsume Head.png|50x50px]] |
||
| + | |- |
||
| + | |[[Wataru Hibiki/Management Story|Wataru – 6]] |
||
| + | |[[File:Wataru Head.png|50x50px]] [[File:Tori Head.png|50x50px]] |
||
|- |
|- |
||
|[[Kanata Shinkai/Management Story|Kanata – 1]] |
|[[Kanata Shinkai/Management Story|Kanata – 1]] |
||
| Line 404: | Line 976: | ||
|[[Kanata Shinkai/Management Story|Kanata – 2]] |
|[[Kanata Shinkai/Management Story|Kanata – 2]] |
||
|[[File:Kanata Head.png|50x50px]] [[File:Madara Head.png|50x50px]] |
|[[File:Kanata Head.png|50x50px]] [[File:Madara Head.png|50x50px]] |
||
| + | |- |
||
| + | |[[Kanata Shinkai/Management Story|Kanata – 3]] |
||
| + | |[[File:Kanata Head.png|50x50px]] [[File:Rei Head.png|50x50px]] |
||
| + | |- |
||
| + | |[[Kanata Shinkai/Management Story|Kanata – 4]] |
||
| + | |[[File:Kanata Head.png|50x50px]] [[File:Kaoru Head.png|50x50px]] |
||
| + | |- |
||
| + | |[[Kanata Shinkai/Management Story|Kanata – 5]] |
||
| + | |[[File:Kanata Head.png|50x50px]] [[File:Wataru Head.png|50x50px]] |
||
| + | |- |
||
| + | |[[Kanata Shinkai/Management Story|Kanata – 6]] |
||
| + | |[[File:Kanata Head.png|50x50px]] [[File:Tetora Head.png|50x50px]] |
||
|- |
|- |
||
|[[Rei Sakuma/Management Story|Rei – 1]] |
|[[Rei Sakuma/Management Story|Rei – 1]] |
||
| Line 410: | Line 994: | ||
|[[Rei Sakuma/Management Story|Rei – 2]] |
|[[Rei Sakuma/Management Story|Rei – 2]] |
||
|[[File:Rei Head.png|50x50px]] [[File:Koga Head.png|50x50px]] |
|[[File:Rei Head.png|50x50px]] [[File:Koga Head.png|50x50px]] |
||
| + | |- |
||
| + | |[[Rei Sakuma/Management Story|Rei – 3]] |
||
| + | |[[File:Rei Head.png|50x50px]] [[File:Ritsu Head.png|50x50px]] |
||
| + | |- |
||
| + | |[[Rei Sakuma/Management Story|Rei – 4]] |
||
| + | |[[File:Rei Head.png|50x50px]] [[File:Natsume Head.png|50x50px]] |
||
| + | |- |
||
| + | |[[Rei Sakuma/Management Story|Rei – 5]] |
||
| + | |[[File:Rei Head.png|50x50px]] [[File:Nazuna Head.png|50x50px]] |
||
| + | |- |
||
| + | |[[Rei Sakuma/Management Story|Rei – 6]] |
||
| + | |[[File:Rei Head.png|50x50px]] [[File:Wataru Head.png|50x50px]] |
||
|- |
|- |
||
|[[Nazuna Nito/Management Story|Nazuna – 1]] |
|[[Nazuna Nito/Management Story|Nazuna – 1]] |
||
| Line 416: | Line 1,012: | ||
|[[Nazuna Nito/Management Story|Nazuna – 2]] |
|[[Nazuna Nito/Management Story|Nazuna – 2]] |
||
|[[File:Nazuna Head.png|50x50px]] [[File:Tori Head.png|50x50px]] |
|[[File:Nazuna Head.png|50x50px]] [[File:Tori Head.png|50x50px]] |
||
| + | |- |
||
| + | |[[Nazuna Nito/Management Story|Nazuna – 3]] |
||
| + | |[[File:Nazuna Head.png|50x50px]] [[File:Tomoya Head.png|50x50px]] |
||
| + | |- |
||
| + | |[[Nazuna Nito/Management Story|Nazuna – 4]] |
||
| + | |[[File:Nazuna Head.png|50x50px]] [[File:Hajime Head.png|50x50px]] |
||
| + | |- |
||
| + | |[[Nazuna Nito/Management Story|Nazuna – 5]] |
||
| + | |[[File:Nazuna Head.png|50x50px]] [[File:Kuro Head.png|50x50px]] |
||
| + | |- |
||
| + | |[[Nazuna Nito/Management Story|Nazuna – 6]] |
||
| + | |[[File:Nazuna Head.png|50x50px]] [[File:Kaoru Head.png|50x50px]] |
||
|- |
|- |
||
|[[Leo Tsukinaga/Management Story|Leo – 1]] |
|[[Leo Tsukinaga/Management Story|Leo – 1]] |
||
| Line 422: | Line 1,030: | ||
|[[Leo Tsukinaga/Management Story|Leo – 2]] |
|[[Leo Tsukinaga/Management Story|Leo – 2]] |
||
|[[File:Leo Head.png|50x50px]] [[File:Ritsu Head.png|50x50px]] |
|[[File:Leo Head.png|50x50px]] [[File:Ritsu Head.png|50x50px]] |
||
| + | |- |
||
| + | |[[Leo Tsukinaga/Management Story|Leo – 3]] |
||
| + | |[[File:Leo Head.png|50x50px]] [[File:Izumi Head.png|50x50px]] |
||
| + | |- |
||
| + | |[[Leo Tsukinaga/Management Story|Leo – 4]] |
||
| + | |[[File:Leo Head.png|50x50px]] [[File:Keito Head.png|50x50px]] |
||
| + | |- |
||
| + | |[[Leo Tsukinaga/Management Story|Leo – 5]] |
||
| + | |[[File:Leo Head.png|50x50px]] [[File:Madara Head.png|50x50px]] |
||
| + | |- |
||
| + | |[[Leo Tsukinaga/Management Story|Leo – 6]] |
||
| + | |[[File:Leo Head.png|50x50px]] [[File:Sora Head.png|50x50px]] |
||
|- |
|- |
||
|[[Tsumugi Aoba/Management Story|Tsumugi – 1]] |
|[[Tsumugi Aoba/Management Story|Tsumugi – 1]] |
||
| Line 428: | Line 1,048: | ||
|[[Tsumugi Aoba/Management Story|Tsumugi – 2]] |
|[[Tsumugi Aoba/Management Story|Tsumugi – 2]] |
||
|[[File:Tsumugi Head.png|50x50px]] [[File:Sora Head.png|50x50px]] |
|[[File:Tsumugi Head.png|50x50px]] [[File:Sora Head.png|50x50px]] |
||
| + | |- |
||
| + | |[[Tsumugi Aoba/Management Story|Tsumugi – 3]] |
||
| + | |[[File:Tsumugi Head.png|50x50px]] [[File:Mika Head.png|50x50px]] |
||
| + | |- |
||
| + | |[[Tsumugi Aoba/Management Story|Tsumugi – 4]] |
||
| + | |[[File:Tsumugi Head.png|50x50px]] [[File:Hokuto Head.png|50x50px]] |
||
| + | |- |
||
| + | |[[Tsumugi Aoba/Management Story|Tsumugi – 5]] |
||
| + | |[[File:Tsumugi Head.png|50x50px]] [[File:Rei Head.png|50x50px]] |
||
| + | |- |
||
| + | |[[Tsumugi Aoba/Management Story|Tsumugi – 6]] |
||
| + | |[[File:Tsumugi Head.png|50x50px]] [[File:Leo Head.png|50x50px]] |
||
| + | |- |
||
|} |
|} |
||
<br /> |
<br /> |
||
Revision as of 16:19, 31 October 2019
Management is a feature that allows you to level up cards, gain affection points, and collect jewels and Yumecoins. Note that you may only manage students from Yumenosaki Academy—this means that cards of the teachers, Eden, or any other collaboration characters cannot be managed.
When you first open the Management page, you will only be able to manage one card at a time. Once you have completed 5 management courses, the second character slot will be unlocked, allowing you to manage 2 separate cards at the same time. Note that if you would like to manage 2 cards at once, they must be of different characters. Currently, you can manage up to 2 cards at once, for a maximum time of 8 hours each.
Note: Some pictures have translations edited in for easier reading.
Management
To begin a management course:
- 1. Click on the blue + sign button to go to the card selection screen
- 2. Click the yellow Change button to select a card. This will bring you to your card list, meaning that cards in the album cannot be chosen. Choose the card that you wish to manage.
3. (Optional) You can set a Management Item by clicking on the white button in the left box. Currently, the only Management Item is the Schedule Book, which is used to increase the number of Jewels and Yumecoins earned during Management, as well as raise the chance of a Conversation Event occurring upon the completion of the course. This item is consumed once the course is completed, and cannot be used again.
4. Select the Management Course you wish to do from the list at the right of the screen. The number in the left of the box indicates how long the course will last. The number on the right shows how many times that course has been completed. The number in gray, at the bottom of each box, shows how much AP each course costs. (You will get 10 times the amount of AP you spend as EXP afterwards, e.g. 400 EXP for a 40 AP course.)
In order to unlock more Management Courses, you must complete each course a certain amount of times. A full #List of Activities and their unlocking conditions can be found at the bottom of this page.
5. Once you have selected your desired Management Course, click the yellow button at the bottom right to start the course. This will bring you to your character performing whatever action you have assigned to them.
You can check back in on them at any time during the duration of the course by clicking the orange Management button in the Home Menu. Management occurs in the background of the app, so you are free to do whatever you would like while it is running. In fact, time will continue to progress even when the app is closed.
Tip: Management is a great way to spend AP when you know you will not be playing the game for a few hours. You can set two 8-hour management courses to run in the background while you sleep, for example. This will consume 120 AP, which takes 6 hours to refill, allowing you to not worry about letting your AP sit full for several hours.
6. The Management Course will complete once its time duration is over. Note that you will receive a phone notification that a course has been completed. You will also see a red exclamation point (!) on the Management button in the Home Menu once a course has been completed. Click on the Management button to see the results of your managing.
There is a chance that you will unlock a Conversation Event upon completing a Management Course. Each character has a few of these events that they can make an appearance in. A full #List of Conversation Events can be viewed in the Management Details screen.
7. Once you have completed five (5) Management Courses, the second character slot will unlock. This allows you to manage 2 cards simultaneously.
Management Details
To access this menu, click on the clipboard icon in the main management screen.
This screen will show you various statistics regarding your management history, as well as allow you to access the List of Activities and the List of Conversation Events.
- The first number shows the number of times management courses were started.
- The second number shows the cumulative amount of time spent managing your cards.
- The character icons show your top 5 most managed idols, as well as how many times you have managed them.
- List of Activities: Shows you the full List of Management Activities. It will also display which courses you have unlocked, and which courses you have yet to unlock.
- List of Conversation Events: Shows you the full List of Conversation Events, and allows you to reread the ones you have unlocked through management.
Management Items
| Item | Effect | How to obtain | Expires |
|---|---|---|---|
Schedule Book |
Increases the number of Jewels and Yumecoins earned during Management, raises the chance of a Conversation Event occurring upon the completion of the course. | Special campaigns | Never |
List of Activities
| Management Duration | EXP per hour | Affection Pts per hour |
|---|---|---|
| 30 mins | 200 | 2 |
| 1 hr | 200 | 1 |
| 2 hrs | 150 | 0.5 |
| 4 hrs | 100 | 0.5 |
| 8 hrs | 75 | 0.375 |
| Management Activity (JP) | Management Activity (EN) | Duration | Affection Points Gained | Activity Required to Unlock | # of Completions Needed to Unlock |
|---|---|---|---|---|---|
| 振り付け確認 | Choreography Rehearsal | 30 min. | 1 Point | n/a | n/a |
| 準備運動 | Warm-Up Exercises | 30 min. | 1 Point | n/a | n/a |
| 勉強 | Studying | 30 min. | 1 Point | Added 9/11/18 | n/a |
| 宣材写真の撮影 | Head Shot Photographing | 30 min. | 1 Point | n/a | n/a |
| 筋トレ | Weight Training | 30 min. | 1 Point | n/a | n/a |
| 廊下のお掃除 | Cleaning the Hallway | 30 min. | 1 Point | n/a | n/a |
| バスケの授業 | Basketball Lesson | 30 min. | 1 Point | Added 11/26/18 | n/a |
| 演技練習 | Acting Practice | 30 min. | 1 Point | Added 5/13/19 | n/a |
| 餌の用意 | Preparing Animal Feed | 30 min. | 1 Point | Added 10/26/19 | n/a |
| 間食 | Snack | 1 hour | 1 Point | Weight Training | 1 time |
| ダンス練習 | Dance Practice | 1 hour | 1 Point | Choreography Rehearsal | 1 time |
| 発声練習 | Speech Practice | 1 hour | 1 Point | Choreography Rehearsal | 3 times |
| ウォーキング | Walking | 1 hour | 1 Point | Warm-Up Exercises | 1 time |
| 縄跳び(初級) | Jump Rope (Basic) | 1 hour | 1 Point | Added 9/11/18 | n/a |
| 商店街でビラ配り | Handing out Fliers (Downtown) | 1 hour | 1 Point | Added 9/11/18 | n/a |
| サッカーの授業 | Soccer Lesson | 1 hour | 1 Point | Added 5/13/19 | n/a |
| ティータイム | Teatime | 1 hour | 1 Point | Added 11/26/18 | n/a |
| お花の水やり | Watering the Flowers | 1 hour | 1 Point | Added 10/26/19 | n/a |
| 軽食 | Quick Meal | 2 hours | 1 Point | Snack | 5 times |
| 休憩 | Break | 2 hours | 1 Point | ? | ? |
| 宿題 | Homework | 2 hours | 1 Point | Studying | 1 time |
| PV撮影 | PV Shooting | 2 hours | 1 Point | Head Shot Photographing | 1 time |
| 書類の整理 | Sorting Documents | 2 hours | 1 Point | Cleaning the Hallway | 1 time |
| テニスの授業 | Tennis Lesson | 2 hours | 1 Point | Basketball Lesson | 5 times |
| ステージ設営手伝い | Helping with Stage Construction | 2 hours | 1 Points | Added 5/13/19 | n/a |
| 動物の世話 | Looking after Animals | 2 hours | 1 Points | Preparing Animal Feed | 5 times |
| 歌唱練習 | Singing Practice | 4 hours | 2 Points | Speech Practice | 5 times |
| ジョギング | Jogging | 4 hours | 2 Points | Walking | 5 times |
| 仮眠 | Nap | 4 hours | 2 Points | ? | ? |
| PV撮影(ロケ) | PV Shooting (On Location) | 4 hours | 2 Points | PV Shooting | 5 times |
| 縄跳び(上級) | Jump Rope (Advanced) | 4 hours | 2 Points | Jump Rope (Basic) | 5 times |
| 学院のお掃除 | Cleaning the School | 4 hours | 2 Points | Cleaning the Hallway | 5 times |
| ライブ音源確認 | Live Sound Test | 4 hours | 2 Points | Added 11/26/18 | n/a |
| ライブ映像確認 | Checking Live Show Footage | 4 hours | 2 Points | Acting Practice | 5 times |
| 食事 | Meal | 8 hours | 3 Points | Quick Meal | 5 times |
| ソロパート練習 | Solo Part Practice | 8 hours | 3 Points | Singing Practice | 5 times |
| テスト勉強 | Studying for a Test | 8 hours | 3 Points | ? | ? |
| 筋トレ(上級) | Weight Training (Advanced) | 8 hours | 3 Points | Weight Training | 5 times |
| 備品の整理 | Sorting Fixtures | 8 hours | 3 Points | Sorting Documents | 5 times |
| 繁華街でビラ配り | Handing out Fliers (Business District) | 8 hours | 3 Points | Handing out Fliers (Downtown) | 5 times |
| 音響設営手伝い | Helping with Sound System Setup | 8 hours | 3 Points | Helping with Stage Construction | 5 times |
| アフタヌーンティー | Afternoon Tea | 8 hours | 3 Points | Teatime | 5 times |
List of Conversation Events