*<font color=green>'''''Tip:'''''</font> Tapping your '''Rank''' will lead to a small tab popping out that allows you to check exactly how much EXP you need till your next rank up like so:<br>[[File:Exp_tab.png|center]]
+
*<font color=green>'''''Tip:'''''</font> Tapping your '''Rank''' will lead to a small tab popping out that allows you to check exactly how much EXP you need till your next rank up like so:<br>[[File:Exp_tab.png|center|380px]]
|-
|-
|
|
Line 103:
Line 103:
**LP limit is 5, and does not change upon leveling up your Player Rank.
**LP limit is 5, and does not change upon leveling up your Player Rank.
*Ways to replenish your AP & LP can be found in [[#Items]]. Leveling up will always restore all your AP & LP instantly.
*Ways to replenish your AP & LP can be found in [[#Items]]. Leveling up will always restore all your AP & LP instantly.
−
*You can '''overflow''' your AP and LP up to 400 and 10, respectively, through leveling up or using an item that restores AP or LP.
+
*You can '''overflow''' your AP and LP up to 400 and 10, respectively, through leveling up or using an item that restores AP or LP.
**Any remaining AP and LP that you have upon leveling up will be added to your total AP and LP. If you level up with 50 AP remaining, for example, you will end up with 250 AP.
**Any remaining AP and LP that you have upon leveling up will be added to your total AP and LP. If you level up with 50 AP remaining, for example, you will end up with 250 AP.
**You cannot overflow past 400 AP and 10 LP. AP and LP will not continue to accrue naturally when in an overflow state--you must lower your current AP or LP below the usual cap (200 AP and 5 LP) for natural recovery to occur.
**You cannot overflow past 400 AP and 10 LP. AP and LP will not continue to accrue naturally when in an overflow state--you must lower your current AP or LP below the usual cap (200 AP and 5 LP) for natural recovery to occur.
|It's useful for finding cards you need to max the affection points of.
+
|It's useful for finding cards you need to max the affection points of.<br>There may also be an icon of the character's face that isn't associated with a card; this states affection points gained through normal or birthday greeting events.
|-
|-
|
|
Line 243:
Line 243:
*'''Name change:''' Change your nickname and story name here.
*'''Name change:''' Change your nickname and story name here.
*'''Unit info:''' See Unit descriptions here. Clicking the character icons here will lead to their [[#Student's Profile Page]] too.
*'''Unit info:''' See Unit descriptions here. Clicking the character icons here will lead to their [[#Student's Profile Page]] too.
−
*'''Help:''' How to play guide on Happy Element's website (in Japanese)
+
*'''Help:''' How to play guide on Happy Element's website. (in Japanese)
*'''Set password for Account Transfer:''' Set a password here so that you can use it transfer your account between devices. See [[#How to transfer Game Data to another Device]] for more details.
*'''Set password for Account Transfer:''' Set a password here so that you can use it transfer your account between devices. See [[#How to transfer Game Data to another Device]] for more details.
<font color=red>NOTE</font>: You cannot transfer an account without a password so make sure to set one and keep a screenshot of the details somewhere safe.
<font color=red>NOTE</font>: You cannot transfer an account without a password so make sure to set one and keep a screenshot of the details somewhere safe.
Line 263:
Line 263:
*'''LP Full Recovery''' - Lets you know when LP bar is full. On by default.
*'''LP Full Recovery''' - Lets you know when LP bar is full. On by default.
*'''Management Course Completion''' - Lets you know when a character has finished a management course. On by default.
*'''Management Course Completion''' - Lets you know when a character has finished a management course. On by default.
−
*'''Course events''' - Toggle whether you want to turn off (talking) events if you have already completed all of them for the course. ''[[#Lesson_Information|See Lesson Information]]''. Off by default.
+
*'''Course events''' - Toggle whether you want to turn off normal/special events if you have already completed all of them for the course. ''[[#Lesson_Information|See Lesson Information]]''. Off by default.
*'''Event Course mini-events''' - Toggle whether you want to see [[#Mini_Events|mini-events]] in Event Courses. Off by default.
*'''Event Course mini-events''' - Toggle whether you want to see [[#Mini_Events|mini-events]] in Event Courses. Off by default.
**You can change your password as many times as you want.
**You can change your password as many times as you want.
|-
|-
−
! style="background:#2f2f2d; color:#fff; font-size:14px; padding:3px 10px; text-align:center;" |Transferring to Another Device
+
! style="background:#2f2f2d; color:#fff; font-size:14px; padding:3px 10px; text-align:center;" |Transferring to Another Device
|-
|-
|[[File:TransferGame.png|center|600px]]
|[[File:TransferGame.png|center|600px]]
Line 311:
Line 311:
|-
|-
|
|
−
For iOS users, codes must be redeemed through [http://stars.hekk.org/web_campaigns this page]
+
For iOS users, codes must be redeemed through [http://stars.hekk.org/web_campaigns this page].
*For the first row, choose a choice.
*For the first row, choose a choice.
+
**The current choices are:<br>・ [Select One]<br>・ Youth Concerto Novel<br>・ Revolutionary Victory Song Novel<br>・ Happy Elements Guidebook Vol.1<br>・ Happy Elements Guidebook Vol.2
*The second row is your user ID, which is found in the settings page.
*The second row is your user ID, which is found in the settings page.
*The last row is your code. Once they are all filled out, you will receive your gift.
*The last row is your code. Once they are all filled out, you will receive your gift.
Revision as of 17:54, 23 March 2019
Current as of March 2019. Feel free to leave a comment if you have any questions.
Ensemble Stars is a card collecting game that requires simple strategy, but leans mainly towards interaction with the characters and stories.
A key feature of the game is that, unlike many idol-themed games, it is not a rhythm game. According to the creators, they wanted to make a game that did not involve "skill" per se, but rather was able to be played and enjoyed by anyone. As such, the main focus is the story of the game, hence the simplistic nature of the gameplay.
Learning to strategically use your resources and time, in order to maximize your cards' strengths and optimize your teams, is the key to success in Ensemble Stars. Of course, luck is a component of the game, as with most card collecting games of this nature.
This guide serves as a compiled resource to help you understand the main mechanics of the game. If you are completely new to Ensemble Stars, and have just downloaded the app, you might want to check out Introduction to the Game first! Clicking that link will bring you to a step-by-step guide on how to complete the in-game tutorial. And, of course, if you are looking for more information on a specific mechanic, feel free to look at the Guides page!
The links with a # will lead you to a different heading in the page. Any other links will direct you to other pages on the wiki, or outside resources. (For example, #How to Download the Game: will lead you to the first header.)
Note: Some pictures have translations edited in for easier reading--they do not actually appear that way in-game.
If there's any information missing, feel free to leave suggestions in the comments!
While these achievements are not mandatory to complete, they provide helpful bonuses to beginners such as producer points (for scouting and leveling up your cards) and jewels (for idol road completion). All tiers of these bonuses are listed below.
List of Tasks
ユーザーランクをxまで上げる Reach Rank x
Amount
Reward
10
x 10,000
20
x 150, x 150, x 150
30
x 10, x 10, x 10
40
x 5, x 5, x 5
メインストーリーを第x話まで読む Read the Main Story Through Chapter x
Amount
Reward
8
x 100, x 100, x 100
17
x 20,000
28
x 10, x 10, x 10
39
x 5, x 5, x 5
カードをx枚集める Collect x Cards
Amount
Reward
20
x 10,000
30
x 10, x 10, x 10
40
x 5, x 5, x 5
カードをx枚レベルMAXにする Raise x Cards to Max Level
Amount
Reward
1
x 100, x 100, x 100
5
x 20,000
10
x 10, x 10, x 10
アイドルロードでxマス開放する Unlock x Squares in Anyone's Idol Road
Amount
Reward
10
x 100, x 100, x 100
20
x 20,000
50
x 10, x 10, x 10
カードをx枚才能開花する Bloom x Cards
Amount
Reward
1
x 100, x 100, x 100
3
x 10, x 10, x 10
5
x 5, x 5, x 5
10
x 5, x 5, x 5
ドリフェスバトルでx回勝利する Win x DreamFes Battles
Amount
Reward
5
x 10,000
10
x 150, x 150, x 150
20
x 10, x 10, x 10
30
x 5, x 5, x 5
キャラクターの親愛度rankをxに上げる Raise a Character's Intimacy Rank to Rank x
Amount
Reward
2
x 10,000
3
x 150, x 150, x 150
4
x 10, x 10, x 10
5
x 5, x 5, x 5
Navigation
Title Screen
Clear Cache: Clears the game cache. If you are having loading problems with the game, you might want to try this.
Terms and Conditions: The Terms and Conditions for the app.
Contact Us: Form for contacting Happy Elements when you have a problem with the game (such as your dia purchase not going through or if there is a bug).
Opening: Press to watch the game opening again. You can also watch the opening here.
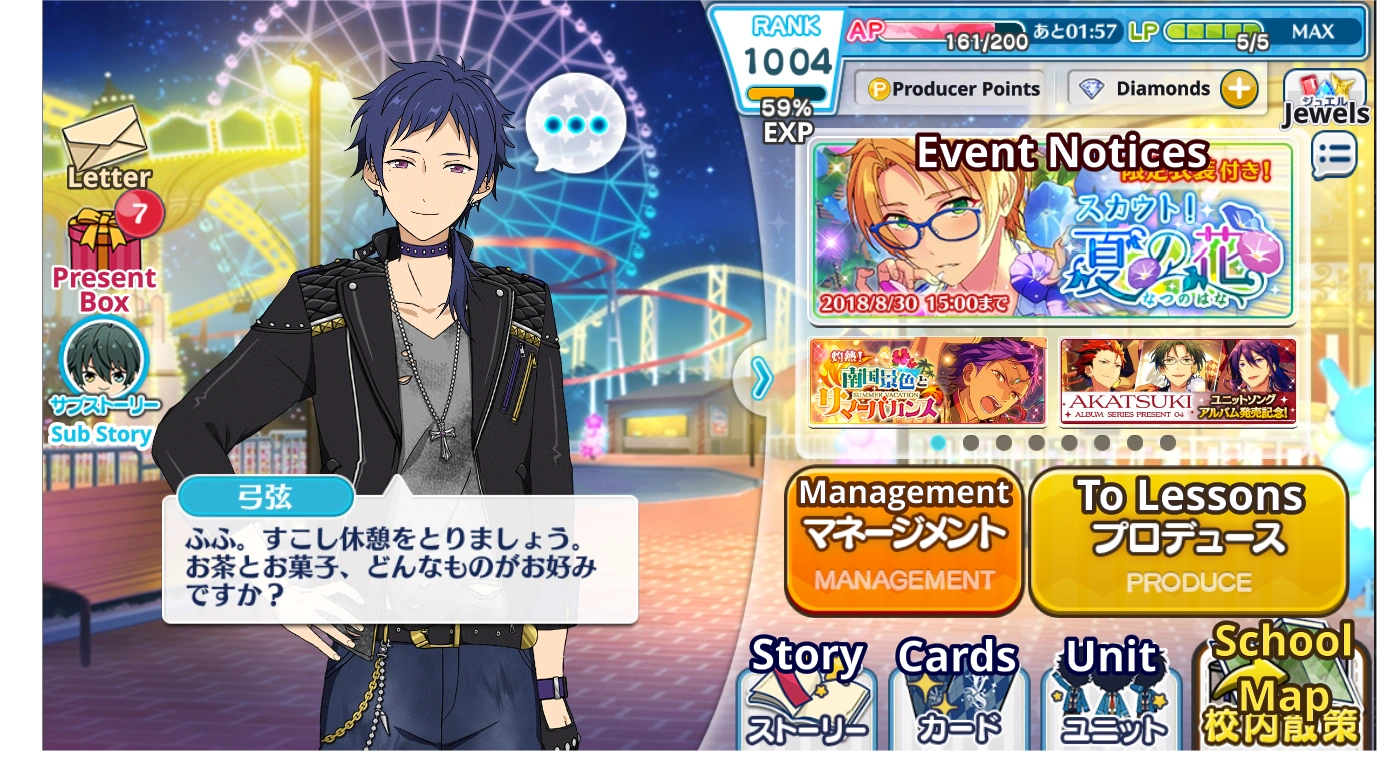
Home Menu (My Room)
Rank: Your Player Rank. Level it up to increase your max AP.
Event Notices: Slideshow featuring the current Events, Limited Scouts, campaigns, or other promotions.
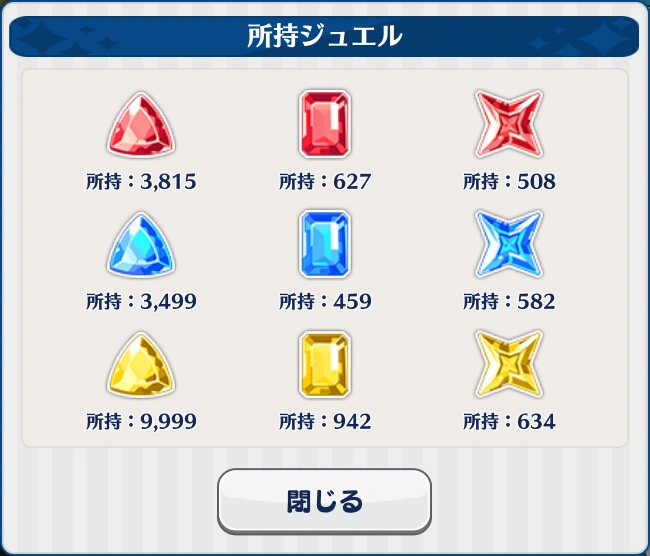
Jewels: Displays the current amount of small, medium, and large jewels you have in each color.
Speech Bubble: Clicking on the Speech Bubble will bring you to a Greeting Event, which automatically earns you a third of an affection heart or Producer Points. It resets at 12:00 A.M. and 12:00 P.M. JST every day. Note: Greeting Events are time dependent, meaning that there are different events that you will receive based on the time of day you click the Speech Bubble. However, unlike Voice Lines, Greeting Events are aligned to the time in JST, not the internal time on your device.
#Management: Brings you to the Management menu, where you can set cards to be managed, check Management status, or claim Management rewards. When a Management course is complete, this button will have a red exclamation point notification.
To Lessons (lit. Produce training): Guides the player to the #Lesson page or allows the player to resume the Lesson they are currently in.
#Story: Story Menu, in which you can access the Main Story, Event and Scout stories, and Character stories.
#Cards: Brings you to your card list, where you can see all your cards that have not been placed in the album.
#Unit: Allows you change the cards in your Produce Units, DreamFes Units, and Live Units.
#School Map: Leads to a menu where you can access more options, such as the Settings, DreamFes, Individual Character pages and such like.
Letter: Recent news can be viewed here. It is organized into Event News (blue), Scout News (same blue), and Other (green). The last 20 news posts are viewable.
Present Box: Where gifts and #Items are sent to and can be claimed from. The date displayed to the right of the item/card is the expiration date in JST.
The first tab shows all items, the second tab shows items that do not expire in your inventory (cards, diamonds, Story/Background Keys, Yumecoins, etc), and the third tab shows items that do expire in your inventory (Sports Drinks and Yakisoba Bread).
#Beginner Bonuses: A list of various tasks to be completed. Doing these tasks will earn you items, such as Producer Points and jewels.
Sub Story: Every day, a Sub Story is made available to read for free. The character shown in the icon indicates whose Sub Story it is. Clicking this icon allows you to read the story. For more details, see Daily Sub Story.
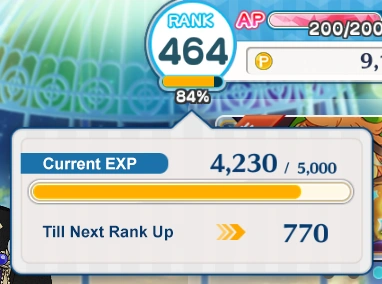
Tip: Tapping your Rank will lead to a small tab popping out that allows you to check exactly how much EXP you need till your next rank up like so:
Player Rank and AP & LP
To increase your Player Rank, you must complete Lessons to gain EXP and level up.
AP is used for Lessons and Management courses.
Recovers by one every 3 minutes.
AP increases with your Player Rank. (Maxes out at 200 AP)
LP is used for DreamFes Lives, PVP, and Event Lives.
Recovers by one every 30 minutes.
LP limit is 5, and does not change upon leveling up your Player Rank.
Ways to replenish your AP & LP can be found in #Items. Leveling up will always restore all your AP & LP instantly.
You can overflow your AP and LP up to 400 and 10, respectively, through leveling up or using an item that restores AP or LP.
Any remaining AP and LP that you have upon leveling up will be added to your total AP and LP. If you level up with 50 AP remaining, for example, you will end up with 250 AP.
You cannot overflow past 400 AP and 10 LP. AP and LP will not continue to accrue naturally when in an overflow state--you must lower your current AP or LP below the usual cap (200 AP and 5 LP) for natural recovery to occur.
Level Up Stat Boosts & Rewards (Incomplete)
Rank
AP
Until next Rank
Story Unlocked
1
10
100
Hierarchy - Friendship
2
30
120
Hierarchy - Interaction
3
31
140
Hierarchy - Academy
4
32
160
Hierarchy - Signature
5
33
180
Hierarchy - Position
6
34
200
Hierarchy - New Wind
7
35
220
Hierarchy - Riot
8
36
240
Hierarchy - The Battle Begins
9
37
260
Hierarchy - Hungry Wolf
10
38
280
Hierarchy - Crouching Dragon
11
39
300
Hierarchy - Special Attack
12
40
320
Hierarchy - Intrusion
13
41
Hierarchy - Contact
14
42
Hierarchy - Oppression
15
43
Hierarchy - Assistance
16
44
Hierarchy - Monologue
17
45
Hierarchy - Hope
18
46
Rebellion - Teacher
19
47
Rebellion - Welcome
20
48
Rebellion - The Devil's Army
21
49
800
Rebellion - The Devil King
22
50
900
Rebellion - Guide
23
52
1000
Rebellion - Objective
24
54
1100
Rebellion - Auditorium
25
56
1200
Rebellion - Trials
26
58
1300
Rebellion - Captive
27
60
1400
Rebellion - Howl
28
62
1500
Rebellion - Bright Future
29
64
1600
Rebellion - Peace of Mind
30
66
1700
Rebellion - Criticism
31
68
1800
Rebellion - Decision
32
70
1900
Rebellion - Before Dawn
33
72
2000
Rebellion - Divine Spirits
34
74
2200
Rebellion - Reception
35
76
2400
Rebellion - Childish Innocence
36
78
2600
Rebellion - Reigning Champion
37
80
2800
Rebellion - Sweating Blood
38
82
3000
Rebellion - Darkness
39
84
3200
Rebellion - Cry of Despair
40
86
3400
Revolution - Birth
41
88
3600
Revolution - Investigation
42
90
3800
Revolution - Villainy
43
92
4000
Revolution - Trust
44
96
4200
Revolution - Meeting Up
45
98
4400
Revolution - Unity
46
98
4600
Revolution - A New Song
47
100
4800
Revolution - Summer Breeze
48
102
5000
Revolution - Assistance
49
104
5000
Revolution - Refreshments
50
106
5000
Revolution - Equals
51
108
5000
Revolution - Harmony
52
110
5000
Revolution - Concern
53
112
5000
Revolution - Seriously
54
114
5000
Revolution - Execution
55
116
5000
Revolution - Opening
56
118
5000
Revolution - Obstacles
57
120
5000
Revolution - Domination
58
122
5000
Revolution - Challenge
59
124
5000
Revolution - Showdown
60
126
5000
Revolution - Cunning
61
128
5000
Revolution - Determination
62
130
5000
Revolution - Chaos
63
132
5000
Kingdom - The Big Day
64
134
5000
Kingdom - Spectators
65
136
5000
Kingdom - Debut
66
138
5000
Kingdom - Stars of the Show
67
140
5000
Kingdom - Blooming
68
142
5000
Kingdom - Climax
69
144
5000
Kingdom - Blessing
70
146
5000
Kingdom - Goddess
71
148
5000
Kingdom - Destiny
72
150
5000
Kingdom - Trial
73
152
5000
Kingdom - Revolution
74
154
5000
Kingdom - Atonement
75
156
5000
Kingdom - Disgrace
76
158
5000
Kingdom - Triumphant Return
77
160
5000
Kingdom - Emperor
78
162
5000
Kingdom - The Morning After
79
164
5000
Kingdom - Fruit of their Labor
80
166
5000
Kingdom - Confrontation
81
168
5000
Kingdom - Imperial Edict
82
170
5000
Kingdom - Temptation
83
172
5000
Kingdom - Tactics
84
174
5000
Kingdom - Reality
85
176
5000
Kingdom - Life
86
178
5000
Kingdom - Regulation
87
180
5000
Kingdom - Execution
88
182
5000
Kingdom - Magnificence
89
184
5000
Kingdom - Absolute Victory
90
186
5000
Kingdom - Pledge
91
188
5000
Ensemble - Fissure
92
190
5000
Ensemble - Loneliness
93
192
5000
Ensemble - Encouragement
94
194
5000
Ensemble - Hot-Blooded
95
196
5000
Ensemble - Comeback
96
198
5000
Ensemble - Hopes
97
200
5000
Ensemble - Announcement
98
200
5000
Ensemble - Courage
99
200
5000
Ensemble - Commencement
100
200
500
Ensemble - Strong Enemy
101
200
5000
Ensemble - Hardship
102
200
5000
Ensemble - Caution
103
200
5000
Ensemble - True Intentions
104
200
5000
Ensemble - Impatience
105
200
5000
Ensemble - True Feelings
106
200
5000
Ensemble - Turnaround
107
200
5000
Ensemble - Cleverness
108
200
5000
Ensemble - Regret
109
200
5000
Ensemble - Dream Eater
110
200
5000
Ensemble - Arrival
111
200
5000
Ensemble - Justice
112
200
5000
Ensemble - Anomaly
113
200
5000
Ensemble - Reinforcements
114
200
5000
Ensemble - Counterattack
115
200
5000
Ensemble - Rapid Progress
116
200
5000
Ensemble - Rest
117
200
5000
Ensemble - Expectations
118
200
5000
Ensemble - Rush
119
200
5000
Ensemble - Stage
120
200
5000
Ensemble - Awestruck
121
200
5000
Ensemble - Letter
122
200
5000
Ensemble - Scenery
123
200
5000
Ensemble - Military Order
124
200
5000
Ensemble - Contrast
125
200
5000
Ensemble - Return
126
200
5000
Ensemble - Resolution
127
200
5000
Ensemble - Determination
128
200
5000
Ensemble - Duel
129
200
5000
Ensemble - Decisive Battle
130
200
5000
Ensemble - Conclusion
131
200
5000
Ensemble - Fate
132
200
5000
Ensemble - Victory And Defeat
133
200
5000
Ensemble - Miracle
134
200
5000
Ensemble - Celebration
Character Screen
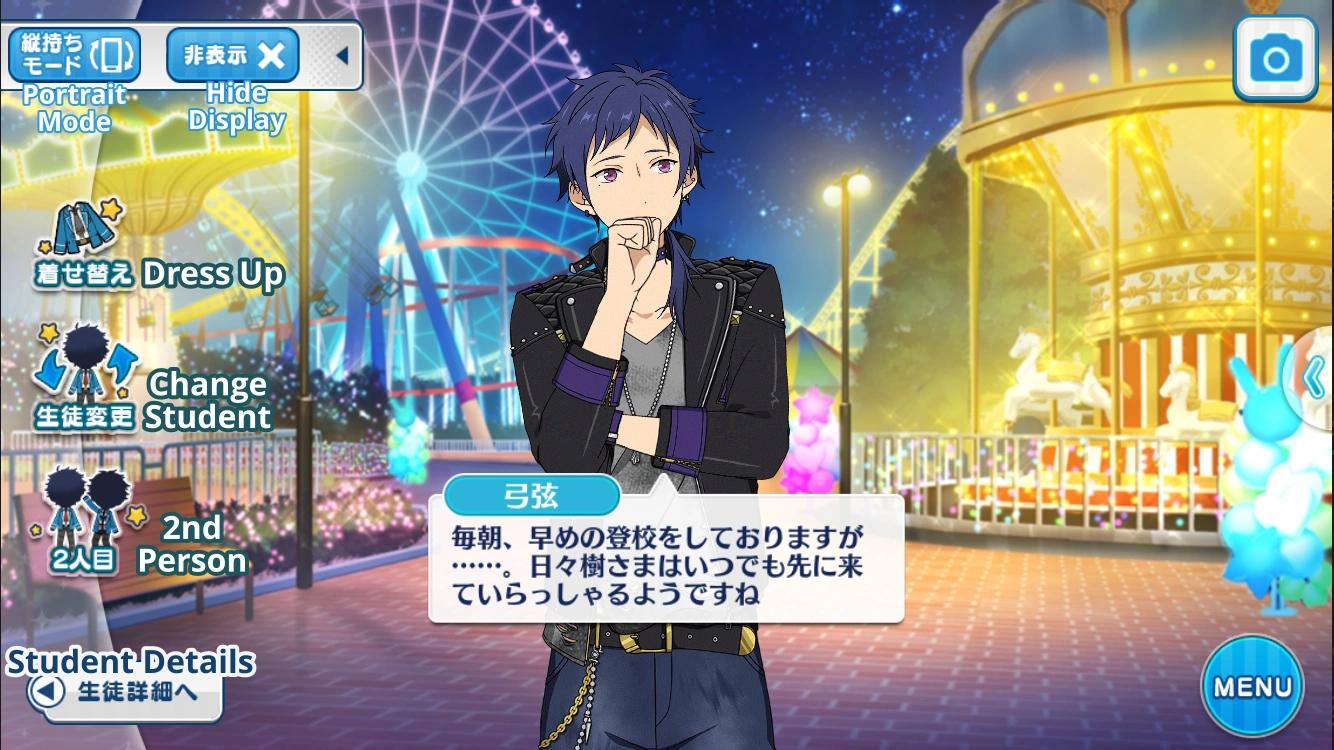
Portrait Mode: Flips the screen into portrait, giving you a close-up of whoever is on screen.
Hide Display: Removes all display items, leaving only the background and whoever is on screen.
Dress Up: Allows you to change the outfit and background you have unlocked from Event or Scout cards for the character, as well as the background music.
Change Student: Allows you to change the student that is currently on screen.
2nd Person: Allows you to add a second student to the screen. Does not persist once you return to the Home Screen.
Student Details: Brings you to the student’s full profile page.
Camera: Opens up a camera that allows you to take pictures with your character(s) overlaid on top. Can only use the outward-facing camera on your device. Character(s) can be moved around by dragging them around the screen. Images can be viewed in an auto-created album called あんスタグラム (Enstagram) in the pictures app on your device. Note that you will be asked to give permission for the app to use your camera, as well as for file access. If you have denied access in the past, you may open the settings on your device to allow permission.
#Scout: Where the player can obtain new cards through the Scouting.
#DreamFes (PvP): Where the player can fight other random players for various rewards.
Classroom: List of the students organized by class. Individual student profiles can be accessed from here, where you can check their details and change their clothes and backgrounds to ones that you have acquired from specific event or gacha cards.
To Another School: Allows you to access the character profiles for Reimei Academy, Shuuetsu Academy, and collaboration characters.
You can also access these profiles through the Classroom. Simply click on the Classroom, and then click the white button at the top of the screen.
Live Requests: Where the player can view current Event Lives in progress (during an Event).
Locker: Allows the player to view all their items.
Message Board: Where the player can talk with other players. There are multiple language-specific boards here, including an English one.
Diamond Shop: Where you can purchase diamonds (or "dia" for short) for use in gameplay. See this page for more details. The Yumecoin shop and Star Medal Shop may be reached here as well.
Revival Events: Past events can be played again here at certain intervals of time between main events. See here for more details .
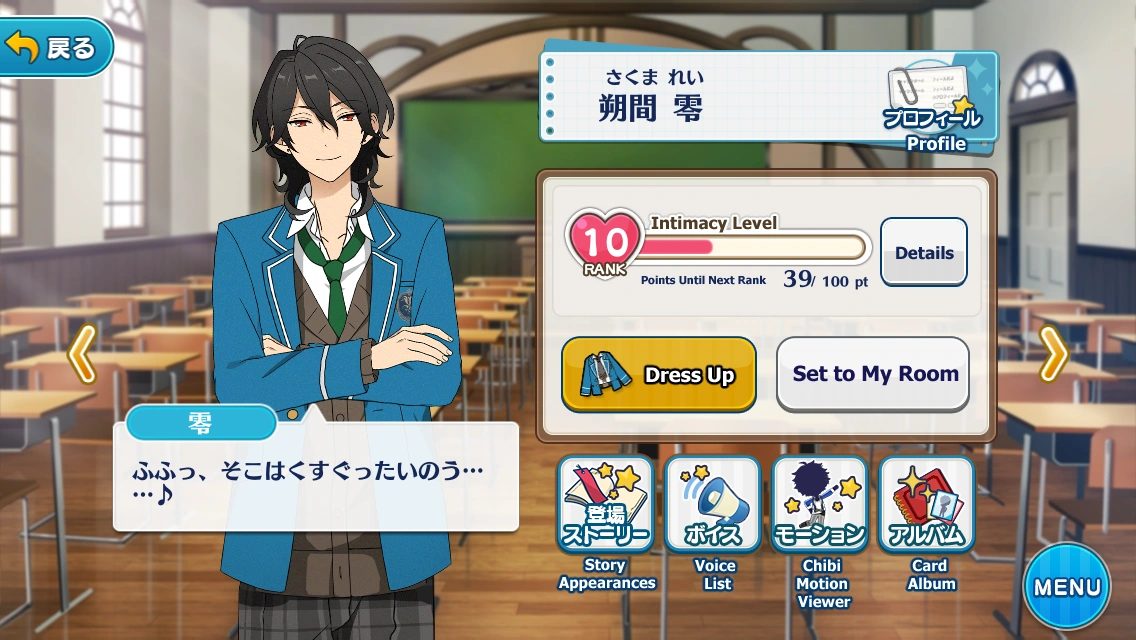
Profile: Click to see a detailed bio on the the character.
Intimacy/Affection Level: Level up to unlock voice clips and sub-stories for that character. See #Intimate Events for more details.
Details: Lets you unlock the obtained voice clips and check the affection points of individual cards.
Dress Up: Allows you to change the outfit and background you have unlocked from Events or Scout cards for the character.
Voice List: List of voice clips of the character which can be played at will. They are unlocked through the Intimacy Levels or the Idol Roads of certain cards of that character.
Card Album: A gallery of all the cards you have obtained. They can be clicked on to view details. Stored cards in the albums will have a red bookmark on the corner of the card.
Story Appearances: Lists all stories that the character makes an appearance in.
Chibi Motion Viewer: Written as "Motion". Opens up a practice room to view the characters' lesson motions part by part.
Set to My Room: Sets the character to be seen at all times in the Home Menu. Only one character can be chosen at a time.
If the selected character is already set to My Room, pressing the button will result in a random other student being placed in My Room and continuing to cycle until a specific student is chosen again.
Dress Up Details
When you click on the Dress Up button, you are brought to the Outfits tab of the Dress Up area first. Any outfit without a lock image over it is able to be used right away.
If an outfit is locked, there are a couple possibilities for the message that will pop up:
夢コインショップで交換 = Buy in the Yumecoin Shop. Outfits are generally 500 Yumecoins. If you click the yellow button on the right, it will take you to the shop.
[card name]アイドルロードで開放 = Unlock in a card's Idol Road. If you don't have the card, the red text below is telling you that. If you do have the card, you can click the yellow button to the right to take you directly to its card page.
The sorting options for outfits are:
Display Conditions: All | Unlocked | Locked
Type: All | School Uniform | Casual Clothes | Practice Clothes | Live Outfit | Scout Outfit | Other
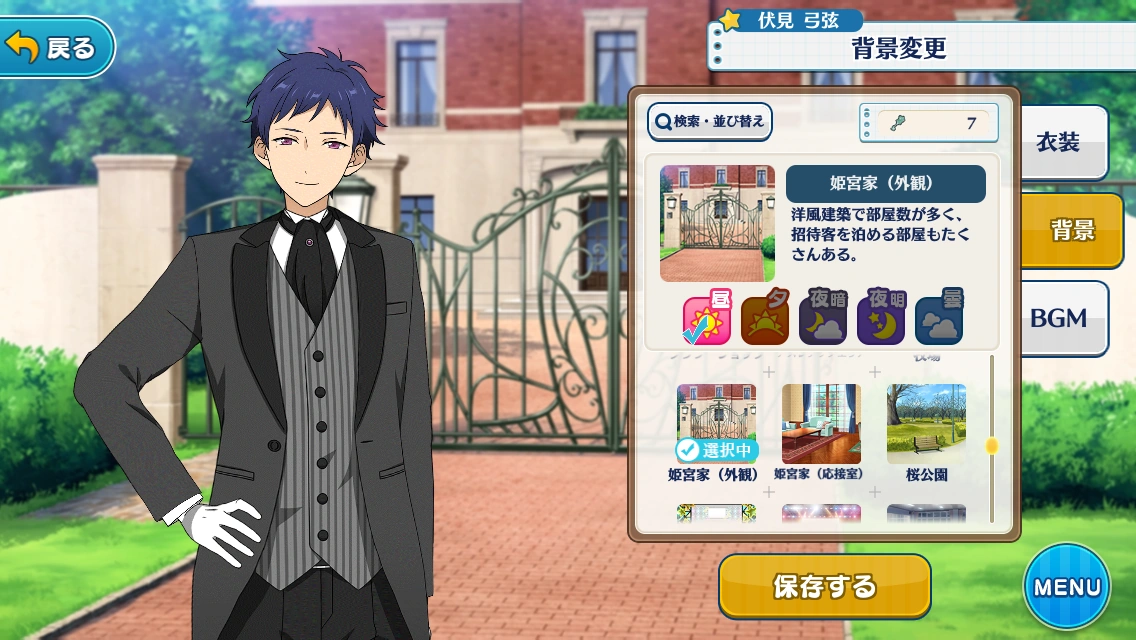
When clicking on the Backgrounds tab, you will be brought to this screen. Similarly to the Outfits tab, any unlocked background is fit to use right away.
If a background is locked, there is only one way to unlock it immediately; through use of a Background Key, only received through special campaigns like Login Bonuses. The amount of Background Keys you have is shown beside the sorting options.
Backgrounds are set to a specific time of day. The times of day available are, in order: Afternoon, Evening, Dark Night, Lit Night, and Cloudy.
If a time of day has a lock on it, it means that it is possible to buy another time other than the default for that background. These can be bought in the Yumecoin Shop for 300 Yumecoins, but only if you have the background itself unlocked.
It is possible to obtain backgrounds from specific cards' Idol Roads, from events, and from special campaigns.
The sorting options for backgrounds are:
Display Conditions: All | Obtained | Unobtained
Event: All | Obtained via Event | Not Obtained via Event
Stage: All | On Stage | Not on Stage
Outside School/Inside School: All | Inside School | Outside School
Indoors/Outdoors: All | Indoors | Outdoors
Season: All | Spring | Summer | Fall | Winter
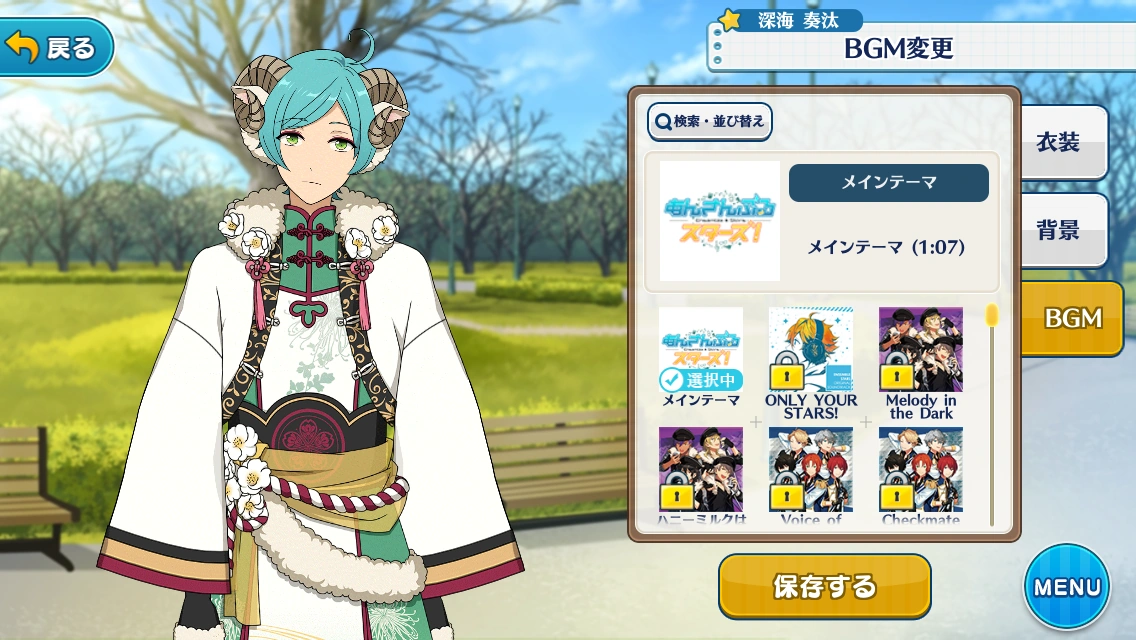
Changes the BGM that plays while you're on that character's page, or the music that plays on your My Room screen if they are selected. This is defaulted to the Enstars main theme, but can be changed to snippets of unit songs and past event BGM.
Additional BGM can only be bought through the Yumecoin Shop. Rarely, a special campaign will also give you BGM to use. BGM costs 300 Yumecoins to buy, and a sample can be listened to before buying.
The sorting options for BGM are:
Display Conditions: All | Unlocked | Locked
Type: All | Event | Unit Songs | Other
Intimacy Level Details
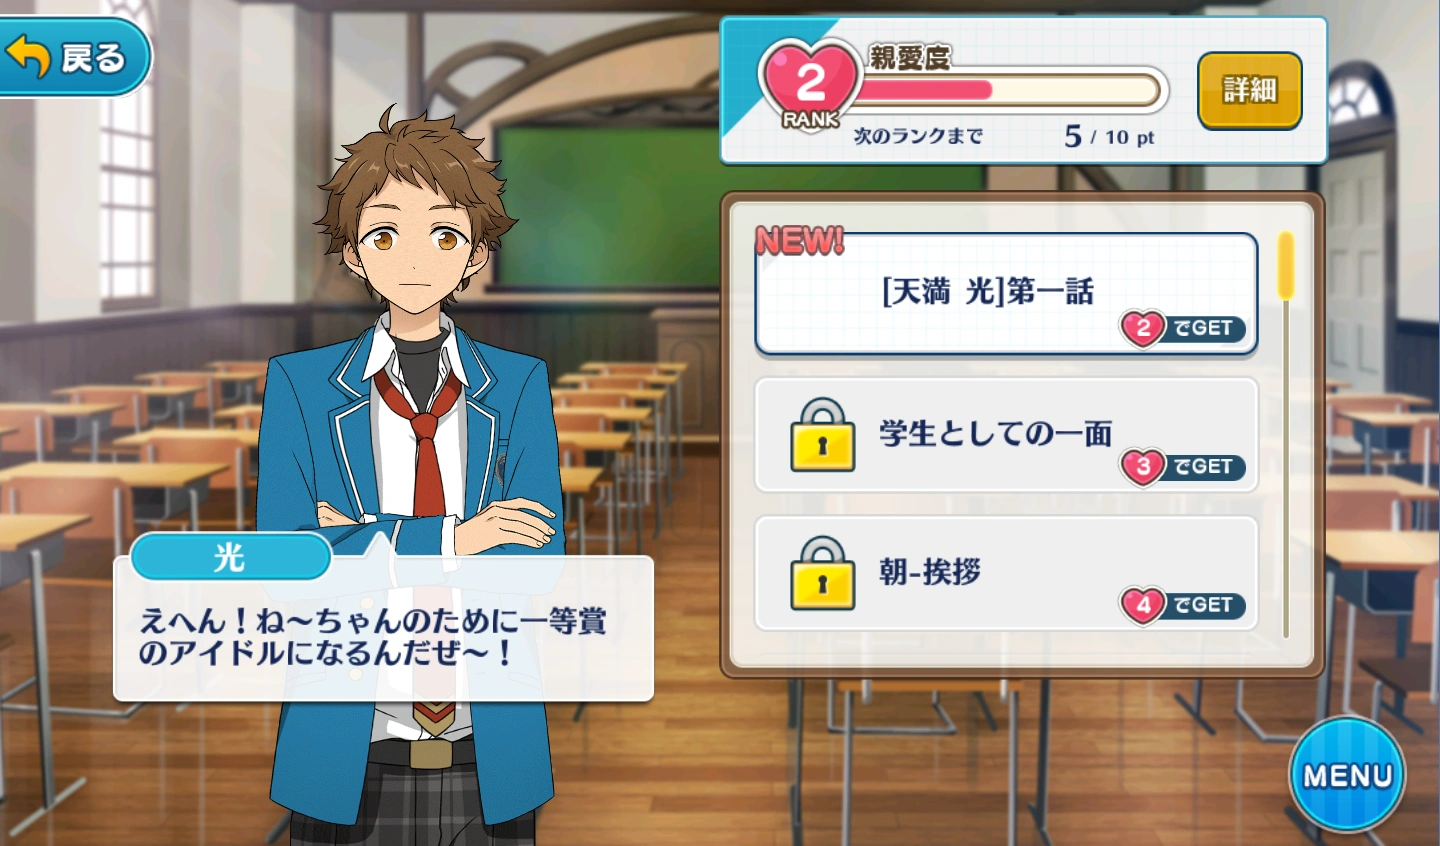
Claim voice clips and sub-stories here by clicking on the boxes here marked with "NEW!"
A window will pop up asking if you want to read it or not.
If you choose to read it later you can just find it again in the "Student" tab of the "Story" menu page. Just select the character you want and you will find it unlocked there now.
Story Chapters are those with [Character name]第#話, while the rest are voice samples that you can listen to in "Voice List".
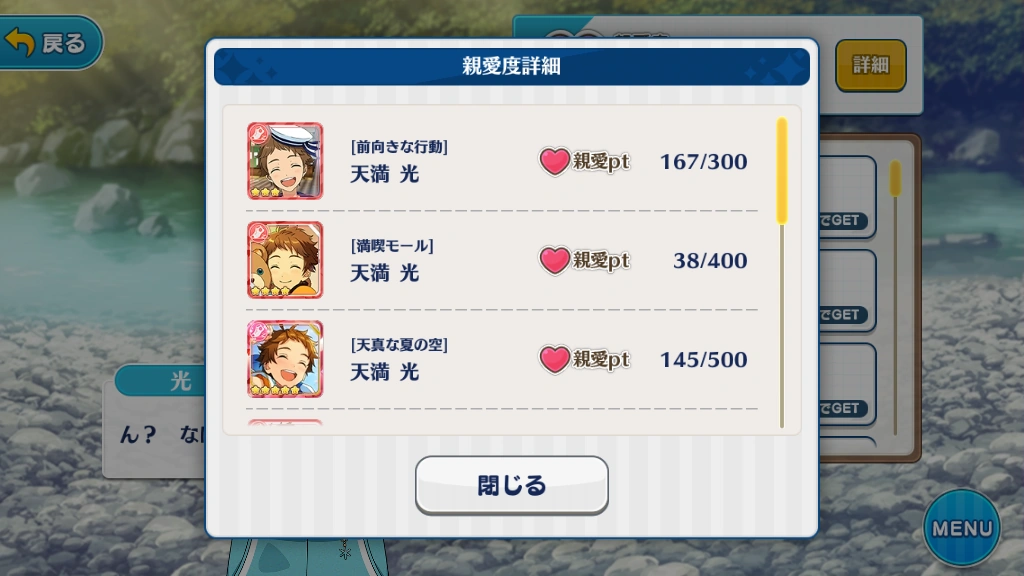
If you click the big yellow button at the top right of this page, it will open a window where you can check the affection points of individual cards like so:
It's useful for finding cards you need to max the affection points of. There may also be an icon of the character's face that isn't associated with a card; this states affection points gained through normal or birthday greeting events.
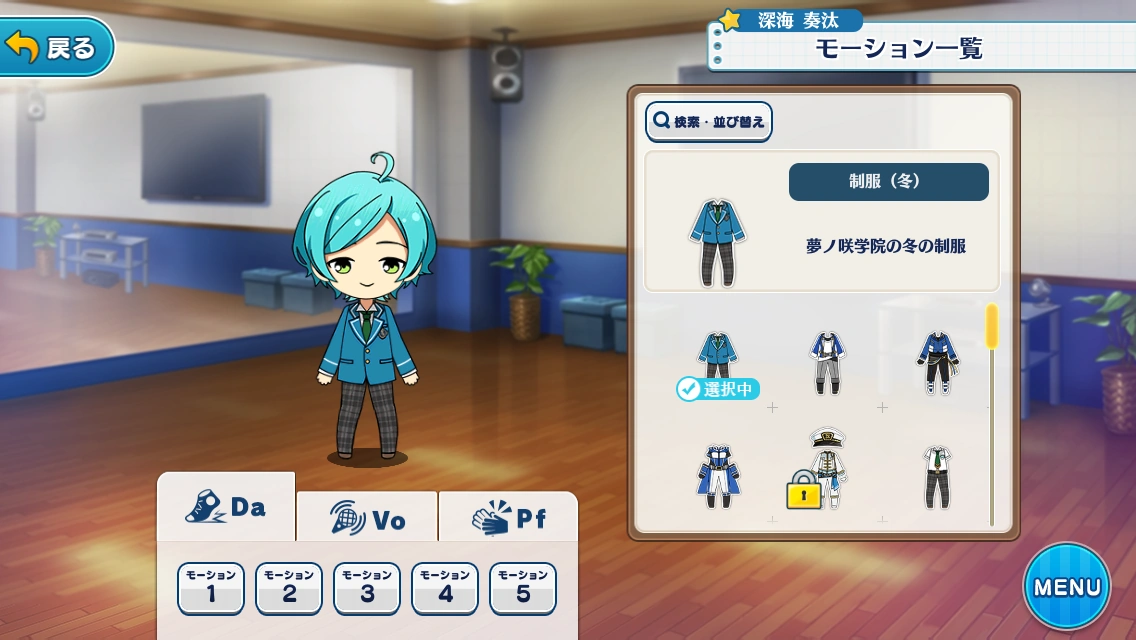
Chibi Motion Viewer
The Chibi Motion Viewer allows you to view the chibis of all the cards you've obtained, whether they come with outfits in their idol roads or not. The dances, songs, and performances that the chibis perform during lessons are broken up into steps here (モーション (Motion) 1, 2, 3, etc) so that you can view them separately or create your own set of movements.
For 5☆ cards, their bloomed chibi's Motion 5 is always their special animation.
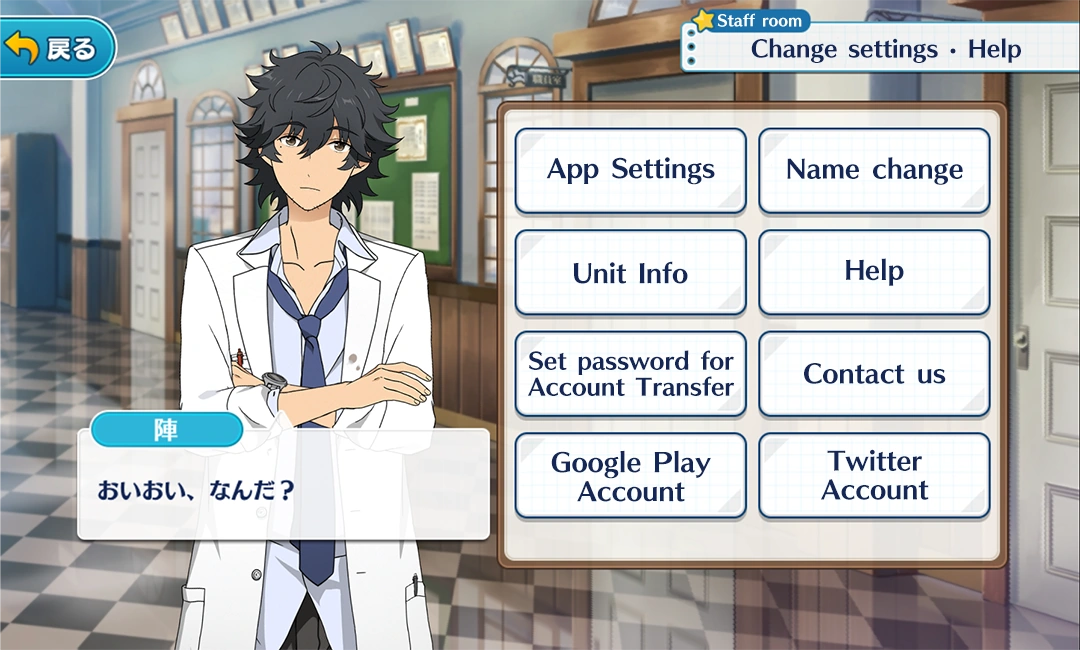
Settings
App settings: Self explanatory. Change various notification settings here.
Name change: Change your nickname and story name here.
Unit info: See Unit descriptions here. Clicking the character icons here will lead to their #Student's Profile Page too.
Help: How to play guide on Happy Element's website. (in Japanese)
Set password for Account Transfer: Set a password here so that you can use it transfer your account between devices. See #How to transfer Game Data to another Device for more details.
NOTE: You cannot transfer an account without a password so make sure to set one and keep a screenshot of the details somewhere safe.
Contact us: Contact Happy Elements in case there is a bug with the game.
Google Play/Game Center Account: Connect/Disconnect your Enstars account with your Google Play/Game Center Account here.
Twitter Account: Connect/Disconnect your Twitter account here. Mainly used for Twitter campaigns, it is NOT a valid account transfer/recovery system.
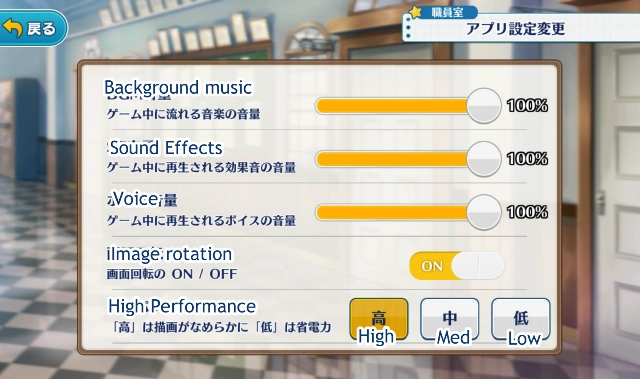
App Settings
For High Performance setting, the High setting is for better image quality while the Low setting is to conserve battery.
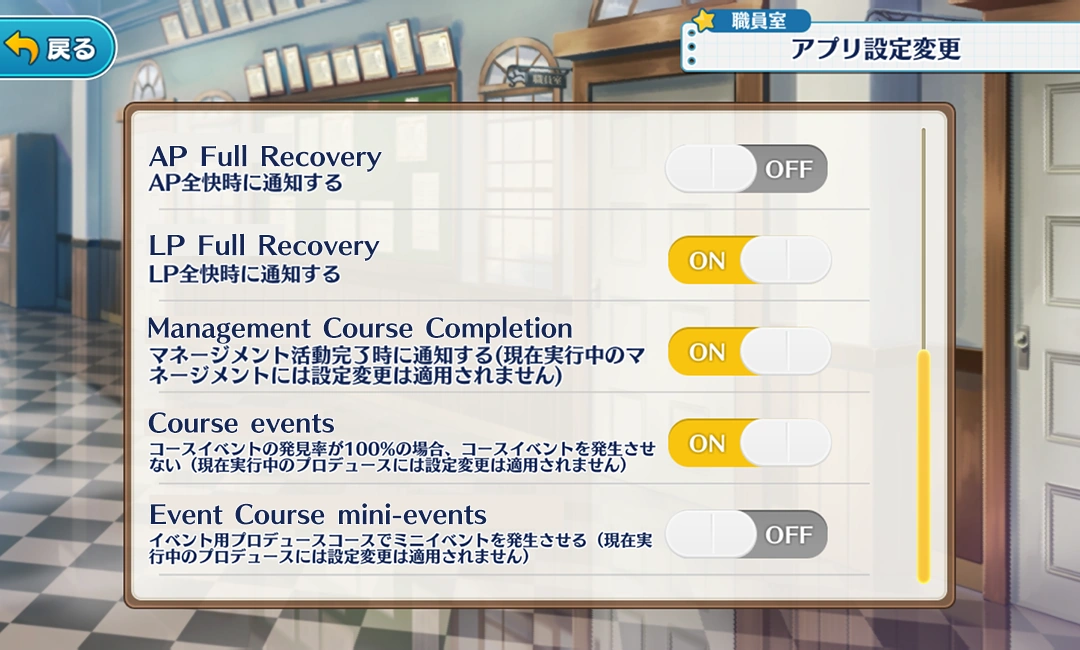
AP Full Recovery - Lets you know when AP bar is full. On by default.
LP Full Recovery - Lets you know when LP bar is full. On by default.
Management Course Completion - Lets you know when a character has finished a management course. On by default.
Course events - Toggle whether you want to turn off normal/special events if you have already completed all of them for the course. See Lesson Information. Off by default.
Event Course mini-events - Toggle whether you want to see mini-events in Event Courses. Off by default.
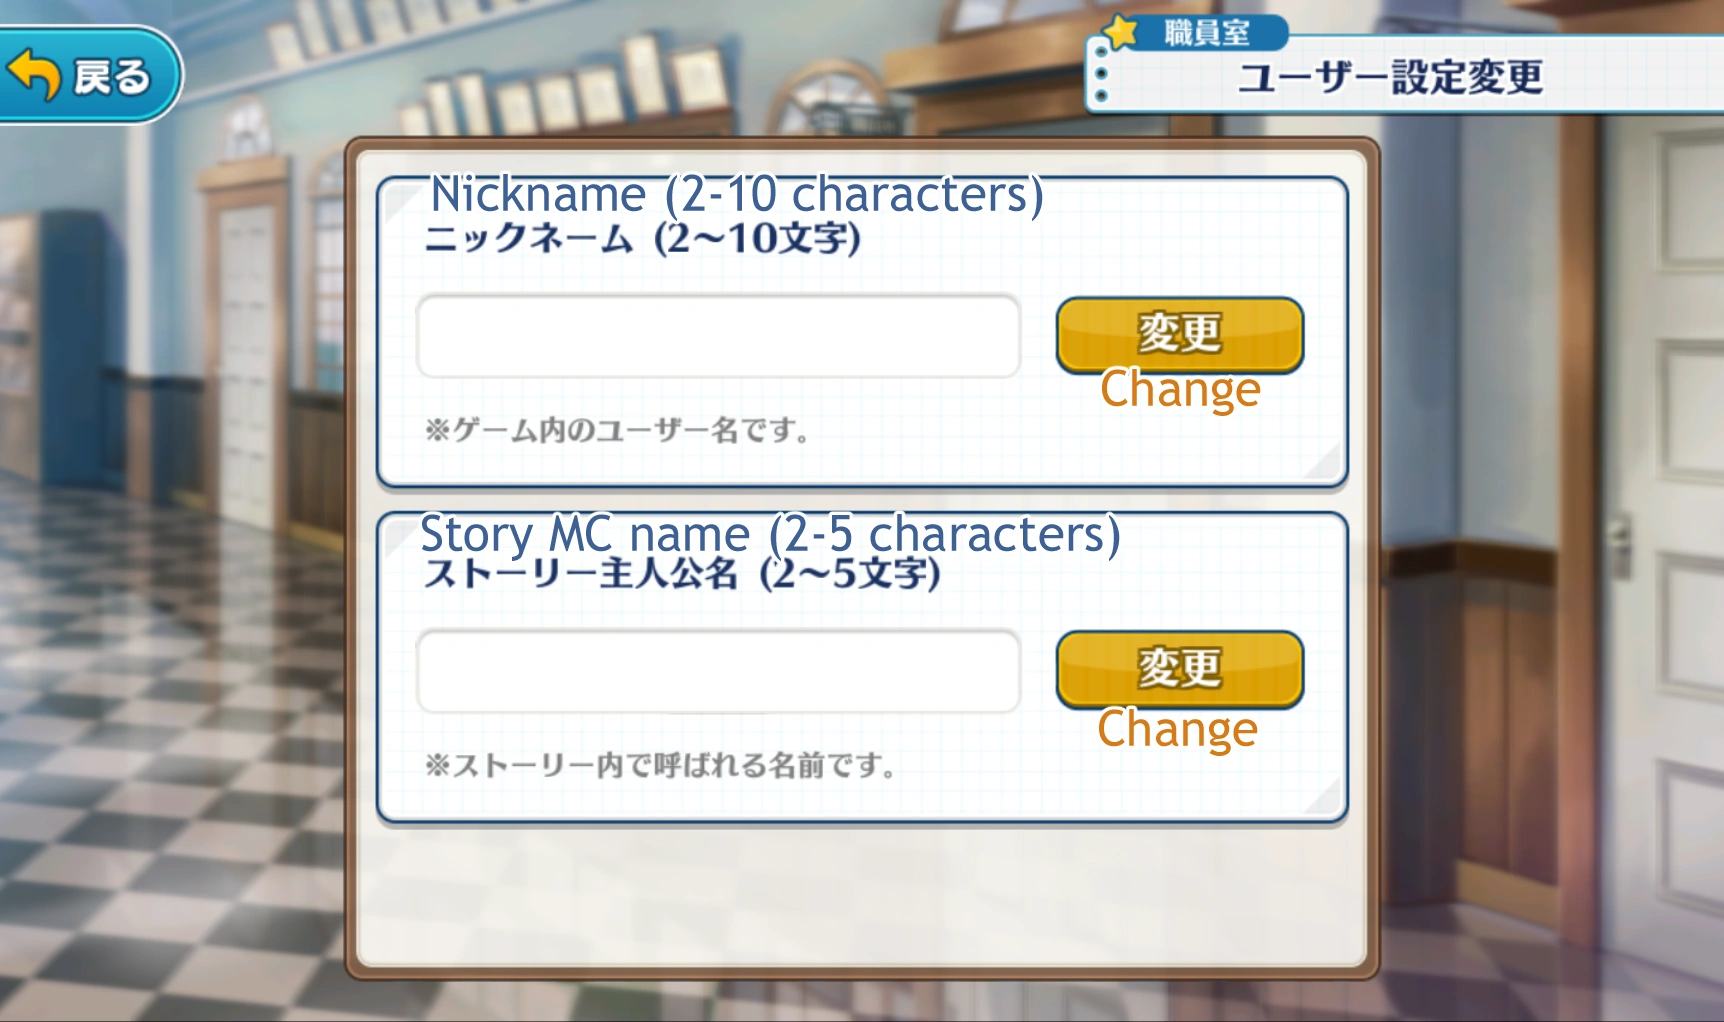
Name change
After typing the new name to use, click on the yellow button.
There is no limit as to how many times you can change the names.
How to transfer Game Data to another Device
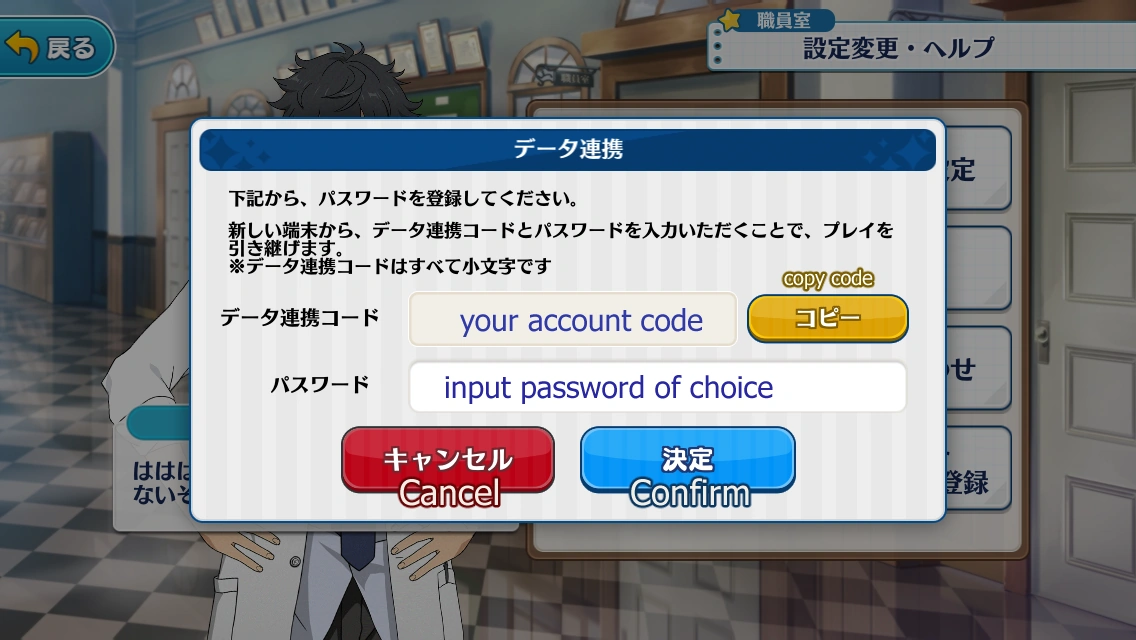
Setting a Password
The top line is your unique account code.
The lower line will be blank for you to input the password for your account. Click on the blue button to confirm your password after typing it in.
NOTE: Avoid using uppercase letters in the password as that doesn't seems to read well between devices when you try to enter it in on another device.
You can change your password as many times as you want.
Transferring to Another Device
Open up your game and click the red button on bottom left at the #Title Screen.
A window that looks like above should pop up.
Type in your unique account code (1st line) and password (2nd line). Then hit the blue button to confirm.
Account Transferred!
Note:
You can transfer your account as many times as you want across any device. The only limit being you can only transfer an account once per day. This resets every 4am JST.
There are no expiration dates on the transfer code.
You can run Enstars on multiple devices. (You can't play at the same time of course)
This means you will not be forced out on other devices so keep that in mind when sharing codes.
All Dia will be transferred :)
This also means you could transfer your account on an Android device and purchase dia for a cheaper price than from the Apple store.
How to Redeem Codes
For iOS users, codes must be redeemed through this page.
For the first row, choose a choice.
The current choices are: ・ [Select One] ・ Youth Concerto Novel ・ Revolutionary Victory Song Novel ・ Happy Elements Guidebook Vol.1 ・ Happy Elements Guidebook Vol.2
The second row is your user ID, which is found in the settings page.
The last row is your code. Once they are all filled out, you will receive your gift.
Occasionally obtained when completing Managements.
Never
Live Cyalume
Makes the rate of event live appearances to be 100% in a produce course. However does not affect the ratio of certain lives appearing.
Purchasing Diamond packs, rewarded one every first day of the second half of events.
Never
Schedule Book
Increases the number of Jewels and Yumecoins earned during Management, raises the chance of a Conversation Event occurring upon the completion of the course.
Special campaigns
Never
Rainbow Key
Unlocks one step on the Rainbow Road, an upgraded Idol Road, for a single card. Fully completing this Rainbow Road Rainbow Blooms the card, which gives it rainbow effects and coloration as well as slightly increased stats.
Note: There have been several campaign periods in the past during which all of the Main Story chapters were free to read for everyone.
All chapters under the Main Story tab are fully voiced.
#Event / Scout: Contains all stories that can be obtained through Events or Scouts.
Character: Contains all stories obtained through Intimacy Events and through Idol Roads of Story Scout cards (note: different from Scout (Gacha) cards). Sorted by student.
Still: Shows a list of story CGs, sorted by character. In order to unlock a CG, you must read the chapter with the CG in it. Note that if you've read the story prior to the implementation of this Still viewer, you'll still have to read the chapter again to unlock it in this list.
Produce Event: AKA Lesson Events. Gives you access to all Normal and Special events that took place in past events. Permanent lessons like class and unit courses are excluded from this. You are able to sort by year using the year dropdown on the top (shows "2018年"). On the righthand side, you are able to choose whether you wish to sort by Event (イベント) or Character (キャラクター). When choosing one of the two given options, you have a 20% chance of receiving the rare answer.
Favorite: Shows a list of the story chapters you have favorited. In order to favorite a story chapter, you must click the empty heart icon at the left of the chapter. Stories that have been favorited will have the heart filled.
Read History: Opens the last chapter that you read.
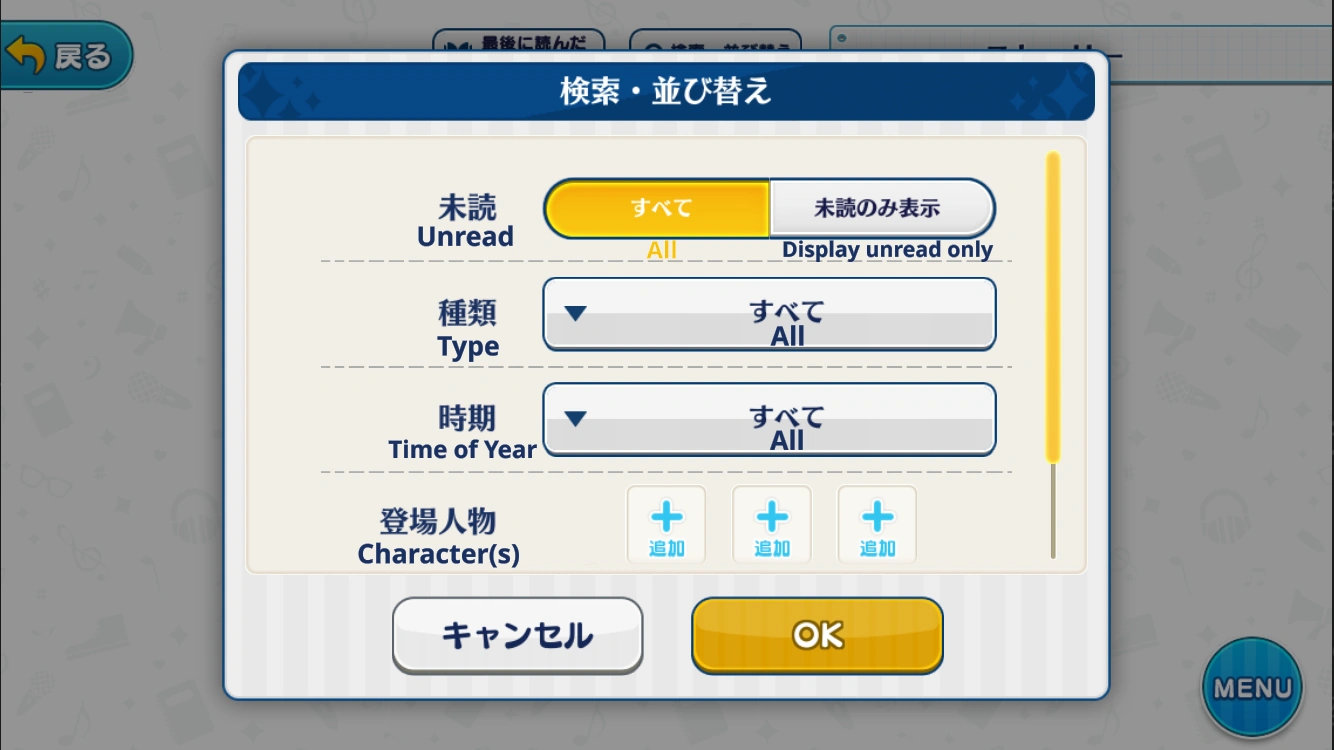
Search / Sort: Allows you to search through every story.
Unread: Choose between every story (all) and those that you have not read (Display unread only).
Type: Choose between every story (all), Main Story, Event Story, Character Story, and Scout Story.
Time of Year: Choose between every story (all), Spring, Summer, Fall, Winter, or Past.
Characters: Choose the characters that appear in the story (Note: leaving this section blank will not filter by any character).
Stories can show full CGs of certain cards.
When reading stories, you will receive extra prizes, such as Diamonds and Producer Points.
You get 200 Producer Points for reading each chapter of the Main Story and each individual Sub Story.
You get a Diamond for reading each chapter of an Event Story or Scout Story.
Locked stories can be opened with Story Keys.
It is wiser to use Story Keys on Scout Stories as they are harder to obtain and because you can now get event stories from Revival Events.
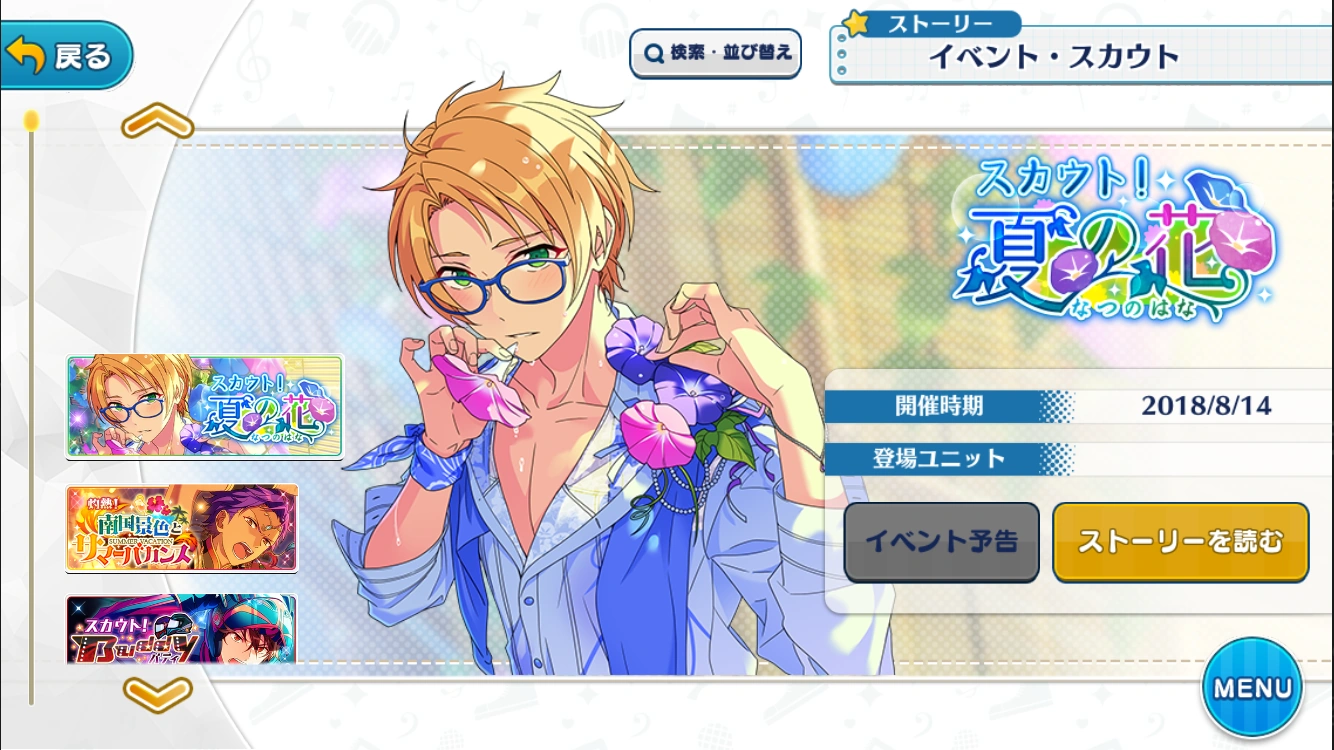
Event / Scout
This is a list of every Event and Scout story in the game. Use the arrows/scrollbar or drag the story icons to cycle through the stories. Stories are listed in chronological order, starting from the most recent. The date of release, as well as the relevant units featured in the story, appear on the right.
Click the yellow button on the right to view the list of chapters for the story you have selected.
For Event Stories, you may click the white button to view the Event preview, which includes a description of the Event.
Click the Search / Sort button at the top of the screen to filter stories. You may filter by:
1st press Display: Number of Copies, % of Idol Road Complete, [if] Bloomed (済 if yes, 未 if no).
2nd press Display: Shows Lesson Skill.
3rd press Display: Shows Live Skill.
4th press Display: Details which unit(s) the card is in. (Ex. Produce unit, Live unit, Dreamfes unit)
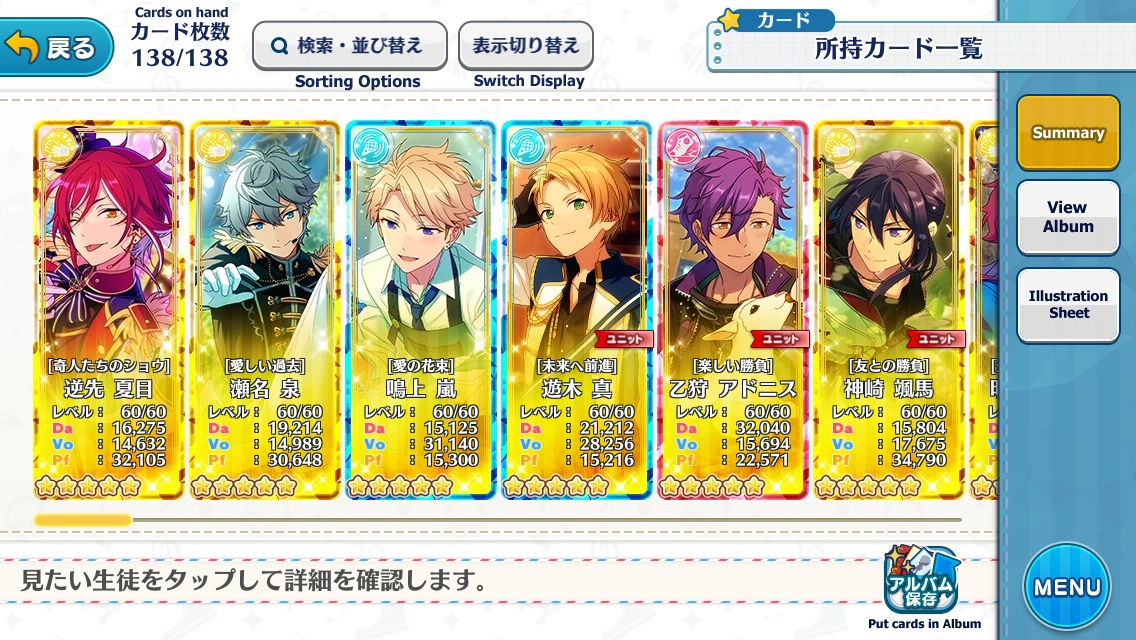
Summary: Default mode of page. In this mode you can click on cards to access their #Card Details for a summary of their stats.
You cannot hold down on a card to access their details. You can only do that when you look at the cards when you are switching them in the Produce Unit menu.
Album: Shows all of your cards, whether you have them in the album or not. This can be intensively sorted. This is the left of the buttons at the top of the page; the right is the display switch, and clicking it will show you the cards' name, stats, Idol Road percentages, and un/bloomed status.
First dropdown: Oldest First (古い順), Newest First (新しい順), Lowest Rarity First (レア度が低い順), Highest Rarity First (レア度が高い順), Character Order (キャラクターごと).
Next 3 button selects:
Rarity: All, 1★, 2★, 3★, 4★, 5★
Attribute: All, Dance, Vocal, Performance
Method of Obtaining: Event, Scout, Other (その他)
Second dropdown: Select a specific unit's cards to view. All, or click on the unit's name.
Character Choosing: Tap one of the blue + symbols to add a character. You can add up to three at once. If you want to remove a character, tap the square with them and then tap on the empty gray square to the left of Tetora.
Illustration Sheet: Create a graphic featuring cards that you own. Tap the graphic near the bottom center featuring cards and stars to select your frame and cards. You can display any card with red, yellow, and blue frames, but if you select the rainbow-colored frame, you will only be able to display cards you have Rainbow Bloomed. You may also choose how many cards you want shown, any amount within the 2-5 range. Using the magnifying class on the top right corner of a card, you can zoom in on the card's illustration, and you can move where on the card you're viewing by sliding your fingers in any direction. Tapping the blue checkmark button will show you your final product, which you can screenshot and share. Tapping on it twice will show you a version of it with your display name.
Red "ユ二ット" ribbon: Shows that the card is currently in a unit(s).
Store in Album: Select cards in this mode to store them into the character's card album. The card(s) may be returned to you main card list through the character's card album. Select the cards you want to store and select the Red Button once you are done.
Rarity (レア度): Choose whether you want to view all rarities (すべて = all) or a specific one.
Attribute (属性): Choose whether you want to view all attributes or just Dance, Vocal, or Performance cards.
More specific options below. These can be sorted by descending (降順, on the left) or ascending (昇順, on the right) order.
Sorting Options
レア度
Rarity
入手日時
Time Obtained
レベル
Level
Da.値
Dance Stat
Vo.値
Vocal Stat
Pf.値
Performance Stat
総合値が高い順
Overall Stats
限界突破回数順
Amount of Copies
ロードの開放率順
% of Idol Road completed
キャラク夕ーごと
According to Character
レッスンスキル順
According to Lesson Skill
ドリフエススキル順
According to DreamFes Skill
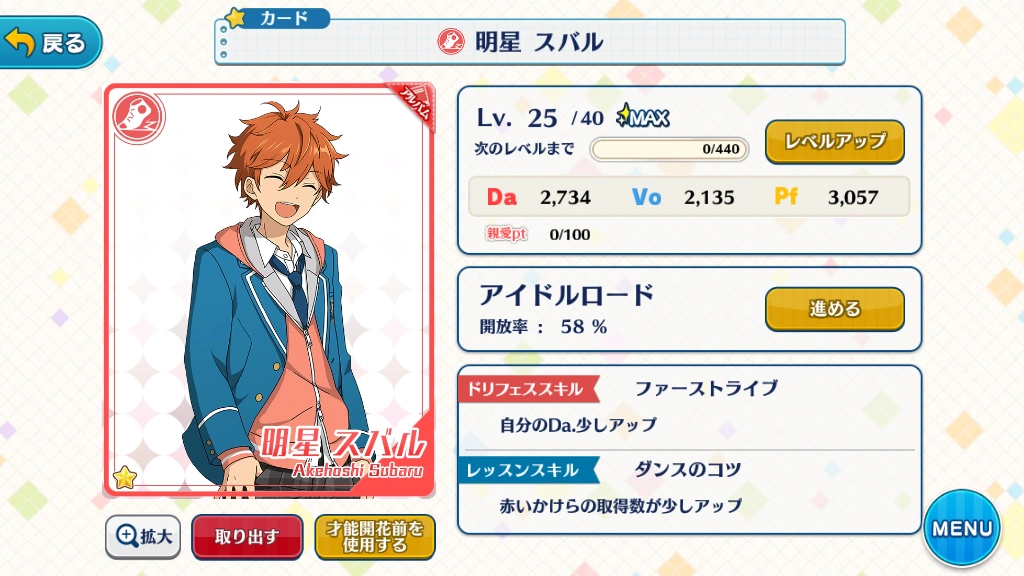
Card Details
There are three main attributes each of the cards can have; Dance (Red), Vocal (Blue), and Performance (Yellow). All cards have stats of these three regardless of their main attribute.
Card: Card Title (special for each card).
Level Up: Level up the card using your PP (Producer Points).
Affection Points: Fill up the points through #Intimate Events to increase your Intimacy Levels with the character. Affection points can also be gained through main screen Greeting Events, but these are independent of card limits.
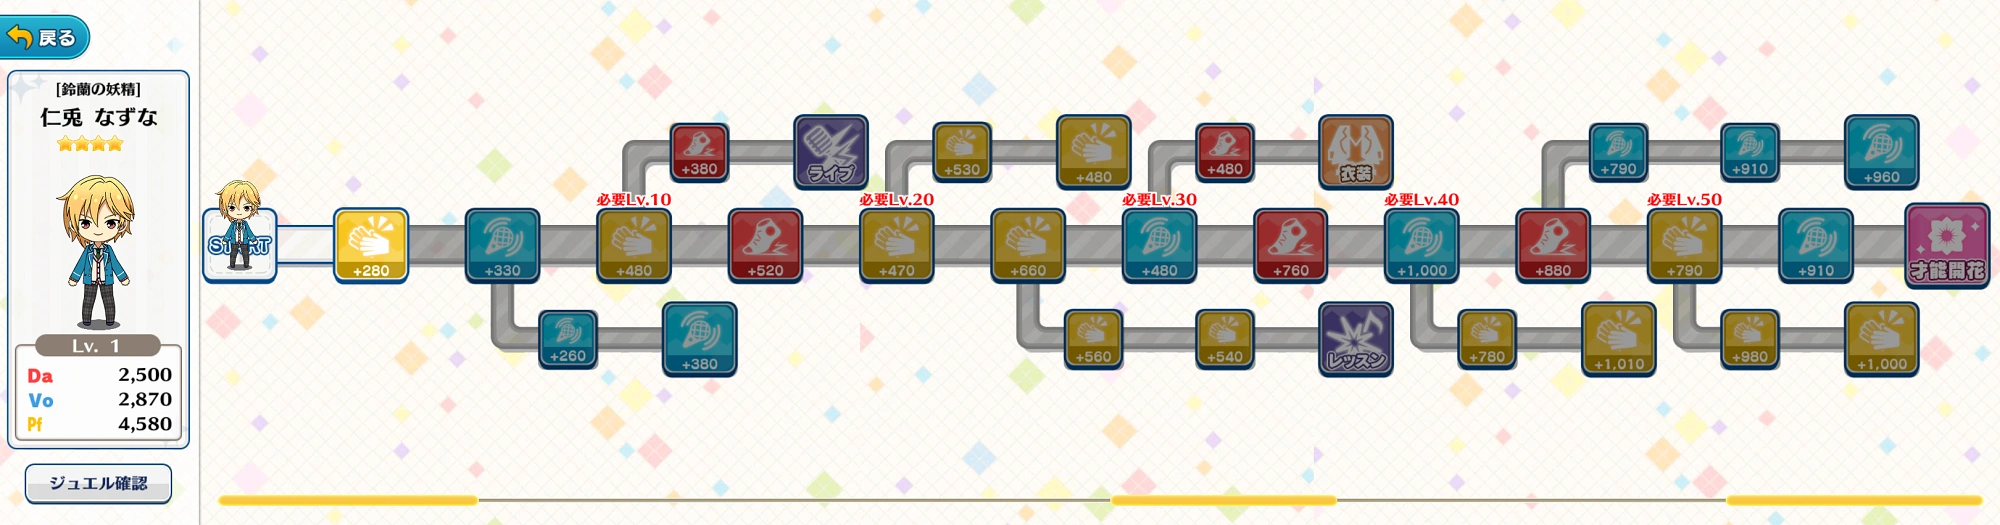
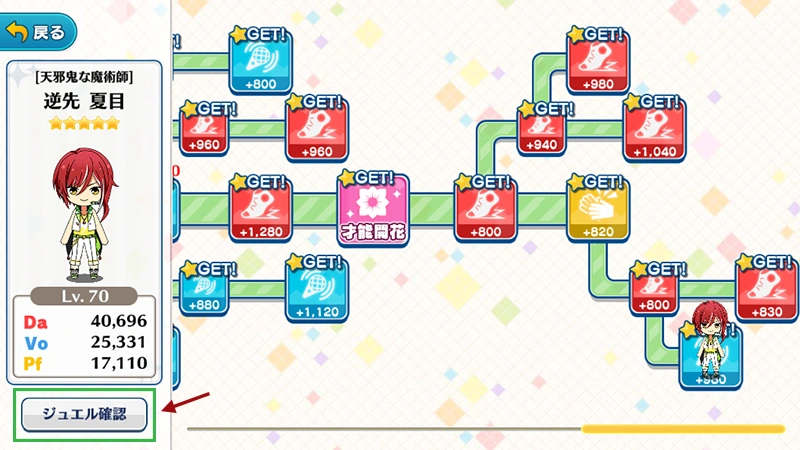
Idol Road
Advance: Press to see the card's Idol Road in order to unlock nodes to strengthen the stats of a card.
Rainbow Road: A different Idol Road that can Rainbow Bloom cards, causing them to become colorful and a little stronger. See Star Medal Shop for more details.
Live Skill: Active skill (only activated in Lives). Upgrade in the Idol Road to strengthen the skill and for a chance of the skill activating during Lives.
If a skill activates during an Event Live it can give bonus stat points.
Lesson Skill: Passive skill (always active). Upgrade them in the Idol Road to strengthen them.
Enlarge Card: Leads to a screen where the card can be viewed larger. Also displays the card's chibi. You can switch between bloomed and unbloomed images via the flower button.
The cards also have a function known as the "Idol Road" which involves allowing the player to Increase the Stats of the card through the use of #Jewels gained from Lessons.
In certain cards, Voice Clips, Backgrounds, Outfits, and Stories may be unlocked in the Idol Roads.
At the end of the Idol Road, cards can be "Bloomed" in which the card will receive new art and gain an overall stat increase.
Idol Road Example
Notable Idol Road Nodes
Background
Outfit
Story
Voice Clip
Bloomed
Live Skill
Lesson Skill
List of Live Skills & Lesson Skills
List of cards by Lesson Skill & Live Skill A more detailed guide on Jewel drop skills can be found here.
List of Lesson Skills
[Color type]かけら取得数アップ
Increases the acquisition of [Color type] Fragments.
[Color type]ジュエル取得数アップ
Increases the acquisition of [Color type] Jewels.
[Type]ドリフェス能力値アップ
Increases [Attribute] stat in Dreamfes Live.
全員の信頼度上昇率アップ
Increases the rate of raising all Cards' Trust
フィーバー上昇割合アッ
Increases the rate of raising Fever
LUCK 1段階アップ状態でプロデュース開始
Increases Luck by 1 stage at Start of the Lesson.
List of Live Skills
自分の[Type]アップ系
Increases the Card's own [Attribute]
相手の[Type]ダウン系
Decreases the Opponent's [Attribute]
Extra Info About Cards
There is an initial card limit of 100 cards in the game, however cards may be stored away in the album to avoid reaching the limit. You can also increase your card limit slightly through Dream Festival (max 10) and by ranking up (2 slots every 50 ranks).
In regards to receiving duplicates of the same card, they will be automatically fused to same card and will result in a "Limit Break", where the card level increases by 5 and unlocks extra nodes in the Idol Road, leading to a significant increase in potential stats.
A card may only receive up to a total of four limit breaks.
Any more duplicates afterwards will be turned into producer points and sent to the gift box.
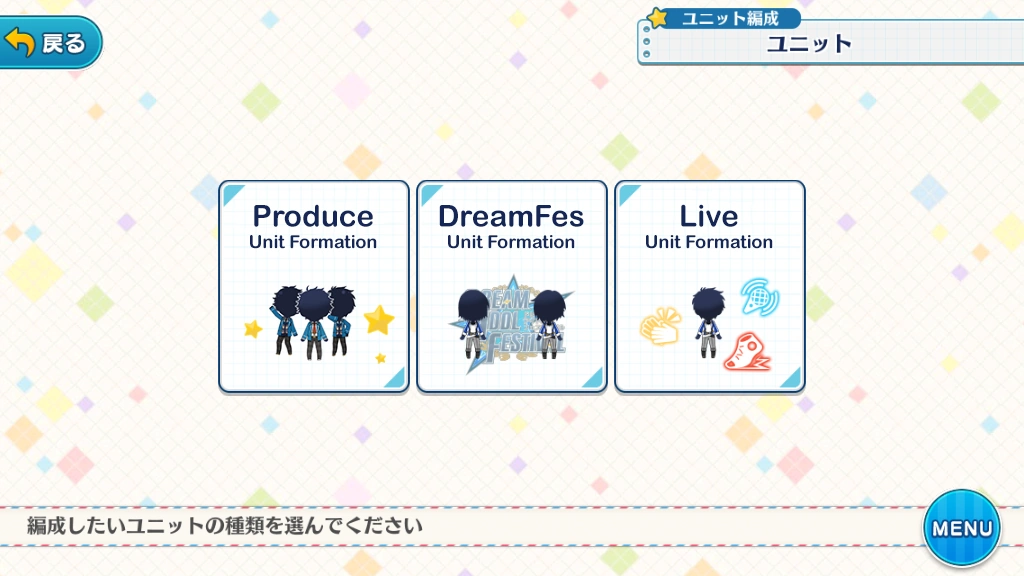
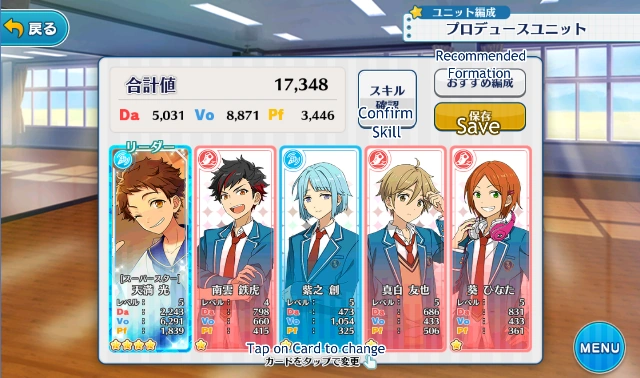
Your cards are arranged into a unit requiring five cards of different characters (For example, if a unit already has Subaru on it, you may not put another Subaru card in a different slot).
Leader postion (リーダー): The leftmost position in a Unit. Used mainly for activation of #Unit Skills.
Confirm Skill: allows you to see what Unit Skill(s) boosts your team has.
Recommended Formation: The game will automatically organize a team for you based on the cards with highest overall stats.
Tip: If you have cards in your album that are not fully leveled, the Recommended button will auto-add them to your team.
Save: Press to save your changes if you switch any members in or out.
After tapping on card to change to another one, you will get to see your card list. Long-pressing on your cards will show you a brief information window.
Tip: In this mode (as well as when viewing your cards) you can sort your cards by Lesson skills! So if you're trying to build a jewel grinding team for instance, it'll be really easy to find those cards. See #Cards List if you don't know how to switch displays.
You can make four different interchangeable units.
You cannot change your unit when a lesson is still ongoing. If you try do so, a window will pop up telling you that your unit is still in a lesson and you won't be able to save the changes to your unit.
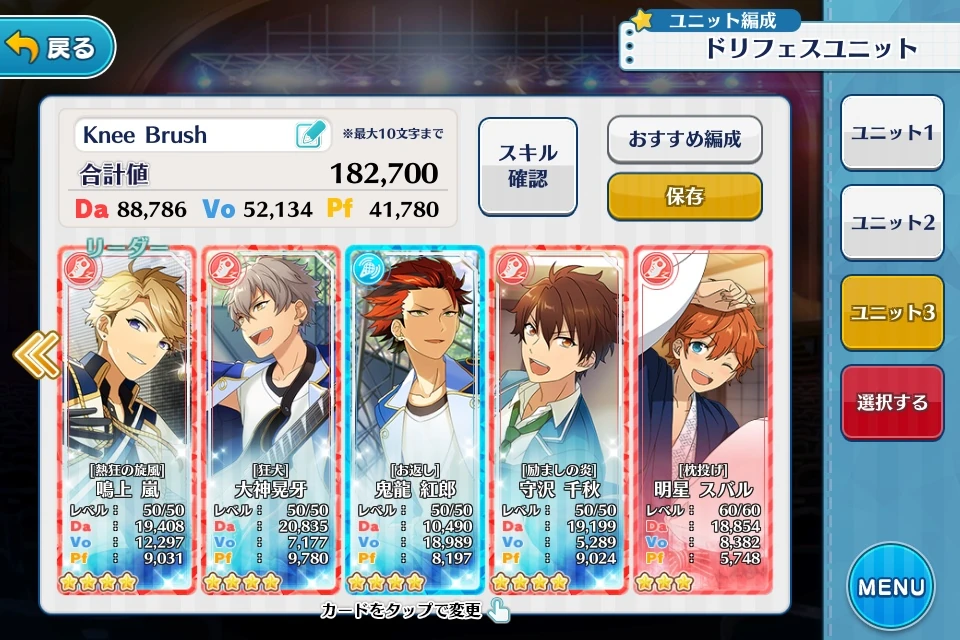
DreamFes Unit
DreamFes Unit Menu
The arrangement method for the DreamFes Unit is exactly the same as the Produce Unit.
Clicking the Green Blue Pen at the top lets you name the Unit (Max 10 Characters).
You can save up to three different DreamFes Units. Clicking the Red Button at the bottom right lets you designate that specific team as your main team.
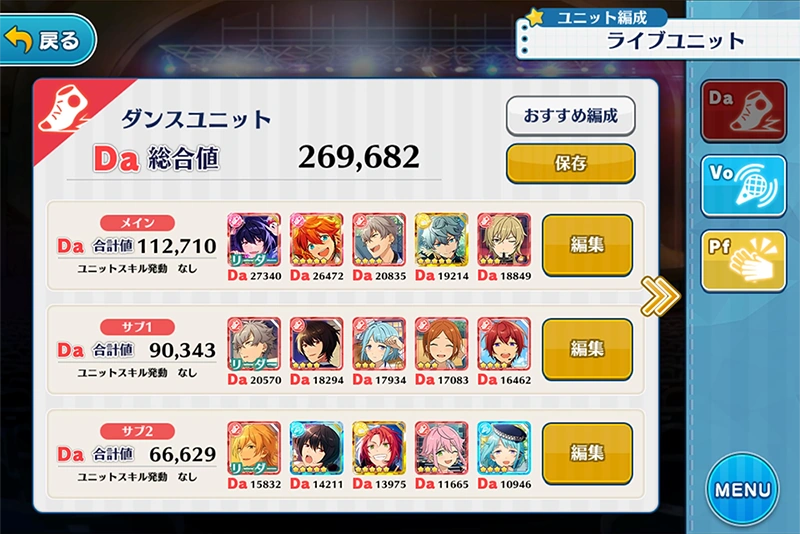
Live Units
Live Unit Menu
Live Units work similarly to the previous types of Units except that there are three rows of Units for one whole Live Unit.
Some people like to differentiate between a Unit row from a whole Live Unit by referring to the whole Live unit as a "team," for example, Dance team, Vocal team, and Performance team.
Unlike other Units, they are sorted by Attribute, and pressing "Recommend Formation" will instead create a team of cards with the strongest stats of that specific attribute.
As seen on the right side, the Units are sorted by Dance, Vocal, and Performance in that order.
Note:#Unit skills here will not affect the whole team, just the individual Unit row it is in.
See the Forming a team section on the Event Guide for more details about Live Units.
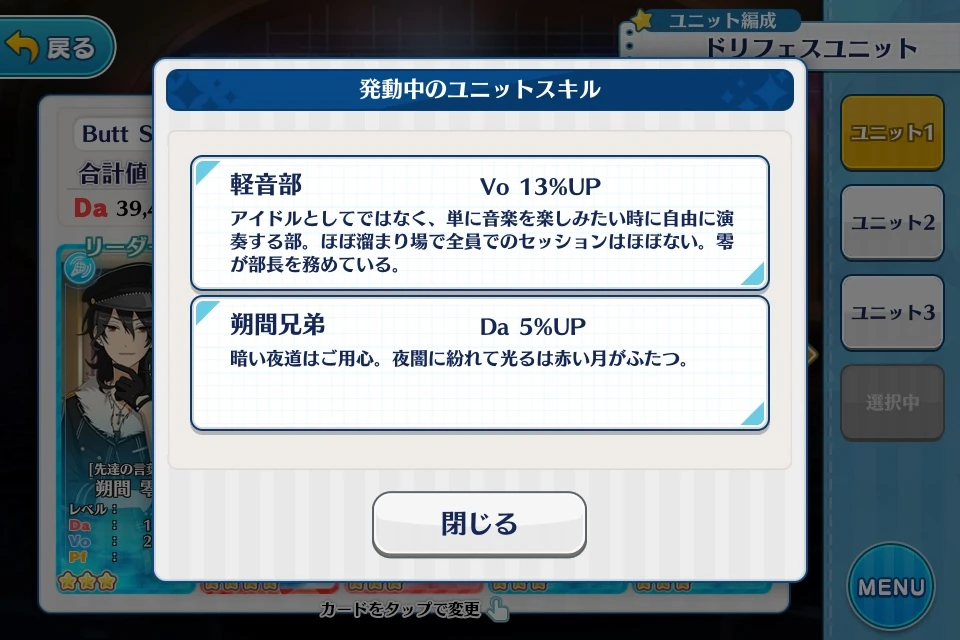
Unit Skills
Unit Skill popup window
Image of current active Unit skills
Unit Skills are special boosts that raise certain stats of your team when certain members of a certain group are put together into a Unit.
In order for a Unit Skill to activate, one of the characters required MUST be the leader of your team.
For example, Subaru must be the set as the leader and the rest of Trickstar have to be in your team to receive the Trickstar Unit Skill boost. If you have a character that is not from Trickstar as your leader but all the characters of Trickstar are in your team, you will not receive the boost.
There are also Limited Time Event Unit Skills, which are correlated to the same characters of the current Limited Time (Gacha) Scout. (You do not need the exact cards from the scout to trigger the Unit Skill. Only the characters are needed.) The Unit Skill will last for the same amount of time as the Limited Time Scout, and will not be available afterwards.
See the Unit Skill page for a list of all possible Unit Skill formations.
Produce Lessons
Officially Lessons are called "Produce Lessons", but people often just shorten it to "Lessons".
Lessons are the main way to level up your cards and increase your rank.
See the Lesson Category page for a detailed list of all available lessons.
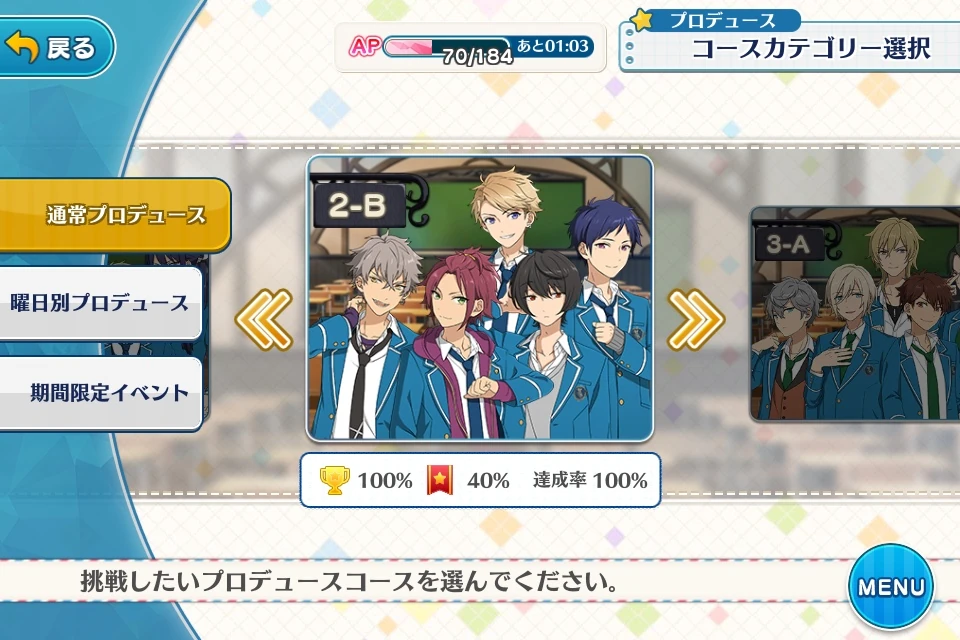
Lesson Navigation
From the left side navigation there are three tabs; those are the three main types of the Lessons. From top to bottom, Main, Daily, and Event, though they may be different types of lessons, gameplay within them are the same.
Main Lessons: Feature the Units and Classes. Each course features on a specific one.
#Daily Lessons: Feature only one set of courses and has a higher chance of obtaining #Jewels of a specific color.
Event Lessons: Found only when a event is ongoing and have a higher chance of receiving Event Lives. Half of the available lessons within it are locked until halfway through an event. See Event Guide for more details.
Tip: During non-event time, the cost of all Lessons are halved, so use this time to grind the courses you need.
Lesson Information
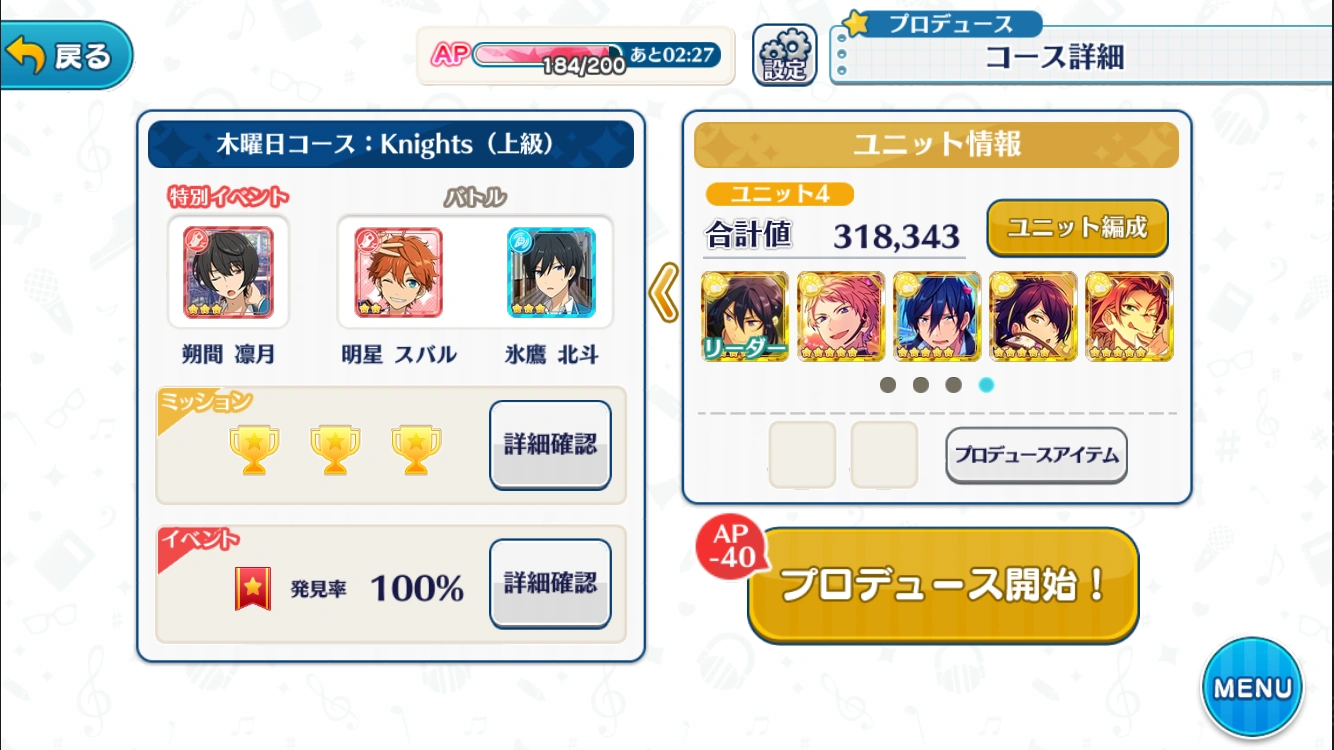
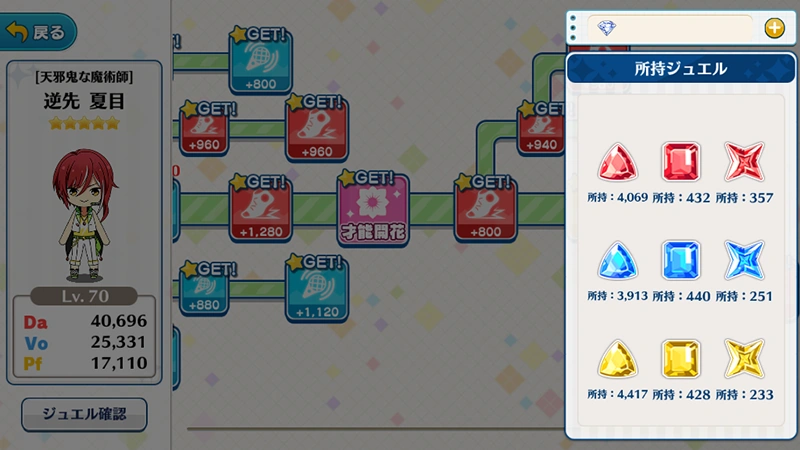
The Left Box features the lesson information:
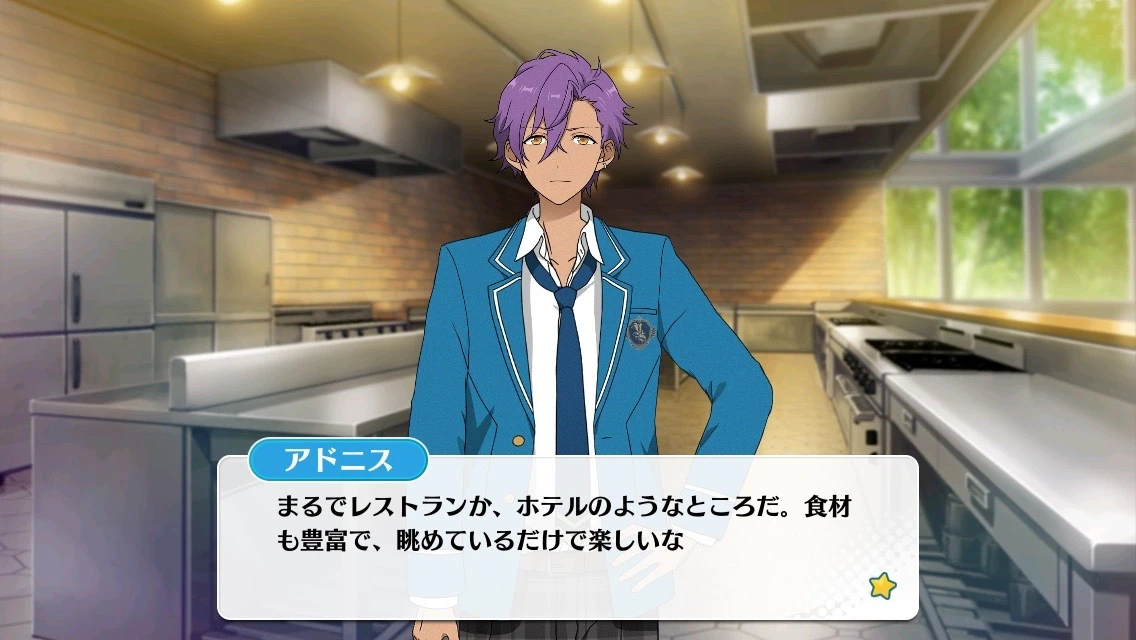
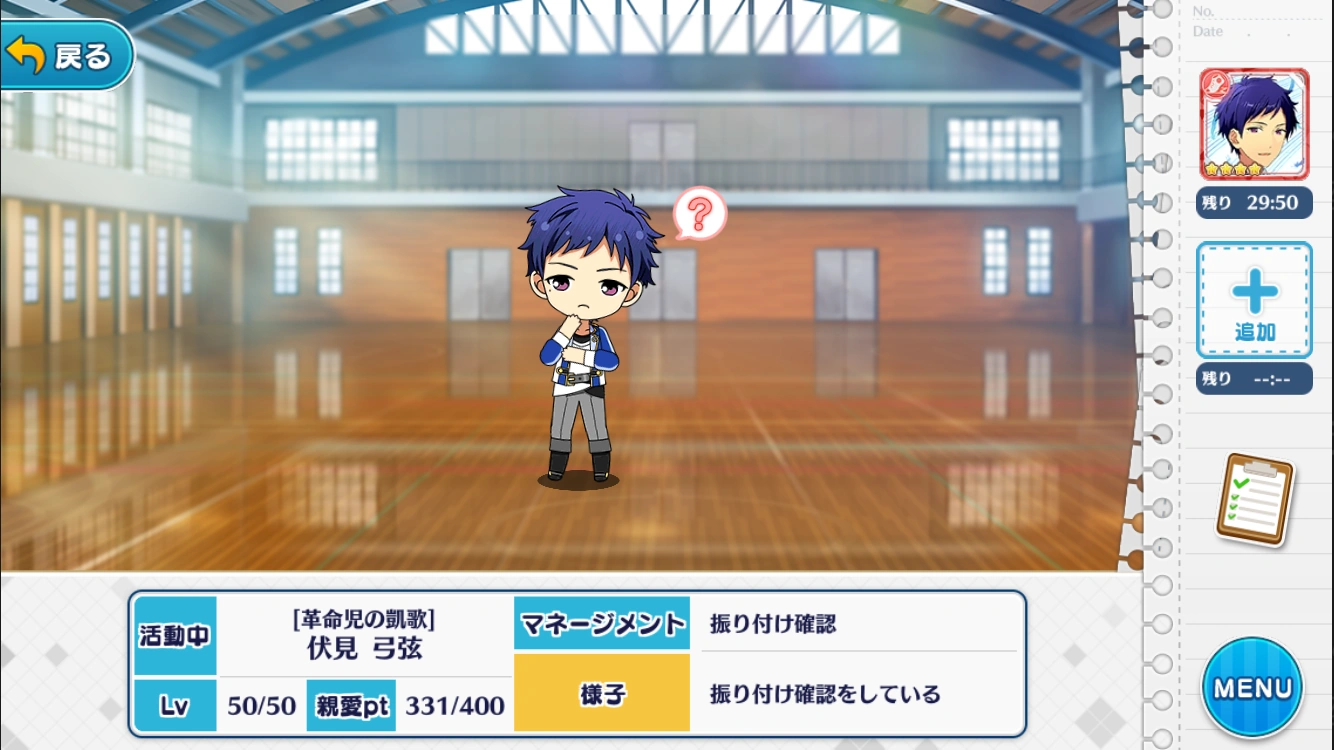
Special Event Character: The character near the top left corner. They will be seen along with your unit in the Lesson and will accompany you throughout.
The two characters to the right of the Special Event Character are the characters you will face in the In-Lesson Lives.
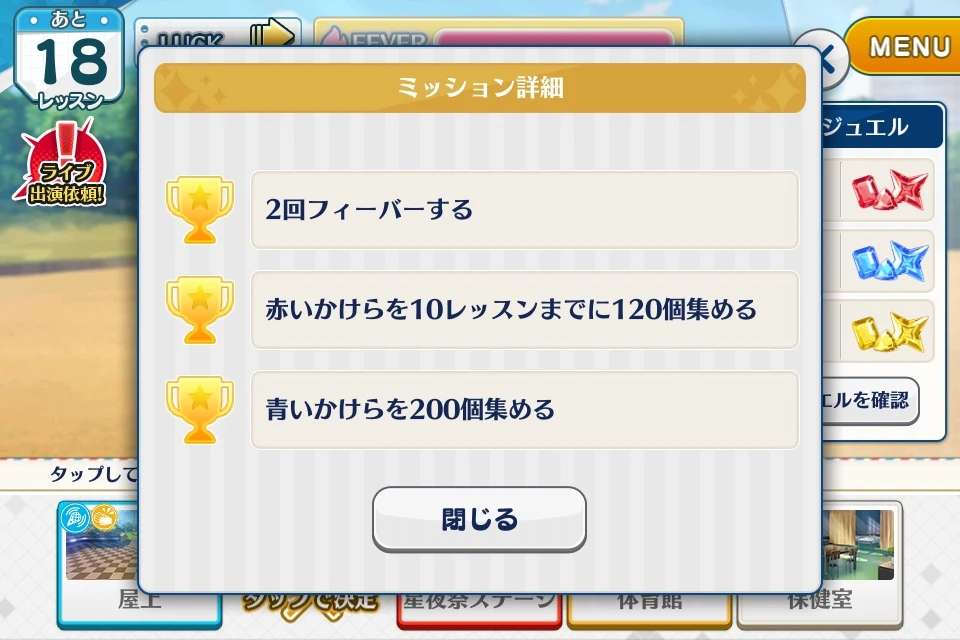
Missions: The box below the characters and marked with a yellow tab. Tapping the button will show you the requirements to complete the missions. There will always be three missions for every lesson.
See #Missions for a translation of all the possible missions.
Events: Box below the missions and marked with a red tab. Tap to see how many events you have completed already.
In a Lesson there are six events overall: 3 Normal Events (★★) & 3 Special Events (★★★).
They have to be activated by talking to the Special Event Character of the lesson. When all Normal Events have been seen, one diamond will be rewarded.
When all Special Events have been seen, one diamond will usually be rewarded. In some of the Main Lessons, Special Events can reward Voice Clips of the Special Event Character.
See the list of Lessons to find translations of the correct options for these events.
Tip: Choosing any option in Daily Lessons will not give you "Luck Down".
The Box on the Right features your Produce Unit:
You can change your team by pressing the button on the upper right. It functions the same way as the #Produce Unit Menu.
If your Produce Unit has the same student with the Special Event Character, their display picture in your Unit will be darkened. You will be asked to whether to proceed to the Lesson without them. If you press the Blue "OK" button to accept, this card will be temporarily absent from your Unit and will not receive any experience points after the Lesson ends.
Clicking on the white button will let you set a Produce item. This functionality is mainly used for Cyalumes, which guarantee a Live on every turn. For more information, see the #Items section.
More About Lessons
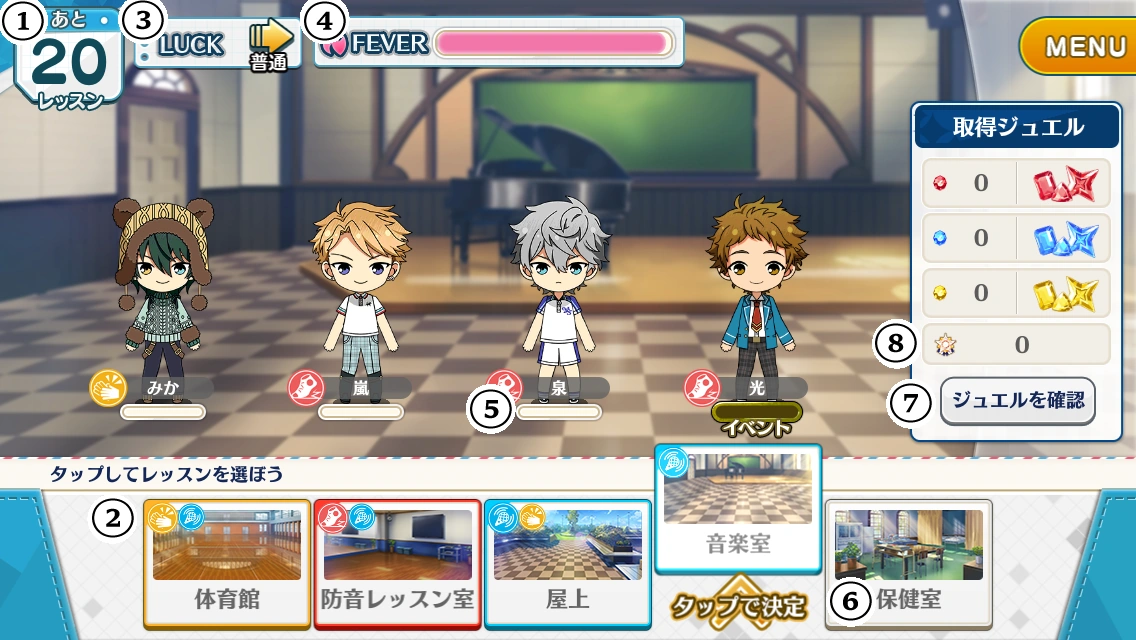
There are 20 turns ① in each Lesson, with a DreamFes Live appearing at turn 11 and 1. Essentially, all you have to do is tap in any one of the given locations at the bottom until the Lesson is over.
Each Location ② is marked with either one or two attribute types, showing which type of Jewel Fragment can be obtained. If the location has two marks, the one on the left is the main fragment type acquired, meaning more of the first type will be received in that area in comparison to type on the right.
Within the Lessons, there is Luck, Fever, and Trust
③ Luck: Can be increased by two stages and decreased by two stages upon the activation of Mini Events. Higher levels of Luck will increase the rate of Trust increase.
④ Fever: The top bar marked with "FEVER." Fills up after each turn with the amount of increase depending on how many characters were on the location selected. See #Fever for more details.
Once Fever is activated, acquisition of jewel fragments is increased for five turns and if it is still active during a DreamFes Live, the unit will receive a 1.5x boost.
⑤ Trust: The bar under the idols which are filled up when the idols are trained with. See #Trust for more details.
Higher Trust will increase the chance of triggering a Normal/Special/Mini Event with the character. The amount of Trust a character has at the end of the Lesson also affects the amount of EXP the card gains.
Touching an area with no idols in it results in a Mini Event with Akiomi Kunugi, which will allow you a chance to increase the rate of Fever or give you a decrease in Luck.
Note that if you touch an area with idols, you are guaranteed that the same area will have idols in it again on the next turn.
Touching the area to the far right is the Infirmary ⑥, where you can activate Mini Events with Jin Sagami and have a chance to increase your Luck by one stage or two.
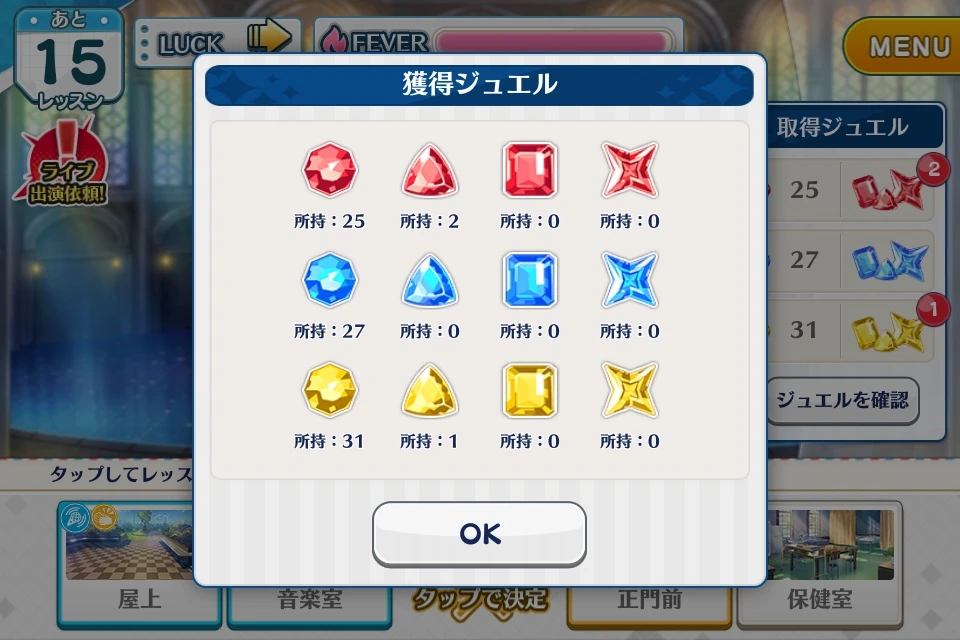
⑦ Check Jewel: Allows you to check the amount of Fragment, Small, Medium, and Large #Jewels you currently have obtained in the Lesson.
⑧ Right above Check Jewel is where the amount of Star Medals you have is shown. Star Medals are collected when interacting with locations with #Animals. They are used to buy cards and Rainbow Keys from the Star Medal Shop.
Upon completion of a Lesson, you will obtain Jewels, Producer Points, Star Medals, and EXP for yourself and the cards.
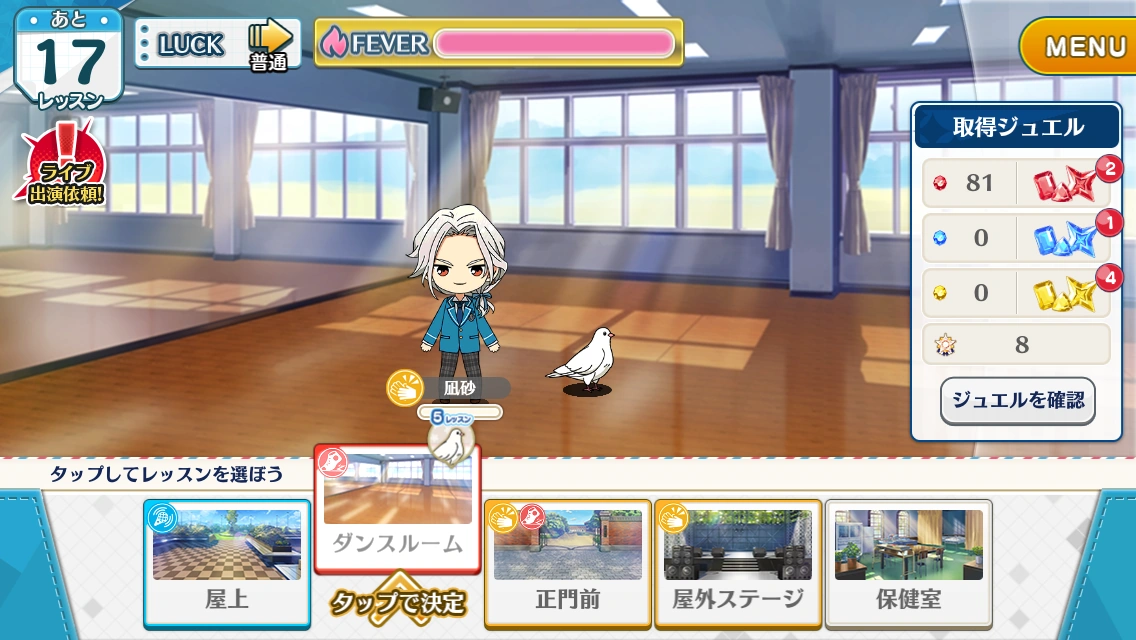
Animals
Sometimes certain animals (shown below) will appear in lessons. Depending on the holiday, they may have various costumes. Visiting the same locations as them will give you Star Medals, a currency used to buy specific cards and Rainbow Keys, used to rainbow bloom cards.
Normally, doves will give 1-2 Medals, Daikichi will give you 4-6, and Leon will give you 8-12. This amount is doubled during Fever. While they usually appear alone, more Star Medals are given when two or more are in the same location.
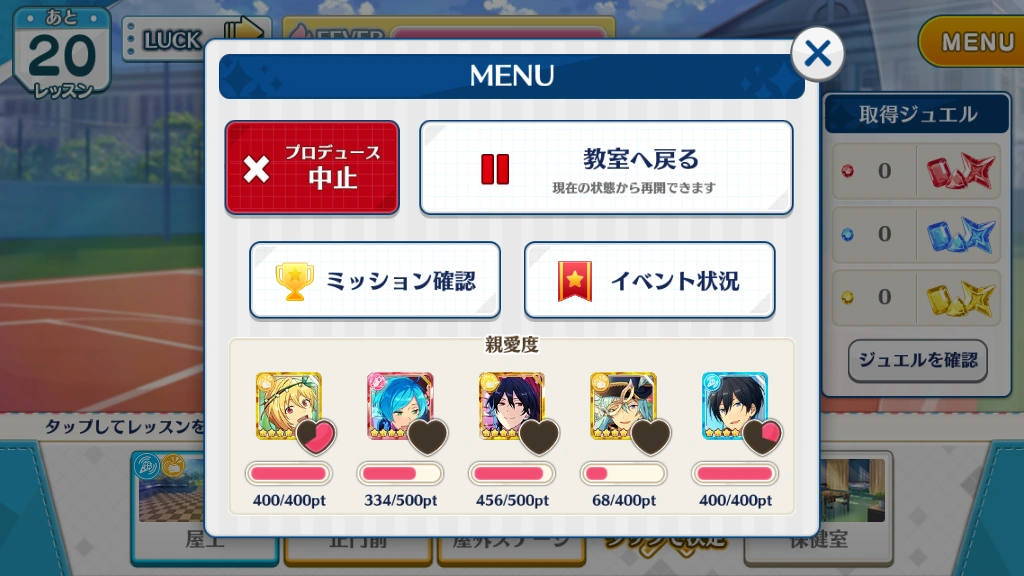
The Menu can be accessed in the upper right hand corner.
The top-left, red button allows make you quit the lesson. (You can no longer return to the lesson again.)
The top-right button allows you to exit the lesson. (You can resume the lesson once again.)
The button with the trophy lets you review the missions.
The button with the ribbon lets you review what events you have seen.
The bottom section allows you to see how many more heart pieces will be needed before you can activate an #Intimate Event with the character.
The fraction below is the max number of Intimacy Points you can receive with each card.
Daily Lessons
Daily Lessons are useful because they increase the drop rate of a specific color of jewels on a specific day.
They are incredibly important to grind as there is always an unending need for jewels to increase the strength of your cards, so knowing when they come into rotation is important to make sure you have enough materials to build up your teams quickly.
Tip: Setting frequent 8 hour Managements can allow you to collect an excess of all types of Jewels, which is extremely helpful.
Note: Daily Lessons rotate at 12AM JST so keep that mind for whatever timezone you may be playing in.
Days when the courses come into rotation:
Red Jewels: Tuesday & Friday
Blue Jewels: Wednesday & Saturday
Yellow Jewels: Monday & Thursday
The only anomaly to daily rotating jewel courses is the Sunday course.
The Sunday course is special in that it doesn't increase the drop rate of a specific color of jewels but you get 2x EXP for the same AP cost as the other daily courses.
More Producer Points than usual may be gained from these courses as well.
It is especially good to use this course to level up cards quickly, or to gain extra LP by leveling up your Player Rank.
Just make sure not to have too weak cards in your Unit (i.e. not all level 1) as the DreamFes battles in this Lesson are especially strong.
Trust
The more Trust a character has, the chances of triggering a Normal/Special/Mini Event with the character increases. The amount of Trust a character has at the end of the Lesson also affects the amount of EXP the card gains.
Tip: The less people on the the map, the faster the Trust bar will fill up, increasing the EXP multiplier that the character will get at the end of the lesson.
Tip: The higher your luck (the arrow near the Fever bar) the more Trust you get, so visiting the infirmary on the first day can be helpful.
You do not need to fill the bar up to get the best multiplier! The bar only needs to turn pink to make the most of the multiplier.
Different Levels of Multipliers
**Exact multipliers are unknown because no one has felt like counting it. All you need to know is that filling the bar to pink helps A LOT.
If you plan well you get up to two characters' trust bar to pink in a Lesson.
If you have a card with a Trust Up skill on your team and choose the maps extra well, it is possible to fill up to three characters' trust bar up to pink in one Lesson!
Fever
Fever has a few main uses:
Increasing the acquisition of jewel fragments for the duration of the Fever (5 turns).
Giving your unit a 1.5x boost during a DreamFes Live in entered during a Fever.
There is a common(?) misconception about this, but Fevers don't affect Event Lives (the ones that pop up randomly, not the DreamFes Lives in an Event Lesson).
How to increase Fever quickly & use it for Missions
Missions often require Fevers to be triggered in Lesson a variety of ways.
Because the Fever bar carries over across Lessons it might be hard to fill it up properly to complete the mission if you don't strategize beforehand.
First choose a low-cost AP Lesson to enter, then we'll cover over how to quickly fill your Fever bar up.
**Key Note: The less characters there are on a location tab, the more the Fever bar will fill up.
1 person - Improves Fever very greatly
2 people - Improves Fever greatly
3 people - Improves Fever a fair amount
4 people - Improves Fever a little
If you have any Fever up cards (look for cards with フィーバー in the Lesson Skill section, see #Produce Unit on how to sort cards by skills.), those are very helpful for increasing the rate at which the Fever bar fills up.
Cards with Fever skills also stack up so putting a few in your unit would be helpful. However, it wouldn't be advised to put more than 2 cause it feels like an overload otherwise, especially if you have other cards to train.
Once you've filled up the Fever bar to about 1 or 2 turns before it triggers, Quit the Lesson (the red button in the #Lesson Menu).
Like mentioned before, the Fever level carries over across Lessons, that still stands when quitting a Lesson.
Tip: If you don't want to quit the Lesson, you can continue to save the level of the Fever Bar by continually going to the Infirmary as it won't raise your Fever level.
Now you can complete the Get Fever within 5 Turns and Get 2x Fever in a Lesson Mission objectives fairly easily.
To complete, Get Fever within 5 Turns, just enter the Lesson with your nearly filled Fever bar and trigger the Fever.
To complete, Get 2x Fever in a Lesson, enter the Lesson with your nearly filled Fever bar and trigger the Fever. Then simply use the method described earlier with only choosing the location tabs with the least amount of people to fill up the Fever bar quickly to quickly trigger Fever again before the Lesson ends.
(From Left to Right, the Jewel Sizes are: Fragment, Small, Medium, and Large)
Jewels (Also called "Gems" by some) are items which can be obtained in Lessons from random drops throughout the Lesson. They are used to unlock nodes on a card's #Idol Road in order to strengthen it.
Fragments are obtained by progressing through the Lesson or as Mini Event rewards.
For every 100 Fragments of a color obtained by the end of the lesson, they will be converted into one corresponding Small Jewel of that color.
All sizes of Jewels (Small, Medium, and Large) can drop in a Lesson.
Jewel Drop Skills
There are cards that help increase the drop rate of Jewels.
For a detailed explanation of identifying those cards see here.
Putting cards with skills that increase the rate of Jewel Drops can greatly help in obtaining more jewels. Just make sure not to forgot to unlock the Lesson node that strengthens that skill or else it won't really improve the jewel drop rate much!
Notable starters that increase Jewel Drops of all Color and Size
See Mini Events for a list and translation of all the Mini Events with the correct options.
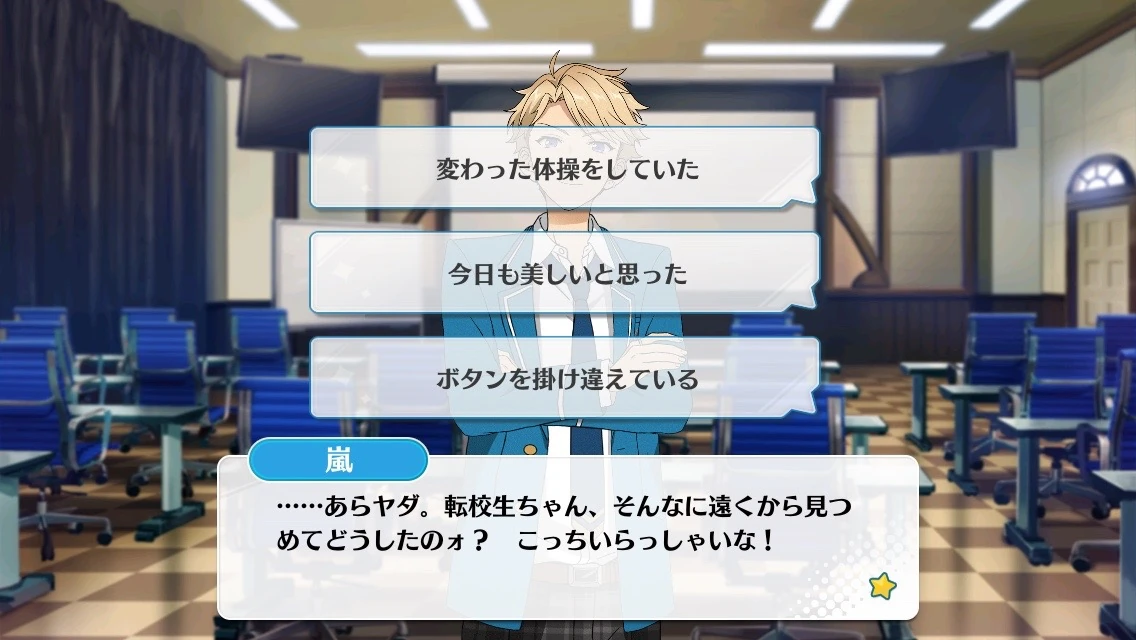
Mini Events (★) are otome game-styled events that can be activated in a Lesson according to the idols in your Produce Unit at that time. Within them, the idol will converse with you and may ask you questions in which you will have to respond accordingly through the choice of several dialogue and/or action options.
A Mini Event will always have three different options to choose from (vs. only two in the Normal and the Special Events found in Lessons).
Only one of the options will be correct answer which, when chosen, will fill up the character's heart by a third.
Once the heart is completely filled up, you will be lead directly to an #Intimate Event.
If the Special Event Character engages with you in a Mini Event, the option that fills up the character's heart will increase Fever instead.
Intimate Events (Touch Events)
See the Intimate Events page for a list and translation of all the Intimate Events with the correct options.
For a simple chart of all the correct points to touch see here.
An Intimate Event triggers after three heart pieces are collected from answering three Mini Events correctly. In an Intimate Event, the player is allowed to touch the character at three main points (Head, Chest, or Arms) to collect affection points and raise their Intimacy level. Each character has three different Intimate Events, which will require you (most of the time) to touch a different point each time.
Touching the different points will produce different reactions from the character.
Happy is the best reaction and will give 10 affection points.
Good is a good reaction and will give 8 affection points.
OK is an alright reaction and will give 5 affection points.
Raising a character's Intimacy Level can unlock Sub Stories and Voice Clips for the specific character. However, only a certain amount of points can be obtained with each card (See #Card Details). Once the limit has been achieved, you will receive a random colored Medium(!!!) Jewel (the image that pops up will appear as a jewel fragment) with that certain card for every subsequent Intimate Event you trigger with it.
Card Point Limits
5★ - 500
4★ - 400
3★ - 300
2★ - 200
1★ - 100
To completely max out a character's Intimacy Level, you'll need for 3,200 points in order to reach Level 27 (**outdated — max level is now 55). When a character's Intimacy Level is at its max level, points can still be collected, but will have no effect.
Dream Idol Festival (PvP)
Dream Idol Festival (or DreamFes, for short) is a PvP mode that lets you battle against others' units. You can participate in DreamFes battles freely, and there are also monthly tournaments that you can sign up for. To access the DreamFes menu, click on the purple DreamFes button on the #School Map.
Participating in DreamFes now gives Yumecoins (Used to unlock BGM, backgrounds, outfits and voice clips that can be bought in the shop) and diamonds as rewards. At certain times Honeyed Lemons and Ame-chans can also be obtained.
Management is a feature in the game that allows you to level up cards, gain affection points, and collect jewels and Yumecoins. It can be accessed by clicking the orange button on the Home Menu.
For more detailed information on Management, including a full tutorial and list of courses, see the Management Guide.
Scouting
See Scouting for a page of the current ongoing scouts
Scouting is a way to get new cards to build your teams.
The different Scout tabs are also referred to as "boxes" by people (i.e. Gacha Box, Dia Box).
Usually there are only 3 tabs (Diamond Scout, 3★ Producer Point Scout & Producer Point Scout) in the Scouting Menu but during certain periods of time there may be up to 5. The other 2 scouting tabs (Limited Scout, Story Intro Scout) are usually the type of scouts that only last a specific amount of time and are a bit more unique.
It takes 15 Diamonds to scout once and 135 Diamonds to scout 10 cards at one time.
If you get a full 10 scout with only 3* cards, a message will appear notifying that the next 10x scout will have a 4★ guaranteed.
Key Note: Unlike some other games you CANNOT scout for previous event cards in here. You can only obtain past event cards by participating in #Revival Events.
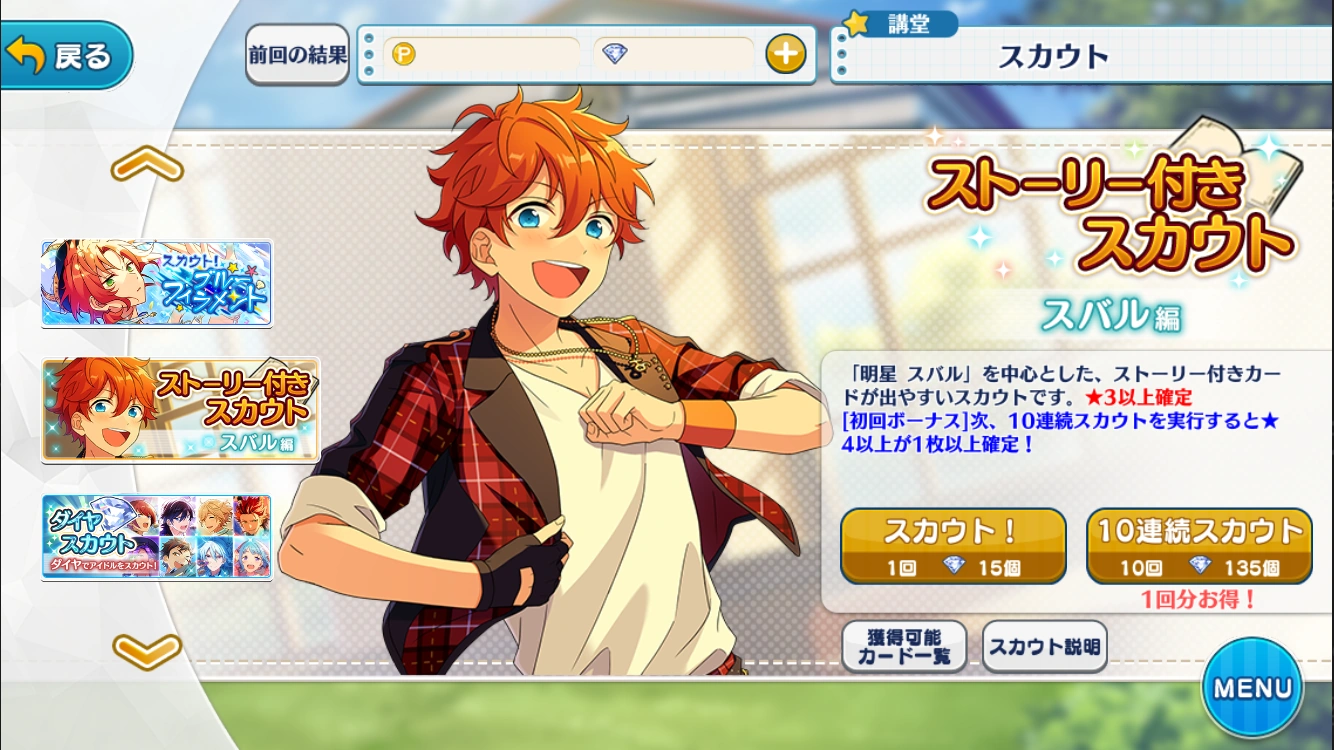
Officially, it is called a Campaign Scout, but many tend to refer to it as the Event Scout, or simply just as the newest Gacha.
A new Campaign Scout opens 1 day before an Event starts, and ends at the same time the Revival Event period does (about 4 days after the main Event ends). The end date and time are displayed in red.
This Scout will have cards that follow a specific theme and story.
There will always be one new 5★ & 4★ card released with this scout, as well as two new 3★ cards. All of these cards come with story nodes that you can unlock on their Idol Roads.
Generally, only the 5★ & 4★ card will get new outfit nodes. It is very rare for the 3★ cards to get new outfits.
During the concurrent Event with the Campaign Gacha, these cards will have 2x their normal stats when used in Event Lives as well as award a slight amount of bonus points. See #Scouting Bonuses in the Event Guide for more details.
If you are participating in a Revival Event during this period, the Gacha bonus will be active there, as well.
In this specific Scout, the new cards will have a boosted chance of appearing.
If you happen to draw a 5★, the 5★ you will obtain will ALWAYS be from the current scout.
It is impossible to draw a previous 5★ Gacha card here.
Any 4★s you draw from here will have a 50% chance of being from the current Gacha 4★. The other 50% can be any of the Initial/Starter 4★s, or Story Scout 4★s.
Cards from the current Gacha will be added to the other Scout pools after 1 month. Until then, they are only available during the Campaign Scout period.
There is a 4★ guarantee for the first 10x draw for every new Limited scout introduced.
This does not guarantee you will pull the current Gacha 4★.
Past Limited Scouting cards CANNOT be drawn from this box.
Also referred to as the Story Scout or the Intro[duction] Scout.
Story Intro Scouts usually occur from the 26th day of the month (or 17hrs after the 2nd event of the month ends) to the 3rd or 4th day of the next month (roughly 7-8 days each). The only notable exceptions being the Valkyrie and Switch scouts, and the Subaru Story Intro Scout.
Story Introduction Scouts usually occur every month or so and will always introduce a 4★ card of a specific character.
There will also be three new 3★ cards that will appear with the addition of this Scout. All of the cards released in the Gacha are unrelated, and each come with their own individual story chapter(s). As such, Story Intro Scouts do not have a cohesive theme or story.
Cards from this scout will not give any Gacha boosts during an Event.
New characters often will get a Story Introduction Scout some time after they are introduced to the game. These cards function as their Initial/Starter cards when choosing their Unit at the start of the game.
Unlike Limited Scouts, these cards are added right away to the main pool as soon as they are released.
In this Scout, the new cards will have a boosted chance of appearing.
Cards from past Story Scouts also have a chance of appearing; however, cards from past Limited Scouts do not.
This is the normal scouting pool where all Gacha cards eventually end up. In this box, you can draw from a pool of 3★, 4★, & 5★ cards.
4★ & 5★ cards only have a small chance (6.5% and 1.5%, respectively) of appearing.
For the first 10x Scout of every new month, your pull will contain at least one 4★ or above card, guaranteed. Cards from Limited Scouting are put in the Diamond Scout pool after a span of 2-3 events (~1 month).
When it is a #Character's Birthday, scouting in this box will guarantee you 5 cards of that character per pull.
Birthday Scouts do not only contain cards of the birthday character. Even if you have the 4★ guarantee, you can still pull any 4★ in the pool.
Any free Gacha campaigns, such as Free 10x Scouts or guaranteed 5★ Scouts, will be effective on this box only.
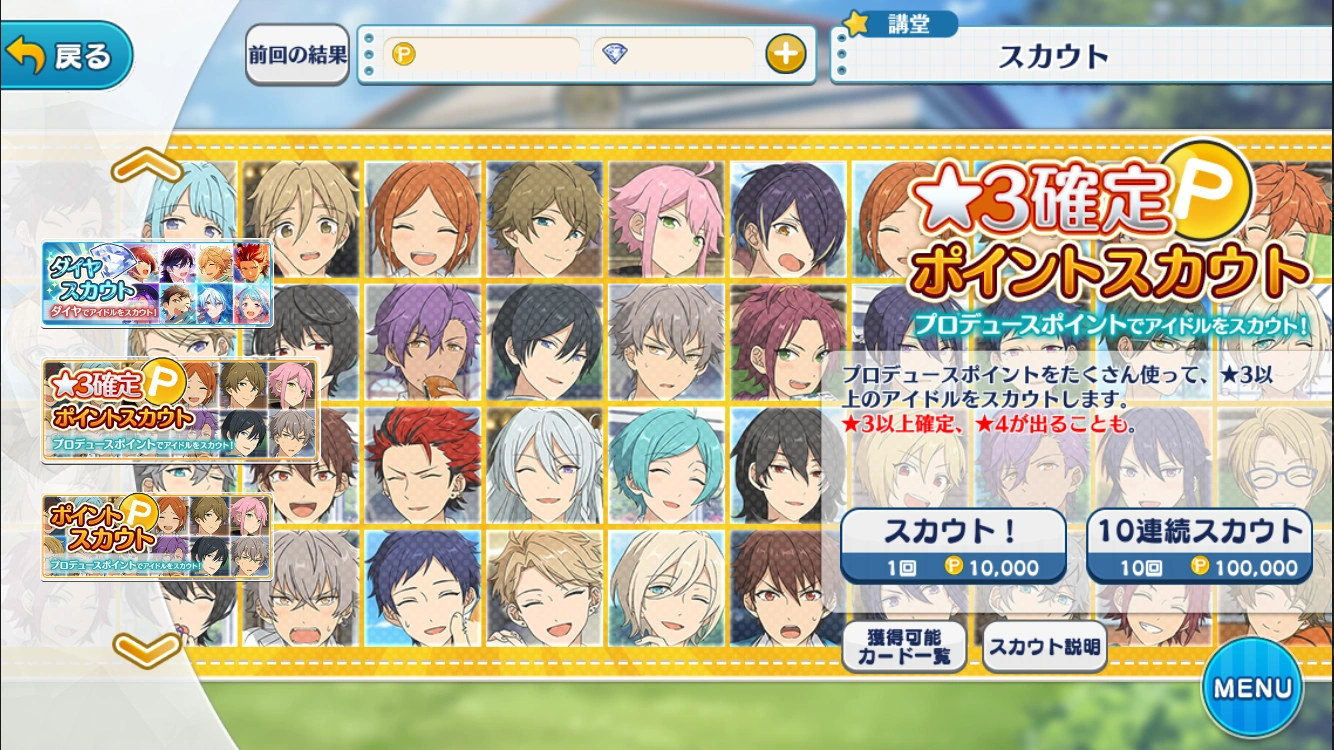
In the 3★ Producer Point Scout, you can only draw 3★ and 4★ cards.
4★ cards have a very small chance of being scouted.
It takes 10,000 Producer Points to Scout once, and allows the player to do a 10x Scout for 100,000 Producer Points.
Note: There is no difference in rarity rates whether you scout once or 10x in the Scout. There are also no rarity guarantees either. Therefore, there is no advantage to saving 100,000 Producer Points to do a 10x Scout.
Beginners are encouraged to Scout in this box to build up their teams.
Often shortened to PP Scout.
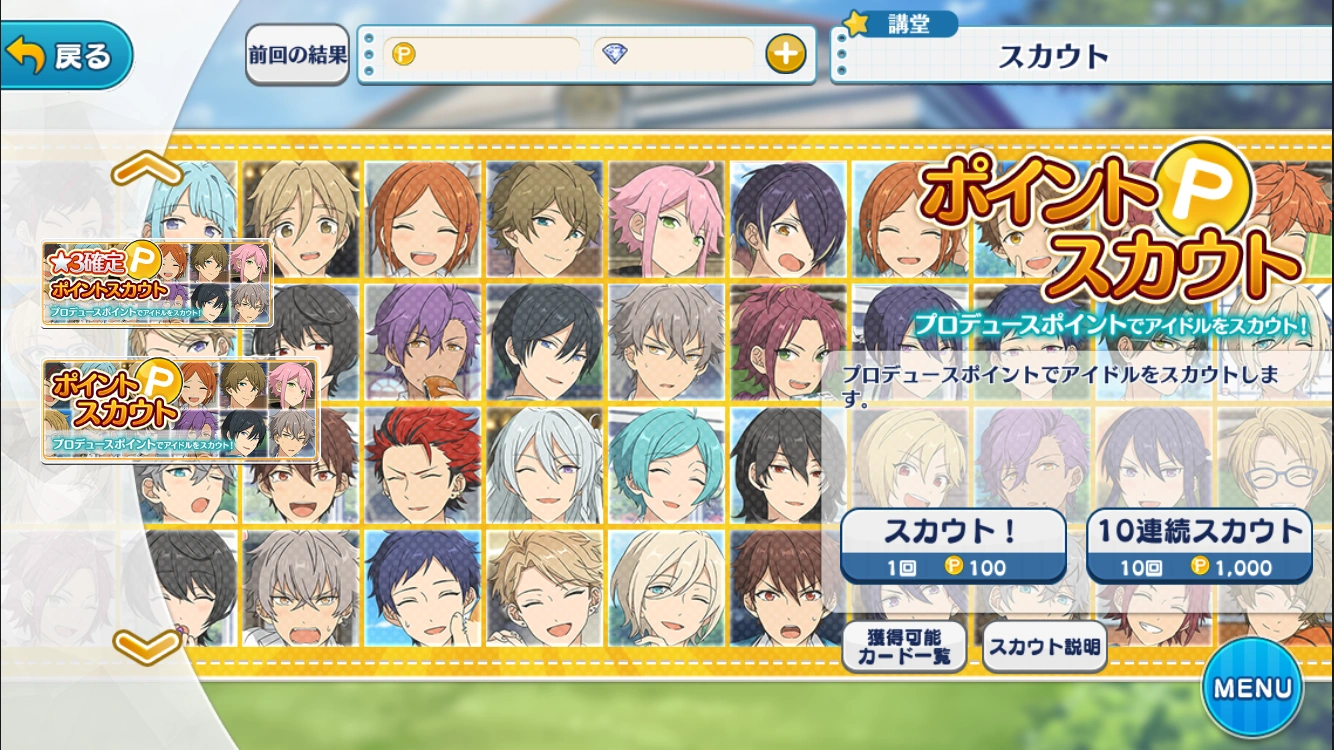
In a Producer Point Scout, only 1★, 2★, 3★ (very small chance), and a extremely small chance (.02%) of 4★ cards may be drawn from the scout.
It takes 100 Producer Points to scout once, and allows the player to do a 10x Scout for 1000 Producer Points.
How to check Scouting History
"Last Result"
On the Scouting page look for the small white button at the top-left area next to the Back button.
A window showing your 5 latest scouts will pop-up which you can click to see what cards you obtained in each one.
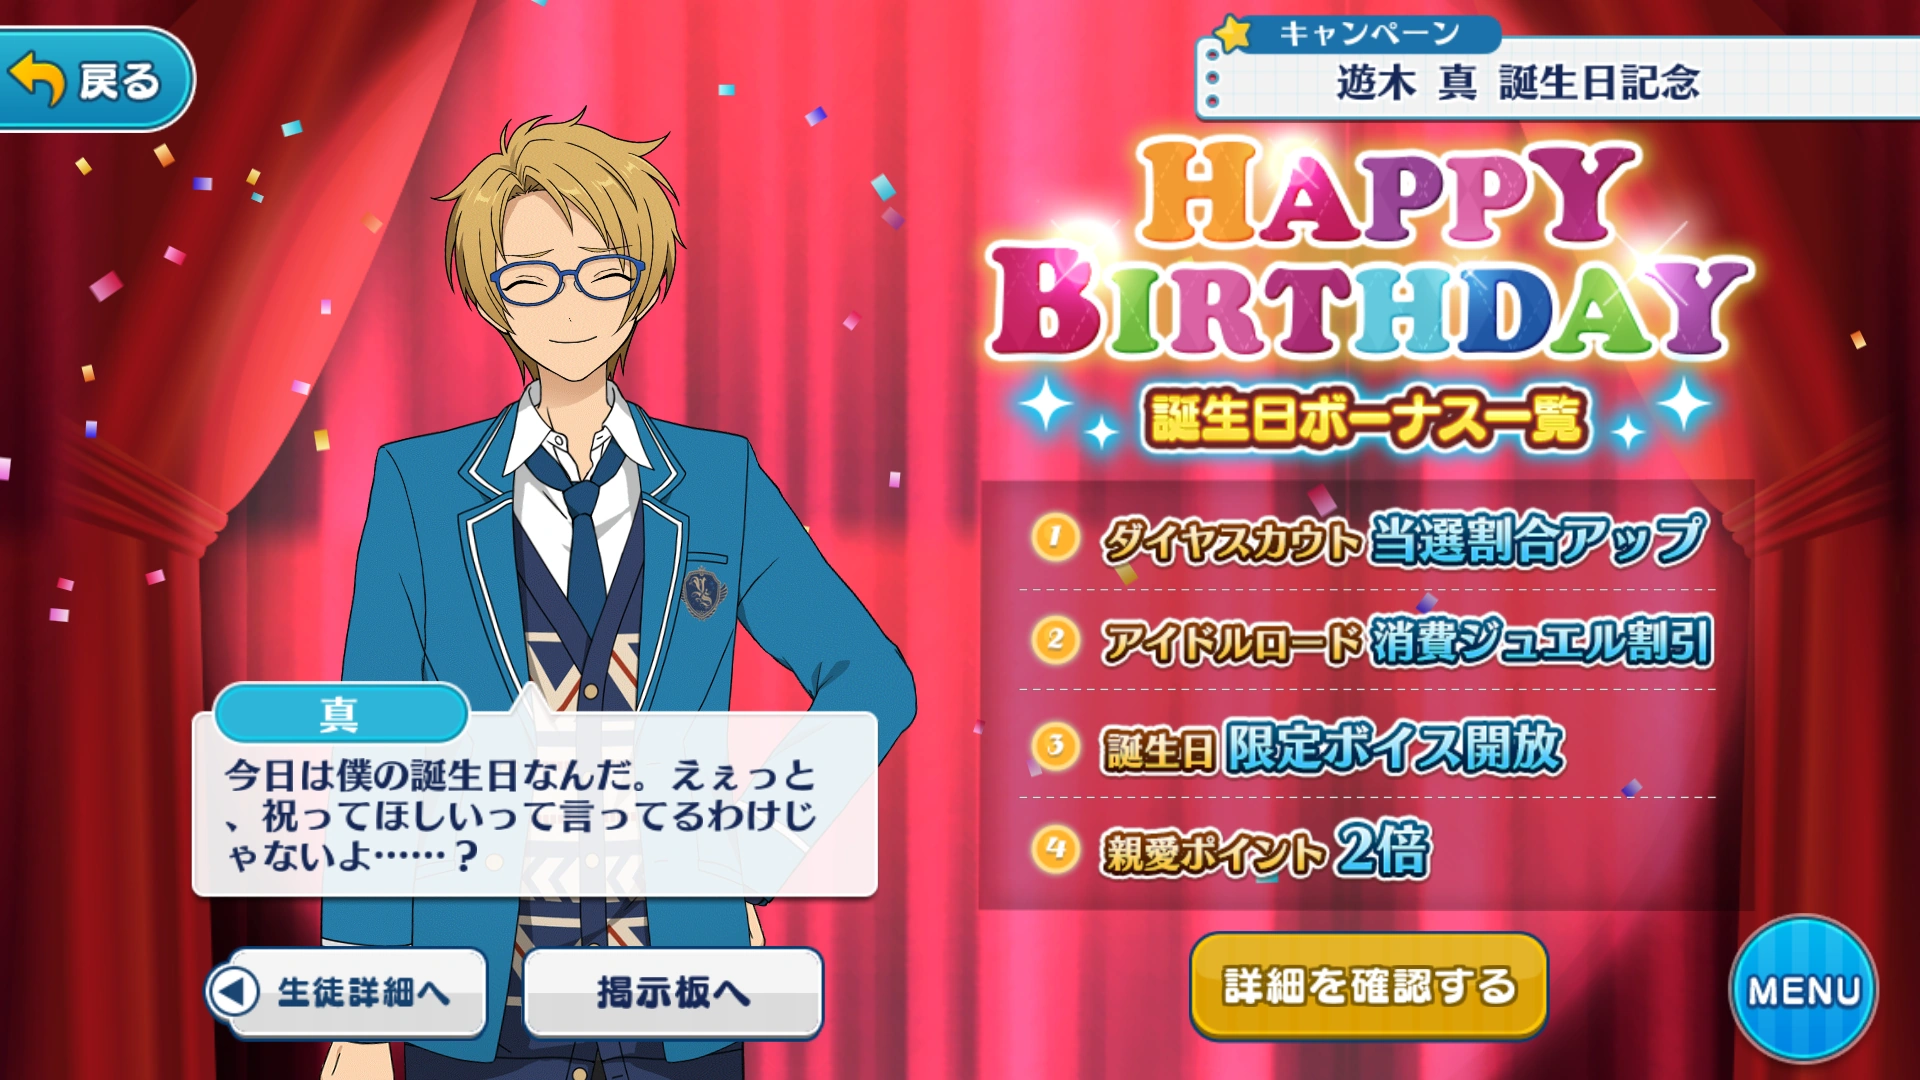
Character's Birthday
A banner will be displayed on the home screen, so you'll know if the campaign is active.
You are guaranteed to get 5 cards of that character when scouting in the Diamond Scout box.
Their idol roads will take less jewels to unlock nodes.
A Birthday voice clip will automatically be unlocked.
You will get double affection points for them in Intimate Events.
Setting the character as the leader will give a 10% unit bonus in a specific attribute.
A Birthday Course and new talk events will be available from the character's birthday banner.
The above banner will be displayed on the home screen, so you'll know if the campaign is active.
The game will wish you happy birthday as you log in. Clicking on the blackboard, which says "Producer! Come to the auditorium ☆ -Subaru", it will play a sequence of birthday greetings.
You will obtain 30 Diamonds, 250 Star Medals, 250 Yumecoins, 30 of each Large Jewel, 50 of each Medium Jewel, and 100 of each Small Jewel.
You are guaranteed to get one 5☆ by scouting in the designated birthday box for 135 dia.
All idol roads will take less jewels to unlock nodes.
A Birthday voice clip will unlocked for every character.
You will get double affection points for everyone in Intimate Events.
Events are special periods where new cards are released following a specific theme. They usually focus on one or two specific Units or multiple characters.
The cards released during an Event tend to be much stronger than normal cards and often come with special outfits as well.
Events follow a ranking system where you have to complete in Lives to gather Event points in order to improve your ranking against other players.
Aside from the ranking system, there are also set Eventpoint rewards (such as event cards and recovery items) that you gain at different point tiers.
Ranking rewards are slightly different in that they are not at set points and depend on the ranking that you achieved at the end of the Event period.
Cards obtained by ranking are often are much stronger than cards you can get from scouting or Event point rewards.
Events occur every 15 days and last for 10 days. Once it's over, there are five days until the next event starts.
For more information about Events see the Event Guide.
Revival Events
For now please see here for an explanation of Revival Events.
Other Campaigns
Click the banner to see the pages
Ongoing
Campaign
Details
Read 4-koma comics drawn by Bkub Okawa
No Longer Available (Outdated)
Log into Game Gift and receive a code every month for ingame prizes!
If you download the game "Merc Storia", you will receive 25 diamonds.
Complete a number of tasks to receive prizes and the (Conquering The Land) Tori Himemiya card.
Enter a drawing to receive autographs of the Voice Actors and the script writer, Akira!
Take a short quiz to check your compatibility with the idols! You will receive one 3☆ card upon completion of the quiz, after sharing your result on Twitter.
Vote for your favorite character for 3 rounds. The winner, Hokuto Hidaka, will receive a 3 star card (Grand Prix) Hokuto Hidaka) which can be claimed by all players, as well as a free substory. The 2nd place winner, Mao Isara, will also recieve a free substory as well.
Pre-register for the game to receive 15 diamonds. Due to the number of pre-registered users surpassing 150,000, all pre-registered users will receive 30 Diamonds (instead of 15) and 1,000 Produce points.
See Special Campaign category page for a list of past campaigns.


